Svelte bind directive explained in-depth
I spent a few hours digging into Svelte's bind directive statement with focus on forms
I spent a few hours digging into Svelte's bind directive statement with focus on forms. Read on if you want to want to learn more!
In this article you will learn how to:
- Bind input values to variables
- Bind to objects instead of variables
- Manipulate text input values dynamically
- Create dynamic select binds
- Work with dynamic select controls such as radio buttons
- Group multiple inputs such as radio buttons
- Bind DOM elements to local variables
- Bind Svelte components to local variables
You will also learn about how Svelte compiler wires up everything together.
If you want to follow along create a basic Svelte app using Snowpack CSA.
Binding input values#
Most of the bind examples have to do with Svelte forms. Why don't we start there with simple text input bindings that binds to a local variable?
<!-- App.svelte -->

<script>
	let username = 'jane';
</script>

<div>
	<h2>Simple two-way bind</h2>
	<form>
		<div>
			<input type="text" name="username" bind:value={username} />
		</div>
		<div>
			<input type="text" name="repeat" bind:value={username} />
		</div>
		<p>
			username: <code>{username}</code>
		</p>
		<button on:click|preventDefault={() => (username = '')}>reset</button>
	</form>
</div>
In the code about we bind one variable to two text input fields. Nothing spectacular. It's very straight-forward and just works.
If you change one field, the value in another changes too.
If you need to bind a textarea element to a variable, it works exactly the same was as with text inputs.
Binding to objects#
When working with forms it's pretty tedious to bind different input fields to standalone variables. Instead, we should bind to objects.
<!-- App.svelte -->
<style>
:global(body) {
font-family: Arial, Helvetica, sans-serif;
background-color: #f3f3f3;
}
:global(*, *:before, *:after) {
box-sizing: border-box;
}
:global(input[type='text'], input[type='select'],
input[type='password'], input[type='number'],
select) {
padding: 5px;
min-width: 30em;
}
.fields {
margin: 2em 0;
}
.fields label {
display: block;
margin-top: 1em;
}
</style>
<script>
let values = {};
const reset = () => Object.keys(values).forEach(key => (values[key] = ''));
const submit = () => alert(JSON.stringify(values, null, 2));
</script>
<div>
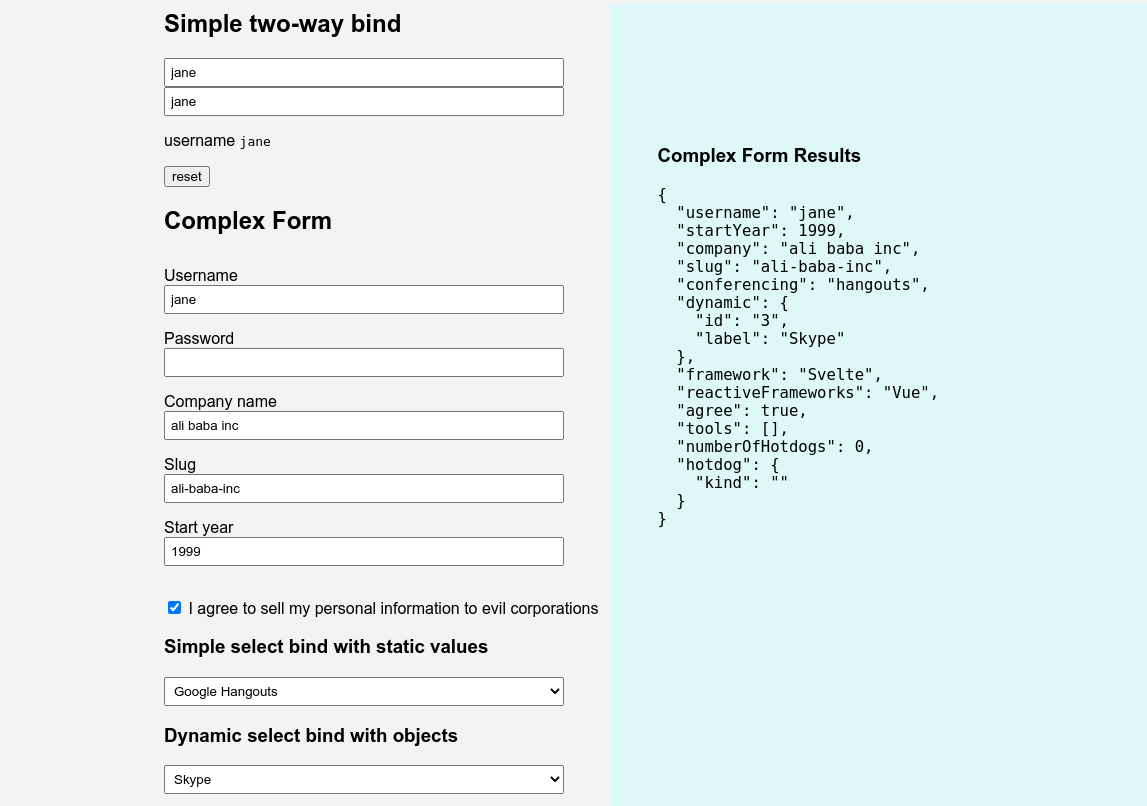
<h2>Complex Form</h2>
<form on:submit|preventDefault={submit}>
<div class="fields">
<label for="username">Username</label>
<input type="text" name="username" bind:value={values.username} />
<label for="password">Password</label>
<input type="password" name="password" bind:value={values.password} />
<label for="company">Company name</label>
<input type="text" name="company" bind:value={values.company} />
<label for="slug">Slug</label>
<input type="text" name="slug" bind:value={values.slug} />
<label for="startYear">Start year</label>
<input type="number" name="startYear" bind:value={values.startYear} />
</div>
<div style="margin-top:3em">
<button on:click|preventDefault={reset}>reset</button>
<button type="submit">submit</button>
</div>
</form>
</div>
<pre>{JSON.stringify(values, null, 2)}</pre>This makes our code a bit cleaner. One important thing to know is that Svelte is smart enough to coerce the type for us. It the example above it will parse the year as type number.
Manipulating text input values#
We can easily manipulate text dependant text fields with Svelte's reactive statements. Let's calculate the slug from our company name.
First, install Slugify by running npm add -D slugify.
Next, we add it to our code.
<script>
	import slugify from 'slugify';

	...

	$: values.slug = slugify(values.company, { lower: true });
</script>
Every time the value of values.company changes we will dynamically calculate the slug field. Try it using a company name with multiple words, like "Ali Baba Inc."
This is a prime example of Svelte's reactivity. Accomplishing a lot with very little code!
Unfortunately, this is a one-way binding. Nothing stops you from changing the slug to regular text later on. It's doable, but involves a little more code. I will save it for a future article.
Checkbox bindings#
Checkbox bindings are straight forward. Add this code to our form.
<label>
	<input type="checkbox" bind:checked={values.agree} />
	I agree to sell my personal information to evil corporations
</label>
If you set the initial value to true in our values.agree property, the checkbox will be checked when the form is rendered.
Select bindings#
This is where things get interesting. If you a building forms they will most likely involve dropdown lists.
In Svelte you can bind to pure values or to objects. The simplest way is to bind to a list of static values.
<div>
	<h3>Simple select bind with static values</h3>
	<select bind:value={values.conferencing}>
		<option value="" />
		<option value="zoom">Zoom.us</option>
		<option value="hangouts">Google Hangouts</option>
		<option value="skype">Microsoft Skype</option>
	</select>
</div>
If you set the initial value in values.conferencing to something that exists in the list, it will be selected when the form is first rendered.
You can also make our select list dynamic, if you have a list of objects that you need to bind.
<script>
  let conferencing = [
    { id: '1', label: 'Zoom' },
    { id: '2', label: 'Hangouts' },
    { id: '3', label: 'Skype' }
  ];
</script>

<div>
	<h3>Dynamic select bind with objects</h3>
	<select bind:value={values.dynamic}>
		{#each conferencing as conference}
			<option value={conference}>{conference.label}</option>
		{/each}
	</select>
</div>
You can also bind the list directly as objects. That way you will get the whole object as a value in the values.dynamic property.
<script>
  let conferencing = [
    { id: '1', label: 'Zoom' },
    { id: '2', label: 'Hangouts' },
    { id: '3', label: 'Skype' }
  ];
</script>

<div>
	<h3>Dynamic select bind with objects</h3>
	<select bind:value={values.dynamic}>
		{#each conferencing as conference}
			<option value={conference}>{conference.label}</option>
		{/each}
	</select>
</div>
Same thing here. You can preselect the dropdown selection by setting the initial value. For example values.dynamic = conferencing[2]. Pretty neat!
Multiple select bindings#
Multi selection works just like you think it does.
<script>
  let conferencing = [
    { id: '1', label: 'Zoom' },
    { id: '2', label: 'Hangouts' },
    { id: '3', label: 'Skype' }
  ];
</script>

<div>
	<h3>Dynamic multiple select bind with objects</h3>
	<select multiple bind:value={values.tools}>
		{#each conferencing as conference}
			<option value={conference}>{conference.label}</option>
		{/each}
	</select>
</div>
This is the thing with Svelte. When you write the code the way you think it should work, the chances are big that it does work like that.
Group bindings#
For radio buttons and checkboxes you should bind to a group by using bind:group directive.
<script>
  const frameworks = [
    { id: 1, name: 'React.js' },
    { id: 2, name: 'Svelte.js' },
    { id: 3, name: 'Vue.js' },
    { id: 4, name: 'Marko.js' }
  ];
</script>

<div>
	<h3>Static radio button bind</h3>
	<label>
		<input type="radio" bind:group={values.framework} value="React" />
		React
	</label>
	<label>
		<input type="radio" bind:group={values.framework} value="Svelte" />
		Svelte
	</label>
	<label>
		<input type="radio" bind:group={values.framework} value="Vue" />
		Vue
	</label>
</div>

<div>
	<h3>Dynamic radio button bind</h3>
	{#each frameworks as framework}
		<label>
			<input type="radio" bind:group={values.reactiveFrameworks} value={framework} />
			{framework.name}
		</label>
	{/each}
</div>
Just as with select you can preselect the initial value by assigning a value from the list to a property we bind to.
Binding DOM elements#
You can bind DOM elements to local variables and manipulate them directly if you like.
In my previous article, Recreating a classic FRP tutorial with Svelte and RxJS, we chose not to use RxJS's fromEvent observable.
This is how we could have done it instead.
<script>
  import { onMount } from 'svelte';
	import { fromEvent } from 'rxjs';

	let clickStream = null;

	onMount(() => {
		clickStream = fromEvent(button, 'click');
  });

</script>

<button bind:this={button}>click me</button>
Note that you have to wire up your logic in the onMount hook, otherwise you will get a null reference exception.
Here is another example of what you can do with DOM elements.
<style>
  .box {
    width: 100px;
    height: 100px;
    background-color: #ff4;
    display: flex;
    align-items: center;
    justify-content: center;
  }
</style>

<script>
  import { onMount } from 'svelte';
	import { fromEvent } from 'rxjs';

	let box = null;

	onMount(() => {
    var colors = ['#F99', '#9F9', '#99F', '#FF9', '#F9F'];

    setInterval(() => {
      let random = Math.floor(Math.random() * colors.length);
      let color = colors[random];
      box.style.background = color;
      box.innerHTML = color;
    }, 1000);
  });

</script>

<div class="box" bind:this={box}>color</div>
If you are working with animations and SVG manipulation this binding is a must.
There are also a few more useful bind directives available in Svelte, like block-level element bindings and media level bindings, but they are not as frequently used.
Binding Svelte child components#
Last thing I want to talk about is how to bind Svelte components to local variables. Or more precisely, how to bind child component properties to local variables.
If you have read some of my earlier articles such as 3 different ways of cross-component communication in Svelte or Accessible switch toggle button with svelte.js and tailwind.css, you have seen this type of bind in action.
As the saying goes, "Repetition is the mother of learning," so let's repeat this with another example.
Start by creating a component named Hotdog.svelte in the src directory, because you know, who doesn't like hot dogs?
<!-- Hotdog.svelte -->

<style>
  .addons {
    margin-top: 1em;
  }
  select,
  input {
    min-width: 0;
  }
</style>

<script>
  export let order = {};
  export let amount = 0;
</script>

<h4>Order your hot dog!</h4>

<label for="kind">Choose kind</label>
<select name="kind" class="kind" bind:value={order.kind}>
  <option value="" />
  <option value="bratwurst">Bratwürst</option>
  <option value="kielbasa">Kielbasa</option>
  <option value="frakfurter">Frakfurter</option>
  <option value="merguez">Merguez</option>
  <option value="chorizo">Chorizo</option>
</select>

<label for="amount">How many?</label>
<input name="amount" type="number" bind:value={amount} />

<div class="addons">
  <label>
    <input type="checkbox" bind:checked={order.sauerkraut} />
    Sauerkraut
  </label>

  <label>
    <input type="checkbox" bind:checked={order.mustard} />
    Mustard
  </label>

  <label>
    <input type="checkbox" bind:checked={order.ketchup} />
    Ketchup
  </label>
</div>
Notice that we are exposing two variables in our component - order and numberOfOrders.
Import the newly created component in the App.svelte and wire it up.
<script>
	import Hotdog from './Hotdog.svelte';
	...
</script>

<div>
	<h3>Component bind</h3>
  <Hotdog bind:order={values.hotdog} bind:amount={values.numberOfHotdogs} />
</div>
Since we have exposed our variables we can bind to them in out App.svelte.
How does the bind directive work?#
Good question. Let's look at the generated source code and try to understand how this is all wired up.
We can take a look at the internals of Hotdog.svelte component, because it's rather small and the principles are the same across all components.
There is no reason to go over the whole source file so we will concentrate only on the part which are related to the bind directive.
// `kind` select event listener
function select_change_handler() {
	order.kind = select_value(this);
	$$invalidate(0, order);
}

// `amount` number input event listener
function input0_input_handler() {
	amount = to_number(this.value);
	$$invalidate(1, amount);
}

// the rest of the event handlers should be clear

function input1_change_handler() {
	order.sauerkraut = this.checked;
	$$invalidate(0, order);
}

function input2_change_handler() {
	order.mustard = this.checked;
	$$invalidate(0, order);
}

function input3_change_handler() {
	order.ketchup = this.checked;
	$$invalidate(0, order);
}
What Svelte compiler does behind the scenes is that it attaches correct event handlers to our inputs. That's all there is to it.
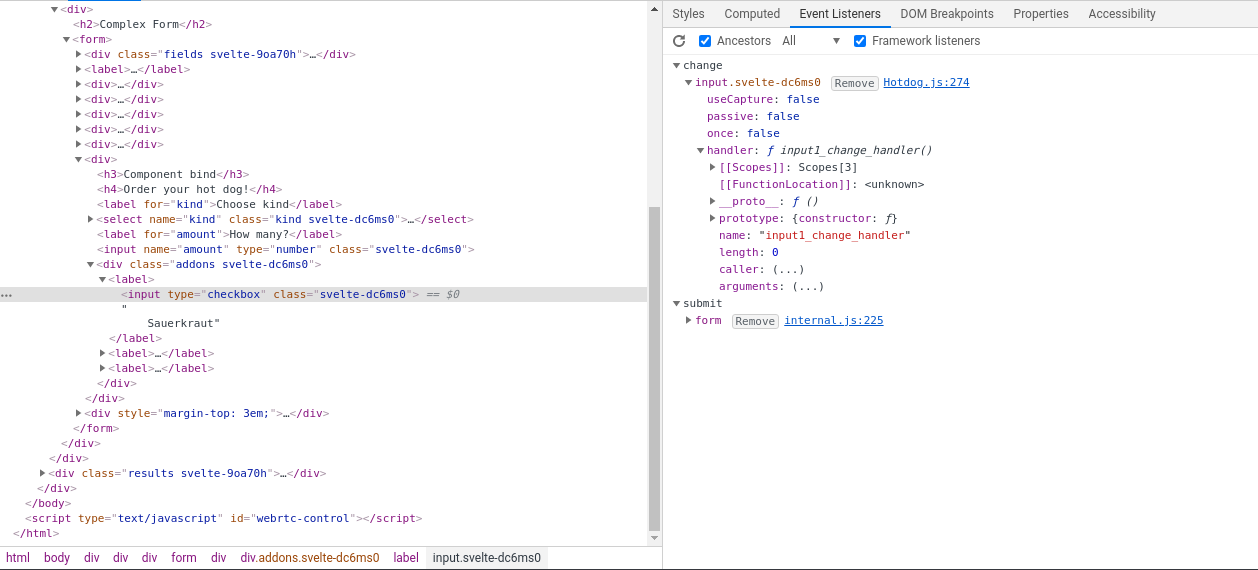
If you look at the amount event handler you will also notice that it knows it has type of number and Svelte compiler converts it for us. How kind of it!
Summary#
That's all there is to it! Svelte bindings works just like you expect them too, or want them to. With very little code we can build pretty sophisticated forms in Svelte.
Form handling is hard in any framework and I will explore this topic more in-depth in the near future. Stay tuned and subscribe on the main page when I publish a new article!
As usual, here is the code https://github.com/codechips/svelte-bind-directive-examples