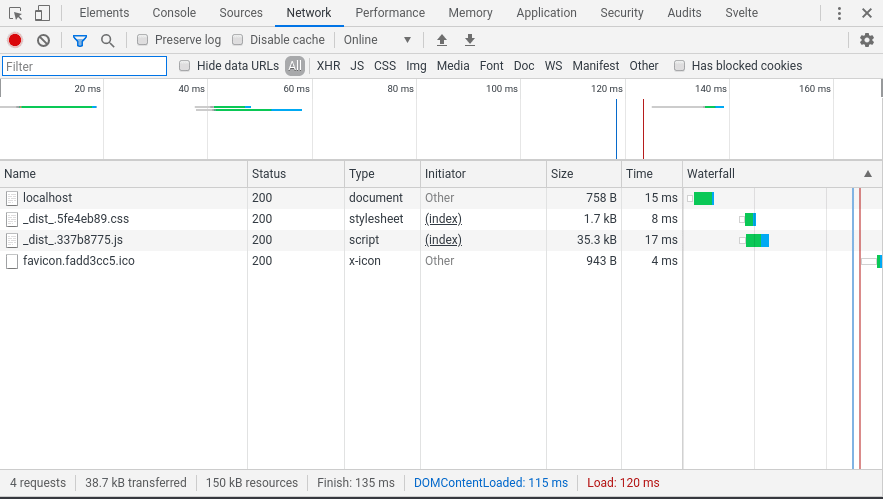
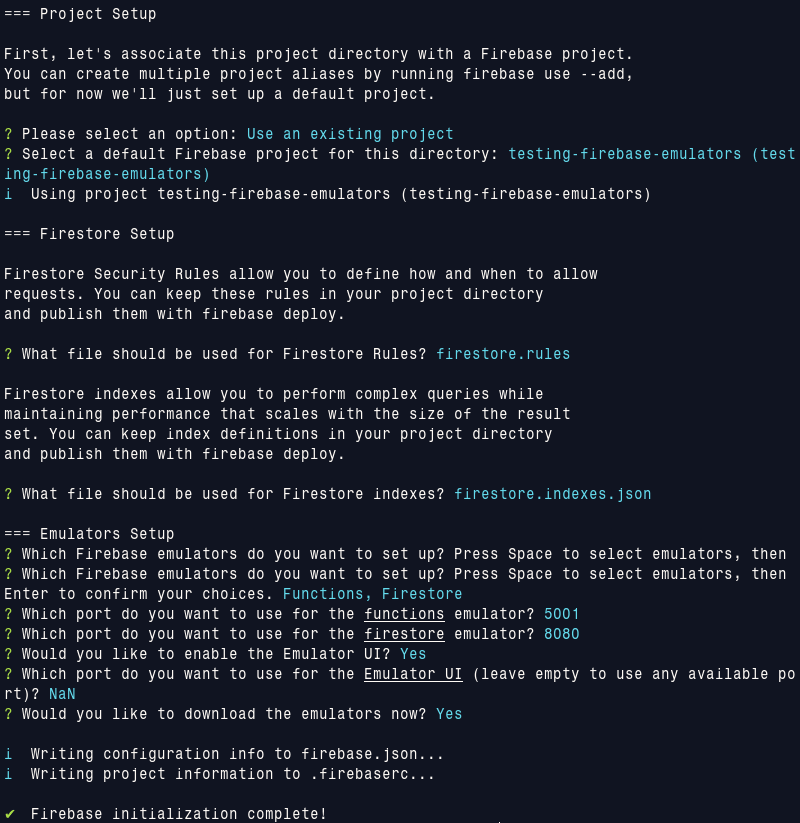
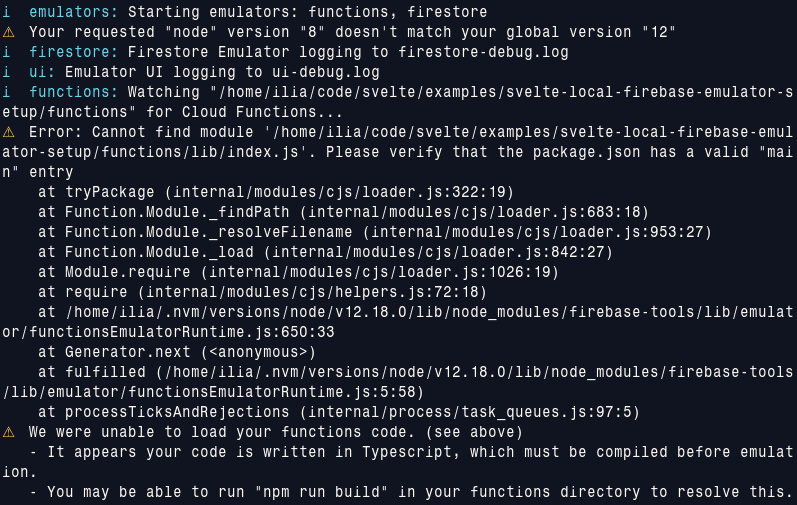
codechipsThoughts on modern reactive web development, together with a healthy dose of career and productivity tips2023-05-11T00:00:00Zhttps://codechips.me/Ilia Mikhailovilia@codechips.meLet's Build a Svelte fullscreen componentLearn how easy it is to create a fullscreen component in Svelte2020-01-04T00:00:00Zhttps://codechips.me/lets-build-a-svelte-fullscreen-component/Sometimes you have the need to go fullscreen, especially when building some fun internal dashboards. Because, you know, they are fun to build. Useful too. So why not build one in Svelte for a change? Let's see how easy it is to slap together a fullscreen component with this awesome framework.
Altough, it might not look like much, but you will learn about:
Svelte's slots
Exposing sub component's properties to parent
Adding stylesheets to document's head at runtime
Using the onMount callback
Svelte's reactivity
And maybe even some CSS
App.svelte
Replace your App.svelte with the code below. We are importing a fullscreen component that we haven't defined yet. No worries, let the compiler whine for a few minutes. It can wait.
<Fullscreenlet:isFull> <div> <img src="https://media.giphy.com/media/vCKC987OpQAco/giphy.gif" alt="Yes you are!" /> <h2> {#if isFull}I am now in fullscreen!{/if} </h2> </div> </Fullscreen>
If you look at the code you can see that we passing a div as a child component to our fullscreen component. Our fullscreen component is also exposing a property called isFull to the parent. We can use it to make decisions if we want to hide something when in fullscreen mode and other useful things. Let's keep things basic.
Fullscreen.svelte
Here is our fullscreen component. Take a quick look and let's go through it below.
<!-- Fullscreen.svelte -->
<script> import { onMount } from"svelte";
// define initial component state let isFull = false; let fsContainer = null;
At the top we are defining two state variables. isFull is a boolean that indicates if component is in fullscreen mode. This is also a variable that we'are exposing in the slot <slot {isFull} />, so our parent component can use it if it needs. We are also binding the DOM node of the fullscreen div to the fsContainer variable that we use in our code to trigger fullscreen state.
In the code snippet above we are also using Svelte's nifty way of setting a CSS class on the component depending on the variable state. You can see that we defined a .isFull class in the style tag. There is also a way to use a pseudo CSS class :fullscreen when then component is in fullscreen mode, but for some reason I couldn't get it to work with Svelte's CSS scoping.
Conclusion
As you see, it's really easy to build custom components in Svelte because it's just vanilla JS with some sugar sprinkled on top. Sometimes it's easier to just copy and paste code and tweak it to your own desire, than to install a package from NPM.
]]>Svelte + Tailwind + Parcel = Awesome!Parcel.js together with Tailwind.css might be the best combo for Svelte development2020-01-05T00:00:00Zhttps://codechips.me/svelte-tailwind-parcel-awesome/I must admit that Rollup.js, that default Svelte projects use, never grew on me for some reason so I decided to give Parcel a try. Let's see how to setup a new Svelte project using it. While on it we will also include some other useful tools and plugins on the way.
Basic Basics
Let's start by creating a simple new project with Yarn.
We are almost ready to go, but before that we need to add some stuff to package.json and some actual source files. Start by adding the following properties to your package.json.
The config purges unused CSS and adds browser prefixes only in production builds. Why? Because during development you want to have a full Tailwind CSS file so you can tinker with various classes in your browser's dev console.
Finally, let's add a PurgeCSS config so that PostCSS will know what unused CSS to purge during the production builds. Create a purgecss.config.js file with the following content.
Here we are telling it to ignore svelte- classes when purging. These are classes that Svelte generates whey you write scoped styles in you Svelte components.
We could have wired up our configuration only in postcss.config.js, but I think it's nicer to have them in two different files for clear separation of concerns.
Finally, include the following line in the head tag in index.html.
<linkrel="stylesheet"href="./global.pcss" />
Add the following classes to the H1 tag in App.svelte to see that everything works as expected.
Boom! If you now start the app you should see a styled heading. NOTE: If for some reason it doesn't work, delete Parcel's .cache folder and restart the app.
So there you go. New fresh and slick Svelte setup. You can stop here and go build your next great thing or you can continue reading and maybe learn something new.
Bonus Basics
Inter font is pretty sweet if you are building UIs. Here is how to include it in our new setup with tailwindcss-font-inter plugin.
$ yarn add -D tailwindcss-font-inter
Replace tailwind.config.js with following content.
Now add the following class to the body tag in index.html.
<bodyclass="font-inter">
Your app should now use the Inter font. There are many configuration options for how the font is rendered. Let that be a home assignment.
Extra Bonus Basics
Linting and code formatting is important. I personally use Vim with coc.vim's Svelte extension when writing code. It's actually working mighty fine I must say! However, in order for that to work you have to install some additional plugins and add more configs.
Voila! Linting and code formatting should now work.
Conclusion
As you see it's not hard to use Svelte with Parcel. The setup feels very fresh and snappy. Everything with Parcel works almost out-of-the-box. I really like it.
If you want to learn and understand how things are wired together you can repeat all the steps above to understand what's happening, but if you are lazy (like me) and just want to bang out some code, you can use my boilerplate and be done with it.
]]>Svelte Auth0 integration in 66 LOCWhen using Svelte you usually end up with less code. Learn how easy it is to create Auth0 integration2020-01-11T00:00:00Zhttps://codechips.me/svelte-auth0-integration-in-66-loc/Yep, you read correctly. Pathetic 66 lines of code. You think I am lying? Well, code analysis tools don't lie. Let's ask one.
$ scc src/auth.js
───────────────────────────────────────────────────────────────────────────────
Language                     Files       Lines     Blanks    Comments      Code
───────────────────────────────────────────────────────────────────────────────
JavaScript                       1         107         19          22        66
───────────────────────────────────────────────────────────────────────────────
Total                            1         107         19          22        66
───────────────────────────────────────────────────────────────────────────────
Estimated Cost to Develop $1,556
Estimated Schedule Effort 1.314907 months
Estimated People Required 0.140209
───────────────────────────────────────────────────────────────────────────────
Told ya! But I personally think other numbers are waaay more interesting. scc tells me that it takes around 1,5K USD to develop this in approximately 6 weeks by only 1/10 of me. It took me 20 minutes to write the code (I am very skilled at skimming the docs and copy-pasting). So, if I do the math correctly my hourly rate would be .... astronomic! Mind blown.
Note to self: raise the hourly rate pronto!
Ok, sorry for sidetracking. Back to the code. So Auth0 has a generous free tier in case you need to add authentication to your app. It also has all these cool starter packs for all these cool frameworks, but not for little Svelte. Turns out we don't really need one! Hah!
Show me the code!
Let's boot up and add Auth0 dependency.
$ npx degit sveltejs/template svelte-auth0
$ cd svelte-auth0 && npm i
$ npm add -D @auth0/auth0-spa-js
Now, create an auth.js file in src dir. Here it is in all its glory with comments and all.
// Default Auth0 expiration time is 10 hours or something like that. // If you want to get fancy you can parse the JWT token and get // token's actual expiration time. const refreshRate = 10 * 60 * 60 * 1000;
functioncreateAuth(config) { let auth0 = null; let intervalId = undefined;
// You can use Svelte's hooks in plain JS files. How nice! onMount(async () => { auth0 = awaitcreateAuth0Client(config);
// Not all browsers support this, please program defensively! const params = newURLSearchParams(window.location.search);
// Check if something went wrong during login redirect // and extract the error message if (params.has('error')) { authError.set(newError(params.get('error_description'))); }
// if code then login success if (params.has('code')) { // Let the Auth0 SDK do it's stuff - save some state, etc. await auth0.handleRedirectCallback(); // Can be smart here and redirect to original path instead of root window.history.replaceState({}, document.title, '/'); authError.set(null); }
if (_isAuthenticated) { // while on it, fetch the user info userInfo.set(await auth0.getUser());
// Get the access token. Make sure to supply audience property // in Auth0 config, otherwise you will soon start throwing stuff! const token = await auth0.getTokenSilently(); authToken.set(token);
// refresh token after specific period or things will stop // working. Useful for long-lived apps like dashboards. intervalId = setInterval(async () => { authToken.set(await auth0.getTokenSilently()); }, refreshRate); } isLoading.set(false);
// Provide a redirect page if you need. // It must be whitelisted in Auth0. I think. constlogin = async redirectPage => { await auth0.loginWithRedirect({ redirect_uri: redirectPage || window.location.origin, prompt: 'login'// Force login prompt. No silence auth for you! }); };
// Put everything in context so that child // components can access the state setContext(AUTH_KEY, auth);
return auth; }
// helper function for child components // to access the auth context functiongetAuth() { returngetContext(AUTH_KEY); }
export {createAuth, getAuth};
In the onMount hook we are setting up a timer to refresh the access token so it doesn't expire and things suddenly stop working. This is useful for long running apps like dashboards.
Now replace App.svelte with the following contents.
<!-- App.svelte -->
<script> import { createAuth } from'./auth';
// Go to Auth0 to get the values and set everything up. // Make sure all callback urls are set correctly. const config = { domain: 'your-auth0-tenant.auth0.com', client_id: 'auth0-client-id', audience: 'https://my-facebook-killer.io' };
Done. Start the app (npm run dev) and hopefully everything should work.
Routing
If you need auth, you probably need routing too. Let's add one.
Now, there are quite a few routing solutions available. I chose one with the shortest name - yrv. Also because the slogan spoke to me - Your routing bro! Nobody has called me "bro" in a long time. Hey, I live in Sweden!
Yrv is small, sweet and with great documentation. The author says that "v" stands for Svelte (you make the connection), but I think that it secretly stands for vato. If you look at the author's GH profile pic he looks really badass, a true OG.
Ok, let's throw Yrv in the mix (npm add -D yrv) and add --single argument in your package.json in order to support SPA router.
<div> <Router {disabled}> <Routeexactpath="/"> <h2>Home</h2> <p>This is the root page</p> </Route> <Routeexactpath="/settings"> <h2>Settings</h2> <p>This is the settings page</p> </Route> <Routeexactpath="/hello/:name"let:router> <h2>Hola {router.params.name}!</h2> <p>Nice to see you</p> </Route> <Routefallback> <h2>404 Not Found</h2> <p>Sorry, page not found</p> </Route> </Router> </div> </div> {/if} </div>
</main>
Now, when you start the app you should see our routing in action. Boom!
Conclusion
This example is bare and sloppy and might not solve all your problems. As the saying goes - there are many ways to skin a cat or ... peel a banana, or something. View it as inspiration. You can use it as base and adjust to your needs. The main point is that sometimes you don't need an NPM package because it's easier to write the code ourselves. I feel that this is often the case with Svelte. What Svelte community needs is more examples and inspiration and not NPM packages. But on the other hand, there is the discoverability aspect that NPM brings to the table, but that's a story for another day!
Hope you learned something new or got some inspiration and as always, thanks for reading!
]]>If Svelte and RxJS had a babyLearn how to use RxJS with Svelte and why they are such beautiful couple2020-02-19T00:00:00Zhttps://codechips.me/if-svelte-and-rxjs-had-a-baby/If Svelte and RxJS had a baby maybe she would grow up to become a React slayer one day. Because Svelte got the looks and elegance and RxJS got the brains. But first, let's see if the potential parents are a good match for each other.
I love Svelte's maintainer crew. They all seems very open-minded. They listen to smart people and understand the power of the community. "If it's a good idea, then let's do it" approach is very successful. Just look at the commit history yourself and you will understand what I mean. They are banging out features and bugfixes at incredible pace. Kudos to them and all the people involved!
Because they listen, and people asked for it, they have adopted the store contract to match the contract of the RxJS observable, which in its turn matches the ECMAScript Observable specification. That means we can almost use observables out of the box in Svelte, so let's test drive the combination.
Disclaimer
Although I have used RxJS in production I am by no means an expert in it. I am still trying to wrap my head around thinking in streams so the examples in this article might not be the most efficient way of doing things in RxJS. Please point it out in the comments if you know of a better way of doing things!
Also, don't use RxJS because you can. It's pretty complex and many things can be solved by Promises and other simpler ways instead. Please, please don't view everything as a nail just because you have a hammer.
RxJS
This article is not about RxJS but about the ways you can use RxJS in Svelte. However, I think it deserves a few words anyway. RxJS is a pretty cool declarative reactive framework that allows you to mangle and stream data in the ways you never imagined. Its declarative coding style is very concise and easy to read ... when you finally understand how streams work.
It's used heavily in Angular, so if you want to learn RxJS practically you might look into it. Last time I looked at Angular (version 1), I could only look for 10 minutes. Then I had to look away because I got a little nauseous. But, I heard things have greatly changed since then! Give it a try! For me personally, life is too short to try all the different frameworks, but there is one for everyone.
Baby steps
Alright, let's start by dipping our toes wet. Create a new Svelte app and install RxJs.
$ npx degit sveltejs/template svelte-rxjs && cd svelte-rxjs
$ npm i && npm i -D rxjs
Remember I said that Svelte's store contract fulfills the Observable spec? It's also the other way around. RxJS observable fulfills Svelte's store contract as well. A least partially.
What that means in practice is that we can prefix the RxJS observable with a dollar sign and Svelte compiler will treat it as as store and manage the subscribing/unsubscribing parts for us during the Svelte's component lifecycle.
Let's try it with a simple example - a counter that counts to 10 and then stops. Replace App.svelte with the code below.
Since the observable is prefixed with $ Svelte manages the subscription for us automatically. If you are observant you will see that the observable is undefined first before the timer kicks in and start emitting values only after one second has passed. This is of course easily solved, but I wanted to show this as it is super important to know and understand why this is happening in order to save you the frustration and your hair.
Let me demonstrate why this is important. Try this code.
// emit an array with the initial delay of 2s const values = of([1, 2, 3, 4, 5]).pipe(delay(2000)); </script>
<h2>Loop over array</h2> <ul> {#each $values as v} <li>{v}</li> {/each} </ul>
And ..... BOOM!
Uncaught TypeError: Cannot read property 'length' of undefined
Whoops! It does't work? Why? That's because the initial value is undefined and undefined is not something that you can loop over.
So we need to always make sure that our observable emits some initial value immediately when Svelte subscribes to it. Here is a quick fix. Later I will show you another way of handling this.
// emit an array with initial delay of 2s const values = of([1, 2, 3, 4, 5]).pipe( delay(2000), startWith([]) ); </script>
<h2>Loop over array</h2> <ul> {#each $values as v} <li>{v}</li> {/each} </ul>
Counter Example
Here is a simple counter example. You can see that I use BehaviorSubject from RxJs. A subject in RxJS is an observer and observable at the same time, but this is not the focus of the article. You can simply view it as a store on steroids. By that I mean that you can do lots of fancy stuff with it and not just set values.
There are quite a few different subjects in RxJS. I chose BehaviorSubject because you can initialize it with a default value, thus escaping the undefined problem upon subscription. You use next method to push values into it.
Even though the code is pretty simple in RxJS terms, and I totally stole it on Stack Overflow, I find it overly complex for such trivial task. Let's contrast it with Svelte's store solution.
The code is much simpler if you ask me and does what it's suppose to do. This is what I mean that you should use the right tool for the job.
Note
There is no set method on the Rx Subject, but we can solve it in a multiple ways. Either by wrapping an observable in a custom object, by creating a subclass or by simply creating a method alias like counter.set = counter.next. This will allow you to do fancy stuff like for example binding to it directly in your forms.
Click Handler Example
Alright, let's move on on how to handle click events with Svelte and RxJS, like when I click a button it should fetch something from a server and display it on a page. It's pretty easy to do if you use subjects. Here is a simple example.
It doesn't feel so "Sveltish" to me for some reason, like I am trying to cheat on Svelte by not using her click handler.
Input example
Here is a more complex example that shows the true power of RxJS and it's declarative reactivity. We will perform a simple weather search and render the results on a page.
{#each $weather as loc (loc.id)} <div> <h3> <imgsrc={loc.icon}alt={loc.desc}style="width:24px;height:24px" /> {loc.city} {loc.cel}C ({loc.far}F) </h3> </div> {/each}
What it does in terms of streams (or my intention at least) is:
Kick off a stream if the user types at least 3 chars
Debounce until the user stops typing
Continue only if the search query has changed
Call the weather API to search for locations
Get the weather data for every found location
Honestly, this is example took like 90% of my time to get working when writing this article. I also tried to implement a loading indicator with streams too, but gave up because my RxJS-fu is not that strong. I am also 100%, no 1000% sure that this code is not the true Rx way. It is also not working properly, but I can't figure out why. Please, please leave a comment or create a Gist if you know a better way or if you spotted the error, so I can learn!
Conclusion
The point of the article was to see how well Svelte plays with RxJS. Looks like Svelte and RxJS might be a decent match for each other, but I am afraid that RxJS is a little too smart for Svelte (and for me). If you have seen the movie "Good Will Hunting", you know what I mean. It's very easy to get lost in the RxJS land and I feel that most of the examples can be accomplished just as good with promises and regular Svelte stores, even if it means more code. But at least that's the code that you and the ones after you will be able to understand. It also felt a little clunky that you have to use subjects to get the default state, but maybe there is a better way. Please teach me then!
Nevertheless, I had fun playing around with both frameworks and I learned some new stuff on the way. Hope you did too.
]]>The use for use in SvelteSvelte's use actions are powerful, but examples are scarce. Learn how you can use them2020-03-17T00:00:00Zhttps://codechips.me/the-use-for-use-in-svelte/Recently I stumbled upon this beautiful login form made with Tailwind CSS. It has some Javascript code beside CSS to achieve the desired animation.
<script> var toggleInputContainer = function (input) { if (input.value != "") { input.classList.add('filled'); } else { input.classList.remove('filled'); } }
var labels = document.querySelectorAll('.label'); for (var i = 0; i < labels.length; i++) { labels[i].addEventListener('click', function () { this.previousElementSibling.focus(); }); }
window.addEventListener("load", function () { var inputs = document.getElementsByClassName("input"); for (var i = 0; i < inputs.length; i++) { console.log('looped'); inputs[i].addEventListener('keyup', function () { toggleInputContainer(this); }); toggleInputContainer(inputs[i]); } }); </script>
I didn't like the fact that you had to reach out to pure DOM functions to achieve this functionality. Turns out that Svelte's use directive is a perfect fit for the job and also a good example of showing one of the things you can use it for. Let's refactor the code a bit.
Do you notice that our text inputs now have use:labelToggle directives and our labels have use:labelClick? Basically, we have defined the two "use" handlers, or actions as they are called in Svelte, in the script section of the file and then attached them to the appropriate html nodes. But how does it work?
The use directive explained aka Svelte action
The actions are custom code that will be run when the element is mounted on the DOM and will pass the element to that action as a raw DOM node. If the function returns an object with destroy function on it, Svelte will run that function when the element is unmounted from the DOM. Very simple, but also incredibly powerful in case you want to do something outside of Svelte and use the full power of DOM.
Below is an annotated example of the toggle handler attached to our text inputs.
// Svelte passes in raw html DOM element when element is mounted on the DOM constlabelToggle = node => { // Define a custom event handler for the text input element consthandleKey = event => { // if element's value is not empty add class "filled" if (event.target.value) { event.target.classList.add('filled'); } else { event.target.classList.remove('filled'); } }; // bind custom event handler to element's keyup event node.addEventListener('keyup', handleKey);
// when element is unmounted from the DOM remove the event listener return { destroy() { node.removeEventListener('keyup', handleKey); } }; };
You can also pass in parameters to actions and run custom code if parameters change, but I wanted to keep the example simple here. Read the docs if you want to learn more.
Svelte's actions have many use cases,like drag-and-drop, tooltips, etc. Only your imagination is the limit.
]]>Svelte routing with Page.js, Part 1Svelte doesn't have a built-in router, but it's really easy to build one2020-04-03T00:00:00Zhttps://codechips.me/svelte-routing-with-page-js-part-1/There are many routing solutions for Svelte out there. Some are better than others. I remember Rich Harris tweeted something that many people in Svelte community use page.js - an old, small, simple and battle tested routing lib by TJ, the orginal creator of the express.js web framework.
I wanted to take page.js out for a spin and see what's possible, so I spent an hour playing with it. Something pretty interesting came out as a result. Something that I want to share with you and also teach you a bit about how some of the stuff in Svelte works.
Create a few components and put some H2 tags in them so we have something to work with. Replace App.svelte with the code below. Make sure to get your imports right for the components you created.
// Map routes to page. If a route is hit the current // reference is set to the route's component page('/', () => (current = Home)); page('/about', () => (current = About)); page('/profile', () => (current = Profile)); // activate router page.start(); </script>
In order to our SPA to work you have to add --single flag to the start script in package.json. Like this.
"start": "sirv public --single"
Tres
Start the app (yarn dev) and be amazed that it works.
But HOW does it actually work? First, we wire up the router where each route when hit re-assigns the current var to its matched component. Then our svelte:component tag sees that the reference has changed. It then creates the new component and renders it.
Note on <svelte:component>
This Svelte directive works like this:
If its property this is null or undefined it ignores it and does nothing.
If you pass it a component it will create a new instance of the component and mount it.
If the var reference passed to this changes it will destroy old component and create and mount new one.
Can we do better?
Our simple solution works, but I wanted to have something better, something more declarative, something like this.
<Router> <Routepath="/"component="{Home}" /> <Routepath="/about"component="{About}" /> <Routepath="/profile"component="{Profile}" /> <Routepath="/news"> <h2>Latest News</h2> <p>Finally some good news!</p> </Route> <NotFound> <h2>Sorry. Page not found.</h2> </NotFound> </Router>
Can we make something like this? Yep. Sure we can. Totally achievable with the right level of abstraction. Read on to learn how.
pager.js
Let's try to create our own router by somehow wrapping page.js to do the hard work for us. We can call it pager.js. Start by creating a folder under src called pager and create the following files in it.
$ tree src/pager
src/pager
├── NotFound.svelte
├── Router.svelte
└── Route.svelte
Router.svelte
We will start with the router as it's the main file that will do the dirty work for us. Since we will do the routing in there we need to move the page.js to it.
We also need to declare the routes inside our router. For that we will use Svelte's slot. See slot as a placeholder into which you can put other components and html tags and stuff. Here is the file so far.
<script> import page from'page'; </script>
<slot />
Now create a Route.svelte file and define the component and path properties in it.
<Router> <Routepath="/"component="{Home}" /> <Routepath="/about"component="{About}" /> <Routepath="/profile"component="{Profile}" /> <Routepath="/news"> <h2>Latest News</h2> <p>Finally some good news!</p> </Route> <NotFound> <h2>Sorry. Page not found.</h2> </NotFound> </Router> </main>
Start the app and now at least it should not give you compile errors. But it's not usable at all as we only got the structure, but not logic. Let's fill that part in. Back to our router.
Now, from our simple example in the beginning, we know that we have to use slots to render our components. How can we do that? We are passing path and components to individual routes, right? Add the following code line to the Route.svelte file right above the <slot /> tag and the components passed in will now be rendered.
<svelte:componentthis="{component}" />
Great! Well, actually not THAT great as all components are shown at once, but at least some progress!
We now need to get back to the main router file and add some logic to it. Somehow we need the routes register themselves with page.js which lives in the Router file. How do can we do that? We can use simple dictionary for that and export some kind of register function from the Router file.
Before we start, we need to understand how Svelte components work. When you import a Svelte component somewhere in your app it has only a single default export and that is the component itself. This is important to understand.
// the standard way importRouterfrom'./Router.svelte';
// same component but different name importFoofrom'./Router.svelte';
// This will not work, unless .. import { register } from'./Router.svelte';
So the last import statement will not work unless you declare a module script in your component.
Add that module script to our Router.svelte file and now you can import register function in the Route.svelte file.
When you define the module script in the component, all defined stuff in there (vars and functions) will be available to all the instances of that component. Thus they are "shared" variables. There are some more nuances to that and what you can and can't do. Please refer to the official docs to learn more.
Our route can now register itself with the Router.
// wire up page.js when component mounts on the dom onMount(setupPage);
// remove page.js click handlers when component is destroyed onDestroy(page.stop); </script>
Now if you click around on the nav links you should see the mapped route printed in the dev tools console. We are slowly getting there!
Somehow we need to keep the state of the current component and for that we can use Svelte's reactive store. Add the following to Router.svelte
// on top of the module script
import { writable } from'svelte/store';
exportconst activeRoute = writable({});
// and change the "page" line in the regular script to
page(path, () => ($activeRoute = route));
We now need our components to know which one is the active one, meaning which should be displayed. We can easily do that by importing our activeRoute store. And since stores are reactive all components will know when it changes. Our Route.svelte file looks like this now.
Now stuff should ... kind of work when you click around. Except we constantly see that "not found" route. Not good. Something we need to fix and something that is thankfully, pretty easy to fix.
Phew! Everything finally works now and you can pat yourself on the shoulder for making it this far! But ... we are not quite done yet. I want more! I want to pass custom properties and page's params down to the components and also be able to protect the routes. Something like the code below.
<Router> <Routepath="/"component="{Home}" {data} {user} /> <Routepath="/about"component="{About}" /> <Routepath="/profile/:username"middleware="{[guard]}"let:params> <h2>Hello {params.username}!</h2> <p>Here is your profile</p> </Route> <Routepath="/news"> <h2>Latest News</h2> <p>Finally some good news!</p> </Route> <NotFound> <h2>Sorry. Page not found.</h2> </NotFound> </Router>
]]>Svelte routing with Page.js, Part 2Learn how to abstract our router by leveraging Svelte's built-in components2020-04-05T00:00:00Zhttps://codechips.me/svelte-routing-with-page-js-part-2/Welcome to the second and final part of the series of routing with page.js. In the first part we got the basic routing in place and in this part we will finish what we started. More specifically we will implement:
Route protection with the help of the middleware
Passing custom properties down to our components
Exposing page.js routing parameters in our routes
Propagating page.js params down to our components
This is how we want our final solution to look and work.
<Router> <Routepath="/"component="{Home}" {data} /> <Routepath="/about"component="{About}" /> <Routepath="/profile/:username"middleware="{[guard]}"let:params> <h2>Hello {params.username}!</h2> <p>Here is your profile</p> </Route> <Routepath="/news"> <h2>Latest News</h2> <p>Finally some good news!</p> </Route> <NotFound> <h2>Sorry. Page not found.</h2> </NotFound> </Router>
Exposing params
We will start with the easiest part. Exposing params to the components and in routes. Page.js allows you to define params in the url path and will make them available to you in its context object. We first need to understand how page.js works
page('/profile/:name', (ctx, next) {
  console.log('name is ', ctx.params.name);
});
Page.js takes a callback with context and next optional parameters. Context is the context object that will be passed to the next callback in the chain in this case. You can put stuff on the context object that will be available to the next callback. This is useful for building middlwares, for example pre-fetching user information, and also caching. Read more what's possible in the context docs.
Propagating params is actually pretty simple, we just have to put it in our activeRoute store in the Router.svelte file. Like this.
// if active route -> extract params $: if ($activeRoute.path === path) { params = $activeRoute.params; } </script>
{#if $activeRoute.path === path} <!-- if component passed in ignore slot property --> {#if $activeRoute.component} <!-- passing custom properties and page.js extracted params --> <svelte:component this="{$activeRoute.component}" {...$$restProps} {...params} /> {:else} <!-- expose params on the route via let:params --> <slot {params} /> {/if} {/if}
We use the spread operator to pass page.js params down to the component. That's just one way to do it. You might as well pass down the whole params object if you want. The interesting part is the $$restProps property that we also pass down to the underlying component. In Svelte, there are $$props and $$restProps properties. Props includes all props in component, the passed in ones and the defined ones, while restProps excludes the ones defined in the component and includes the only ones that are being passed in. This means that we also just solved passing custom properties down to components feature. Hooray!
Our main part of the App.svelte looks like this now.
<Router> <Routepath="/"component="{Home}" /> <Routepath="/about"component="{About}" /> <Routepath="/profile/:username"let:params> <h2>Hello {params.username}!</h2> <p>Here is your profile</p> </Route> <Routepath="/news"> <h2>Latest News</h2> <p>Finally some good news!</p> </Route> <NotFound> <h2>Sorry. Page not found.</h2> </NotFound> </Router> </main>
Give the app a spin and see if our params feature works as expected. I left out custom data properties as an exercise.
Protected routes with middleware
The only missing part now is the protected routes part, which we can solve with the help of middleware. Let's implement this.
Page.js supports multiple callbacks for a route which will be executed in order they are defined. We will leverage this feature and build our middleware on top of it.
It works something like this. Our "guard" callback will check for some pre-condition and decide whether to allow the next callback in the chain or not. Our last callback that sets the active route must be last in the chain, named setActiveComponent in the example above. For that to work we need to refactor the main router file a bit.
// extract our active route callback to its own function constlast = (route) => { returnfunction (ctx) { $activeRoute = { ...route, params: ctx.params }; }; };
constregisterRoutes = () => { Object.keys($routes).forEach((path) => { const route = $routes[path]; // use the spread operator to pass supplied middleware (callbacks) to page.js page(path, ...route.middleware, last(route)); });
page.start(); };
You might wonder where the route.middleware comes from. That is something that we pass down to the individual routes.
constguard = (ctx, next) => { // check for example if user is authenticated if (true) { redirect('/login'); } else { // go to the next callback in the chain next(); } }; </script>
<Router> <Routepath="/"component="{Home}" {data} /> <Routepath="/about"component="{About}" /> <Routepath="/login"component="{Login}" /> <Routepath="/profile/:username"let:params> <h2>Hello {params.username}!</h2> <p>Here is your profile</p> </Route> <Routepath="/news"middleware="{[guard]}"> <h2>Latest News</h2> <p>Finally some good news!</p> </Route> <NotFound> <h2>Sorry. Page not found.</h2> </NotFound> </Router> </main>
The app file looks a little different now, but that's because I've added some bells and whistles to it. You can find the whole project here.
Conclusion
This wraps everything up. We've now created fully declarative router for Svelte based on page.js. It's not feature complete, but you can easily adjust it to your own requirements. It's hard to build libraries that cover every possible corner case, kudos to those who try!
I hope that I showed you that it's actually not that hard to build something in Svelte that fits just your requirements, while also keeping control of the code. I also hope that you picked up some knowledge on the way of how Svelte works.
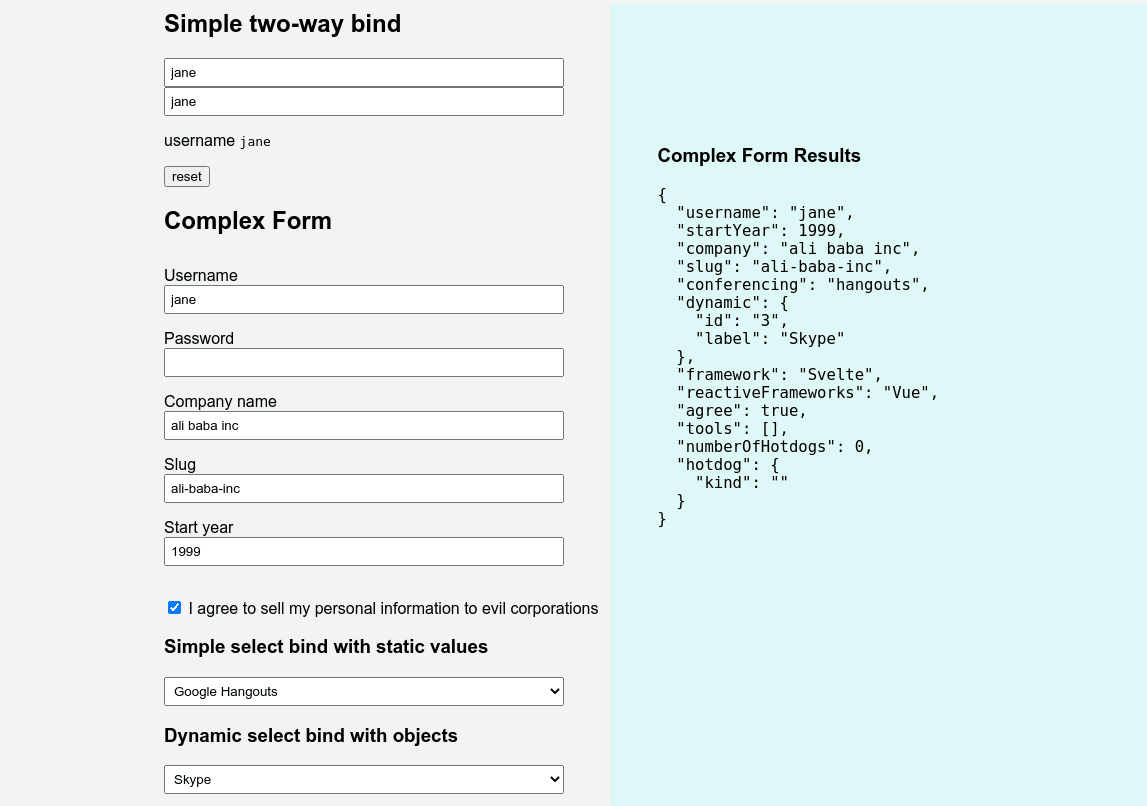
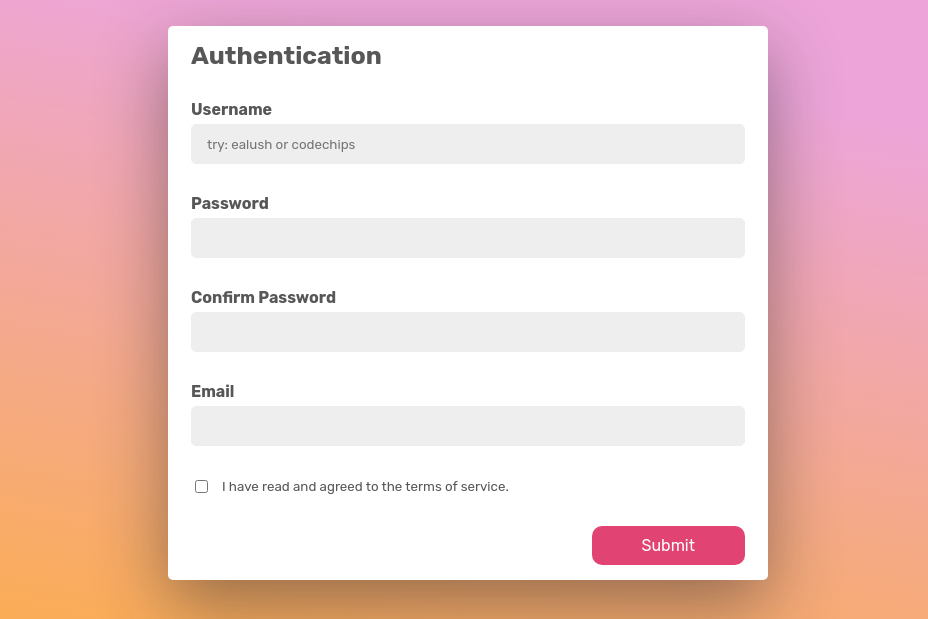
]]>Accessible switch toggle button with Svelte and TailwindLearn how to create an accessible switch button in Svelte with the help of Tailwind.css2020-04-06T00:00:00Zhttps://codechips.me/accessible-switch-toggle-button-with-svelte-js-and-tailwind-css/Sometimes, when working with forms, you might want to style your checkboxes to something more fancy than browser defaults. In this article you will learn how to create a switch button in Svelte with the help of tailwind.css.
For this example we will use my Svelte template which has Tailwind baked into it.
let uno = false; let dos = true; let tres = false; let quatro = true;
$: values = { uno, dos, tres, quatro }; </script>
<divclass="flex items-center justify-center flex-grow h-screen"> <divclass="max-w-xl"> <h1class="text-2xl font-semibold text-gray-700"> Accessible switch toggle with svelte.js + tailwind.css </h1> <divclass="mt-5"> <input type="text" class="w-full p-2 border border-gray-200" placeholder="Tab from here to go to the next switch button" id="text" /> </div> <divclass="flex justify-between mt-5"> <Switchbind:checked="{uno}"id="uno"text="uno" /> <Switchbind:checked="{dos}"id="dos"text="dos" /> <Switchbind:checked="{tres}"id="tres"text="tres" /> <Switchbind:checked="{quatro}"disabled="{true}"id="quatro"text="quatro"/> </div> <divclass="mt-5"> <preclass="p-4 font-mono bg-teal-100">{JSON.stringify(values)}</pre> </div> </div> </div>
That's it. We can now use tab for navigation, to switch between different buttons, and use space to toggle their state. The secret sauce to why it works is Tailwind's sr-only class where checkbox will be hidden, but still be accessible to screen readers. Accessibility is hard to get right, but that doesn't mean we should ignore it.
You can find the code here. Adjust it to fit your needs and as usual, hope that you learned something new. Thanks for reading!
]]>Rollup vs Parcel vs Webpack for Svelte developmentRollup, Parcel or Webpack? I compared the most popular bundlers for Svelte development2020-04-16T00:00:00Zhttps://codechips.me/rollup-vs-parcel-vs-webpack-for-svelte-development/Which one of the three most popular Javascript bundlers is the best for Svelte? I compared Rollup, Parcel and Webpack so you don't have to.
Intro
All of the bundlers are capable of compiling Svelte, but which one should you use?
Here is the list of Svelte plugins for all bundlers.
Rollup and Webpack ones are officially supported by Svelte.
For this experiment I've used a simple Svelte app and some CSS and compared different bundlers in terms of the bundle size they produce and runtime debugging capabilities. Here is the App file.
Rollup is the clear winner here, tightly followed by Webpack. Parcel's JS bundle size is three times as big as Rollup's.
Debugging
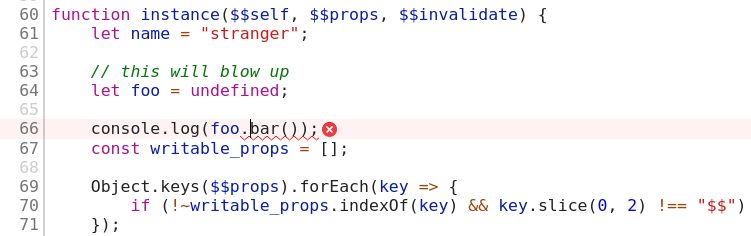
Here I wanted to see how well different bundlers can point to the runtime errors in the console. For this I introduced a small error in the App file.
<script>
  let name = "stranger";

  // this will blow up
  let foo = undefined;
  console.log(foo.bar());
</script>
Parcel
Parcel's stacktrace is useless as it points you to the transpiled JS file.
Parcel console
Parcel stacktrace
Rollup
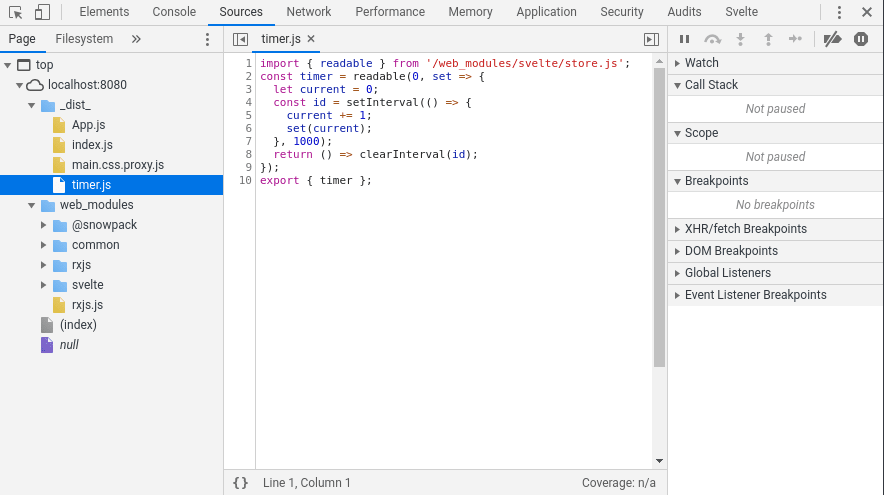
Rollup actually points you to correct line in Svelte file.
Rollup console
Rollup stacktrace
Webpack
Webpack does also a good job of pointing you to correct file.
Webpack console
Webpack stacktrace
Conclusion
To me, personally, Rollup is a clear winner here. It produces small bundles and does a good job of pointing you to the right place in case of runtime error. Only critique I have is that configuration can be somewhat daunting.
Webpack is good too. It's fast, mature and has tons of plugins for your other needs. Both Rollup and Webpack have support for HMR (Hot Module Reload).
Parcel? Parcel is a disappointment. It's fast while developing, because of caching, but the bundle size and development experience is not optimal.
If I've missed any other worth mentioning bundler that works well with Svelte, please let me know in the comments.
]]>How to use Typescript with Svelte (updated)Probably the ultimate Svelte.js with Typescript HOWTO there is2020-05-11T00:00:00Zhttps://codechips.me/how-to-use-typescript-with-svelte/With the official Typescript support in Svelte in place we can finally have turtles all the way down! The only things required are proper tools and plugins. Read on to learn more.
Update (2020-08-10)
This article has been updated since the official Typescript support for Svelte was released. The official Svelte blog post explains how to get started with Svelte and Typescript quickly, but this article takes a little different approach with an opinionated (improved if you ask me) setup, plus some extra bonus materials.
Also, Rollup, which I use in the article as a bundler is pretty slow. Why? Because it needs to re-compile the whole shebang every time you change a file. It produces very small and efficient bundles though.
Things in tech move almost at the speed of light. Since this article was written a few other alternative and faster bundlers popped up. Bundlers that help you shorten the feedback loop. You have Snowpack and Svite for example.
One of the show stoppers for people who want to start using Svelte was the lack of first class Typescript integration. And it's not so much about the type safety as about tooling. Great supporting tools for any framework are important for its future growth and popularity. Svelte is still a young framework, but without proper tooling ecosystem surrounding it, I am afraid it might die. It would be such shame.
I've done some experimenting with Rollup, Webpack and Parcel trying to get Svelte to play nice with Typescript. While I achieved decent results with all of them, I will use Rollup here as it has a pretty straight forward setup plus the re-compilation step was the fastest of them all.
Let's start with a standard vanilla JS Svelte setup and adjust our project there to enable Typescript support. The best way to learn is by doing.
$ npx degit sveltejs/template svelte-and-typescript
$ cd svelte-and-typescript && npm i
We now have a simple Svelte app, with all the greatest and latest dependencies, that we can run with npm run dev.
Rollup Refactoring
I prefer a slightly different Rollup configuration, so we will adjust it a bit. It requires us to bring in a few new utilities first. We will start with them.
There are a few things going on in scripts. We use run-s (run serial) and run-p (run parallel) from the npm-run-all utility package to run NPM scripts in serially and in parallel. We also use rimraf and cross-env utilities to achieve cross-platform functionality.
We now need to create a minimal index.html file in the src directory with the following content.
We can now run and build our app with npm start and npm build respectively. Try it!
From JS to TS
It's time to bring out the big guns - Typescript. For this to work we need to add a few NPM modules - @rollup/plugin-typescript, @tsconfig/svelte, typescript and tslib, which is a dependency for Rollup's typescript plugin.
Fire up the app and see if it works. Hint: It should!
Svelte related files in Typescript
Just your main.js to main.ts and don't forget to change the input property in the Rollup config.
When we now start the app it should also work as expected. Achievement unlocked. We now can work with Typescript files in our Svelte project!
What about Typescript in Svelte files?
Ah! Of course! Glad you asked. The most important thing! For that you have to use the awesome svelte-preprocess plugin. It's a plugin that can help you pre-process many different kinds of languages in Svelte files such as SASS, Less, Pug and, of course, Typescript.
$ npm add -D svelte-preprocess
Tell Svelte plugin to use preprocess in our rollup.config.js
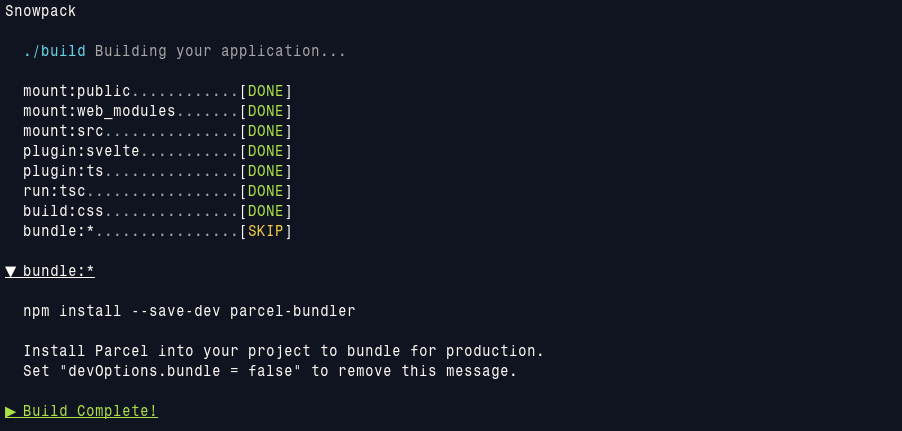
When we start our dev server (npm start), svelte-check runs in watch mode and continuously checks our Svelte files for errors. When we bundle the application (npm run build) we run svelte-check before the bundling step.
BONUS: Speed up your compilation
Rollup is great for building production bundles, but TS compiler is really slow. If you are feeling adventurous and want faster compilation times you can try the SWC compiler to transpile your Svelte TS scripts. It's written in Rust and is still young, but looks very promising.
First, we have to install the SWC npm package.
$ npm add -D @swc/core
Now we have to change the Typescript configuration in our Rollup config.
I've also tried to replace the regular Rollup Typescript plugin with rollup-plugin-swc, but for some reason it cannot resolve external Typescript files in Svelte files.
BONUS: Svelte editor integration
You are most likely using VS Code, Neovim or Vim when coding. There are extensions for all of them - Svelte extension for VSCode and coc-svelte for Neovim/Vim.
Before the official TS support you had to create a special svelte.config.js file so the editor could understand Typescript in Svelte files. This has now changed and you no longer need to do it.
But if you see that your editor is not recognizing Typescript you can create that file with the following contents.
You can probably add other useful code linting plugins, but that's out of the scope for the article, so I will stop here.
Conclusion
There you go. We just learned how to use Typescript in Svelte together with Rollup bundler. But no matter what bundler you use svelte-preprocess always plays the central role when it comes to Typescript integration in Svelte. Actually, without it we wouldn't be able to use any other languages in our Svelte files.
Even though it's now possible to use Typescript in Svelte, I would recommend to keep your Svelte files thin and write the heavy logic in separate files. By utilizing libraries such as XState, RxJS and Rambda you can write concise and testable code. The bar is high, but it's totally worth it! Give them a fair chance!
Hope you learned something new with me today and if something is not right or can be improved, please ping me on Twitter or shoot me an email.
]]>3 different ways of cross-component communication in SvelteSvelte makes component communication quite easy and elegant. Learn how your children can talk to their parents so that parents understand what they are saying2020-05-14T00:00:00Zhttps://codechips.me/svelte-cross-component-communication/How do you pass data between Svelte components? How do you communicate between children and parents? For example, when you need to trigger some action or change state in the parent from a child component. A typical case is to toggle Svelte component's visibility from itself when the visibility state lives in the parent.
Problem
In your parent component you have three different child components that you want to toggle visibility for. In every child component there is a "close" button. When it's clicked the component should hide itself. Since the "close" button is within each child component, you as a parent can't really control it. What are your options?
Turns out it's quite easy to do in Svelte. I can think of three different ways. Let's go through them all.
Setting up the project
Let's dive straight in. The best way to learn is to actually write the code. That way your brain will have time to process the information because it's faster then your typing. We will start by creating a new project.
Nothing fancy yet here either. All our components are hidden by default and you can make then visible by clicking on the show buttons. But how can we hide the children if the visibility state is defined in the parent? All of our children has close buttons, but they have no logic bound to them. Let's fill that part in.
Option One - Passing Down the Handler
This is the most straight forward option. You encapsulate parent's state in a closure and pass it down to the child component that triggers in when needed. In this case we bind it to the button's on:click event. Change One.svelte component to the following code.
<script> // a noop function that will be overridden // by passed-in handler exportletcloseHandler = () => {}; </script>
What's going on here? We are exposing a closeHandler function from the component. This means that we can pass a property closeHandler to the component from our parent. We initially assign it to a dummy noop function so it doesn't blow up when we click the button and no handler was passed. Let's add this.
// add this function to the App.svelte constcloseOne = () => (showOne = false);
We also need to pass the closure to our One.component. Change to this in App.svelte.
<!-- we pass in our local handler to the component --> <OnecloseHandler={closeOne} />
Now it should be possible to close the component from the component itself. First option completed!
Option Two - Binding State to Local Variable
If you export a variable in the child component you can bind it in the parent by using bind:var={local} property where var is the variable name in the child component and local is the parent's local variable.
<!-- Two.svelte -->
<script> // since the variable is exported we can bind // to it in our App.svelte exportlet show = false; </script>
The only thing we need to do in App.svelte is to bind it to local variable.
<!-- we bind Two.show variable to our local showTwo variable --> <Twobind:show={showTwo} />
Tip: if the variable name is the same both in parent and child then you can use a shortcut bind:foo where foo is the shared variable name.
It should now be possible to close the component. Second option is now complete!
Option Three - Dispatching Messages
The last option you have is to use Svelte's dispatcher to send messages between components. This is the most flexible option, but also the most complex one of the three. Personally, I don't use it that much as I don't like that you have to destructure the received event. It feels noisy for some reason.
Change the code in our Three.svelte component to following.
// when the handler is triggered in on:click // can subscribe to the on:close message in our App.svelte // and do what's needed constcloseHandler = () => dispatch('close'); </script>
We also need to subscribe to the message in App.svelte. Change to following.
<!-- we listen for close message triggered in the component --> <!-- we don't care about data in this case as it's not needed --> <Threeon:close={() => (showThree = false)} />
What's going on here? We initialize an event dispatcher in our component and then in the on:click handler we dispatch a close message that parent listens to. Since we only care about the message name we don't need to send any data.
Note: dispatcher can only be used in parent/child relationships. Meaning, you cannot use dispatcher to send messages from parent to children. Only the other way around.
You should now be able to close the third component as well. Third option is also done.
Conclusion
There you go. By now you should know three different ways of how to share data between components. Which one is the best depends on your use case of course. Start simple and adjust to your needs if it doesn't work. If you have more complex needs, where multiple components need to "listen" for data, then Svelte's stores might be a better option.
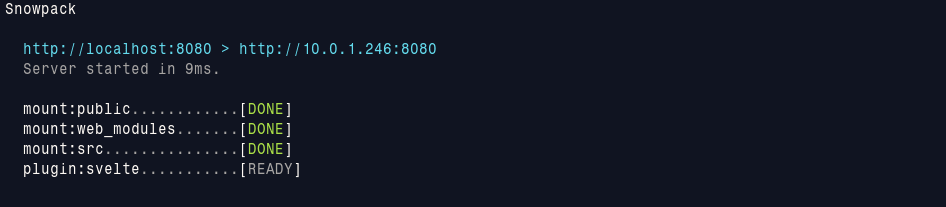
]]>Snowpack with Svelte, Typescript and Tailwind CSS is a very pleasant surpriseI took Snowpack for a test drive. What I found was not what I expected!2020-05-17T00:00:00Zhttps://codechips.me/snowpack-svelte-typescript-tailwindcss/I like bundlers. Correction, I like fast bundlers. Bundlers that help me tighten the feedback loop and help me focus on the code. Not bundlers that make me doze off, waiting for the recompilation to finish, while my CPU fan sounds like an old hair dryer.
Update
Technology moves at the speed of light and since this article was written Snowpack has released a stable version. This means that some of the things explained here (like Typescript support) are baked in and Snowpack also has support for pluggable bundlers now. I have updated example Github repo. You can find the link at the end of the article.
Enter Snowpack
I've been keeping an eye on Snowpack for some time now - an (un)bundler that leverages the power of the ES modules. Personally, I like the ESM idea and hope that we all soon will align and come to a consensus. One promising thing in Snowpack's favour is that almost every modern browser already supports ES modules.
Ok, ok, but what does it actually mean? This is Snowpack's elevator pitch taken straight from its website.
Snowpack helps you build web apps faster by replacing your traditional app bundler during development. No bundling means less unnecessary tooling, instant dev startup time and faster updates on every save.
When you're ready to deploy your site, Snowpack automatically optimizes and bundles your assets for production.
Now, how can one NOT like that?! However, it all sounds too good to be true and thus requires some actual proof. Let's try to climb the mountain.
Snowpack recently re-caught my attention on Twitter, where its author, @FredKSchott, announced the pre-release of Snowpack v2 and also posted a link to a bunch of starter templates - Create Snowpack App (CSA). One of those was a template for Svelte. It was too tempting not to try it.
So I did.
The Setup Experience
The setup experience was very pleasant. You can tell CSA to yarn instead of default npm with the --use-yarn option when bootstrapping, if Yarn is your thing.
My first impression is that it starts really fast! Or more precisely in 9ms. That's crazy fast!
The browser opens up automatically with a nice clean page that has an animated Svelte logo and clear instructions on how to proceed.
I changed some text and deleted some elements to see how fast it would discover the changes and reload. I tried not to blink, but couldn't notice the actual reload. That fast! Had to try it a few times more to make sure that Snowpack wasn't fooling me. Nope, same thing. Blazing fast reloads!
I don't think Snowpack has HMR (Hot Module Reload) support yet for Svelte as Svelte doesn't have support for it itself yet, so Snowpack reloads the whole app when you change something.
NOTE: There are some hacky and experimental ways you can get HMR support with Rollup and Webpack, I believe.
Adding Typescript support
I like to write most of the logic in separate files and just use Svelte as a thin view layer that glues all the pieces together. For that I usually use Typescript, mostly because it gives me nice autocomplete in my editor. Some of you are probably rolling your eyes right now, but hey, tooling and DX is important!
I had some trouble understanding what's required to get Typescript support, so I asked the question on Twitter hoping to get some pointers in the right direction.
To get Typescript support working in Showpack's Svelte template you have to tweak a few things.
First, you need to install Snowpack's Babel plugin, Babel's Typescript preset and the actual Typescript compiler.
Second, we need to tell Babel that we want to transpile Typescript to Javascript. Add the babel.config.json in the project root folder with the contents below. Snowpack's Babel plugin will pick it up automatically if the file exists.
{ "presets":[ "@babel/preset-typescript" ] }
Third, you have to tell Snowpack that you want to transpile and lint Typescript. Change your snowpack.config.json to the code below.
Snowpack uses Babel for transpiling TS to JS, because Babel is much faster than TS compiler. The reason for that is that Babel only strips out the types and does not do any type checking. For TS linting Snowpack uses the actual Typescript compiler. However, before we can lint we need to create a tsconfig.json, so that Typescript will know what to do.
If you start the app now everything should work as expected.
As I wrote earlier Snowpack converts your dependencies and puts them into the web_modules folder. Delete the web_modules folder and see everything blow up. To re-create it just run npm prepare. That script runs snowpack installcommand, which will scan the source code for all import statements to find every NPM package used by your application and package it as a ESM in the web modules folder.
$ npm prepare # or npx snowpack
We should now have Typescript support. How nice!
Let's climb higher and try to enable PostCSS together with TailwindCSS.
Adding Tailwind CSS
Tailwind is a popular atomic CSS framework that I often use and since Snowpack promise us PostCSS support we should be able to use Tailwind.
Fire up the app and we should now have Tailwind support. Yay!
Building for production
The development flow is very fast, code reloads are blazing, but you are running on the local computer. Real applications will need to download all assets through a network. Let's see how Snowpack deals with bundling stuff for production by running npm run build.
I can see that the CSS file is very small. It means that PurgeCSS is working as expected. We haven't bundle the app so everything will be served as modules. In a large app that might be a problem, many files. But they will be cached on subsequent requests.
Snowpack recommends that we add Parcel as a bundler, so we will follow the recommendation and add it to the mix.
The total size of the minified JS bundle in 142 kb. It seems unnecessary large for such small and simple app. I suspect that it's due that Snowpack uses Parcel as bundler. I've written a benchmarking post about most popular bundlers that you can read here.
Another thing that puzzles me is why Snowpack spits out the modules to build directory when we are not using them in production?
You can try to run the production bundle yourself by installing a simple web server like serve.
$ npx add -D serve && npx serve build
Final Thoughts
Snowpack v2 is currently in beta. It's a moving target with almost daily changes, so expect API and things to break until it reaches stability. Overall, it gives developers a great DX with lots of tips and clever easy to understand stats. However, there are some things that I hope can be improved in the future.
New browser window opens every time I start the app. I ended up with like five windows open. Not sure how to disable this behavior yet, but probably it's a very simple thing that I just missed.
Only support for Parcel bundler at the moment. Parcel is not as efficient as Rollup, and produces almost 7 times larger bundles. Hopefully, we will be able to freely choose between different bundlers soon.
Unclear build assets. Not sure I understand what's what in the build directory when building for production. Looks like Snowpack is producing some files that shouldn't be there.
Some people seem skeptical of ES modules. Svelvet was a promising experimental Svelte bundler built on top of Snowpack, but the author decided to stop working on it after running some networking benchmarks. The browsers and network are becoming faster and faster, and with parallel requests, HTTP/2/3 and Brotli compression this should not be such a big issue as it seems now.
Personally, I am very exited about the project and Pika ecosystem in general. Hopefully all the wrinkles will be ironed out soon, and when they are, this might become my new favorite setup for Svelte development.
]]>Recreating a classic FRP tutorial with Svelte and RxJSLearn how I recreated and extended a classic functional reactive programming tutorial without using external state2020-05-31T00:00:00Zhttps://codechips.me/classic-frp-tutorial-with-svelte-rxjs-6/The best way to learn something is to recreate it from scratch. Actually type out the code. This way you brain will have time to process and understand while your fingers move.
I've decided to recreate a classic functional reactive programming tutorial from 2014 with the most recent version of RxJS (currently at 6.5) and tiny reactive web framework called Svelte.js.
This is the tutorial in question that we are going to recreate and then also extend.
Honestly, the frontend framework doesn't really matter for these examples, but I chose Svelte, because I really like it. The main logic (business domain) lives outside Svelte and I often use Svelte just as a thin view layer.
Actually, I realized that I just lied. Another, and very important factor, I chose Svelte for is for its reactive stores. RxJS is a perfect fit for Svelte because you can use RxJS observables as Svelte stores right out of the box. Well, almost. You can use them as Svelte's readable stores. To use RxJS as writable stores you have to do a pinch of monkey patching.
I wrote up an introduction about Svelte and RxJS a while ago - If Svelte and RxJS had a baby. You should read it before continuing, so you understand how they two fit together.
Disclaimer
You should have basic knowledge of RxJS to get something out of this article. If you want to learn RxJS, google it. Internet is littered with thousands of tutorials that will teach you how to build basic countdown timers and use document click events. All the same, literally just rewrites of the examples from the main RxJS documentation site.
What is RxJS?
Simple. It's a big box of full of Lego pieces with no instructions that will keep you occupied for days, and not in a happy way. But when you finally come out, you come out stronger and smarter. But not necessary better looking. Sorry.
Jokes aside, if you ask me, it's a paradigm shift, a mind rape. If you really want to dive in, make sure to stock up on pain killers, because your head will hurt. Mine did.
Ok ok, on a serious note, RxJS will allow you to solve problems in a declarative way, instead of imperative (go and read this), with the help of functional reactive (read async, pull vs push) programming.
Everything is a stream and almost everything can be solved with streams.
And since most things in Javascript land are async, RxJS is a good fit for most things. But not all, of course.
With the air now cleared, why should you learn RxJS?
You will start thinking about your problems in a different way
You will write less code and instead do more thinking
Your code will contain less bugs
You friends will think you are smarter than you actually are
Are you ready? Have you decided to take the plunge? Cool. Let's do this!
Let's get dirty
The author of the original tutorial, André Staltz, does a really great job of explaining how to think in RxJS streams. The code examples are written in an old version of RxJS (the article is from 2014) and it would be very easy and not a real challenge to just port the code to the most recent version of RxJS.
I wanted to do it a bit differently. I wanted to recreate the full functionality using my own interpretation of the problem, and instead using the code examples only as my guide slash cheat sheet in case I got stuck on the way.
The problem
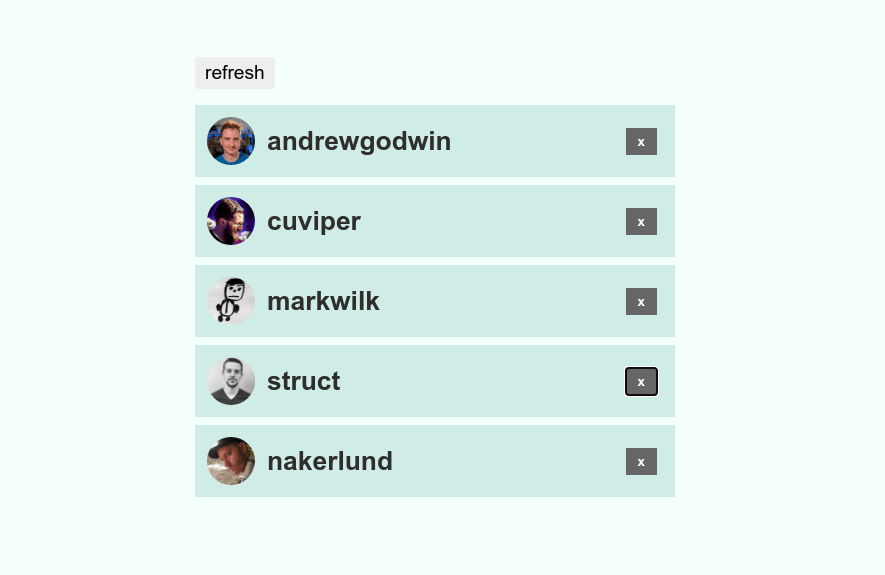
We want to build a small widget that displays a list of Github users. We should be able to refresh the whole list and also be able to refresh each individual user suggestion.
What do we want to accomplish?
We want to display a list of three random Github users to follow
We should be able to refresh the whole list and get three new users
We should be able to refresh (get a new suggestion) each individual user in the list
Seems doable.
How should we do it?
Fetch users from the Github API and display three of them
When clicking the 'refresh' button, we need to re-fetch the list of users and display three new ones
When clicking the 'x' button on individual user, we need to replace the user with a new suggestion
Each user row should show user's profile picture, username that is a link to hers Github profile page
Looks like we have a rough implementation plan. A loose one, but still a plan. Let's get cranking.
Setting up the project
We will use Snowpack bundler for this project. Why? Because it's awesome and fast!
<!-- Remember that I told that we can use streams as Svelte stores? --> <!-- We just have to prefix a stream with $. Yes, it's that simple --> <pre>{JSON.stringify($users, null, 2)}</pre>
When you start the app you should see a long JSON array with Github users.
The problem is that the users are returned to us sequentially with Github founders being first ones in the list. We need to introduce randomness. It's possible to achieve by appending a since query parameter to the URL. That will return users starting at time when they created their Github account.
If you call Github's API too often they will throttle you. What you can do instead is to create a Github auth token and use that in your API calls. We are jumping a head of time a bit, but this is how you can solve it.
I suggest you do that because there will be a lot of reloading involved soon.
Legos all the way down
I've already mentioned it, but building software with RxJS is like building things with Lego bricks. You have all these small pieces that you assemble into larger pieces, that you then assemble into walls, that you then use to build the whole house. Some pieces don't fit together so you try a different one.
Adding the refresh button
And looks like we just built our first Lego part. We now have a pool of Github users to choose from. Let's add the 'refresh' button.
In the original tutorial the author is using fromEvent operator to capture the button click, but we will use Subject instead. While it's possible to do it exactly like in the original tutorial by using Svelte's bind directive, I think that RxSbjects are actually a better fit here.
Shortly explained, Rx Subjects are both observers and observables, meaning you can both push, via next method and pull data from them by subscribing. Don't worry if this doesn't make sense right now.
Back to our problem. We will use plain Subject as a signal to trigger our users stream and force it to reload.
// let's change the users name to response instead const response = ajax({ url: `${usersEndpoint}?since=${randomOffset()}`, headers: { authorization: `token ${token}` } }).pipe(map(res => res.response));
// when clicking refresh button we call `reload.next()` // which triggers the observable chain. const users = reload.pipe(mergeMap(() => response));
export { users, refresh };
You can see that we used mergeMap operator. In short, this operator will replace the outer observable with the inner observable (response in our case).
With our changes we have introduced a couple of problems. First, when you load the page, no users are present until you click the 'refresh' button.
This is easily fixed. We can emulate the first click, and thus trigger the chain, by using the startWith operator. What we send in doesn't really matter here as we will not use it.
// add `startWith` operator as first in the chain const users = reload.pipe( startWith(null), mergeMap(() => response) );
The second problem is that when we click the button, the data is re-fetched, but the results are the same. That is because response stream is not re-triggered, but reused. We need to solve that. The easiest solution that comes to mind is to extract it to a function and create a new stream on every call.
Our whole users.ts file should look like this now and it should work as expected too.
// Rx Subject that we use only to trigger reloads const reload = newSubject();
// instead of exposing subject directly we wrap it in a function constrefresh = () => reload.next();
// replace users with a function instead so that we return // a new stream on every 'refresh' click constfetchUsers = () => { returnajax({ url: `${usersEndpoint}?since=${randomOffset()}`, headers: { authorization: `token ${token}` } }).pipe(map(res => res.response)); };
// call fetchUsers function when we click the refresh button const users = reload.pipe(startWith(null), mergeMap(fetchUsers));
export { users, refresh };
Awesome! Second Lego part is now in place and we only had to refactor our logic to achieve this, not touching the view aka App.svelte. Are you starting to see how we are building our app piece by piece? Nice, isn't it?
Creating a suggestions list
We will now continue to the next step, creating a list with three user suggestions and this will require some view changes.
First, we need to think on how to get a random user from the users stream (the list of users we got back from Github API). We can achieve that with the following code that we can add at the end.
// users.ts
// helper function to get a random user from // the user list we got from Github constrandomUser = (users: any[]) => users[Math.floor(Math.random() * users.length)];
// random user suggestion stream const suggestionOne = users.pipe(map(users =>randomUser(users)));
export { users, refresh, suggestionOne };
So what does this code do? I will explain.
Start with the users list
Pipe the list to map operator
Select a random user from the list of all users
So far so good. We could just make three suggestions and then export/import them. But, let's hold on to that thought for now and try to implement the 'suggest' button instead. When clicked, it will give us a new user suggestion.
Reloading the individual user
What's needed here? Well, we need to have a button to click. Obviously.
Maybe it's a good idea to replicate the functionality of the 'refresh' button with the Subject?
Maybe. Let's try.
const refreshOne = newSubject();
Now what? Something needs to happen when it's clicked, right? It should kick off (trigger) a chain of something that will get us a new user.
How about this? How about I write the code and then explain it? Deal? OK.
What is this "combineLatest" thing, you say? I say, it's pretty awesome.
combineLatest is an RxJS operator that takes provided streams and emits them when any of the provided streams emit (or gets triggered). If you provide a function at the end, so called project function, it will pass all the streams into it. In there you can do what's needed (get a random user in our case) and pass that down the line.
The important thing with combineLatest is that it will not emit anything until all provided streams has emitted at least once. Something to keep in mind for the future, when you are pushing buttons like mad scientist but nothing is happening.
The rest, startWith operator, should be familiar to us by now.
Let me explain exactly what happens in our case:
We build our suggestion observable by "deriving" data from the users observable. It means, if we don't pipe to anything else we will just get a copy of users observables.
Next, we use the built-in pipe operator to build up a chain of other operators that will transform the data as it passes through that chain.
We emulate a button click (trigger the chain) with the startWith operator
It will go to the next step in the chain - combineLatest operator.
combineLatest takes the null click stream and users stream and executes our provided project function passing our current stream and dependant streams in order they are specified
In the function we take the value of the users stream and execute our randomUser function with the list of users, the value of the users stream.
It's important to understand what's happening. I suggest you play around a bit, before continuing, by commenting stuff out and using good ol' console.log to print out values.
PRO TIP: The tap operator
When you need to debug (log) something in the stream pipeline tap operator is really handy. Just import it and plug tap(console.log) inside the pipe operator.
OK. Business logic is done. Let's import the suggestion in our App.svelte file and try it out.
<!-- notice that I didn't wrap our subject in an exported function --> <!-- I did it only for demo purposes here. You should always wrap --> <buttonon:click={() => refreshOne.next()}>refresh one</button>
Click the 'refresh one' button and see that we get a new user suggestion.
Click the 'refresh' button and notice that our suggestionOne also reloads. It's because in RxJS every stream can be connected to each other and when triggering the top stream it can trigger other streams that depends on it. Kind of hard to understand in the beginning and very easy to get lost in, but totally awesome when you finally get it.
We are almost done. Let's add two more suggestions and add some layout to our view file.
We could copy and paste code for the rest of our suggestions, but we will create a helper function instead.
// make sure to import `Observable` from 'rxjs' constcreateSuggestion = (refresh: Observable<any>) => refresh.pipe( startWith(null), // name variable as _ to show that we don't care about it combineLatest(users, (_, users) =>randomUser(users)) );
We can say that we are done, but I say, we are not quite done.
Hot and cold observables
If you open the network tab in the dev tools console and play around, you will notice that we do way too many requests than necessary. How come, you may ask?
This has to do with hot and cold RxJS observables. A topic that would require it's own article. But, briefly, and very simplified, cold (unicast) observables are started (created) each time they get a new subscriber, while hot (multicast) observables "keep" their existing state when getting new subscribers eg they don't start from the beginning again.
Thankfully, it easily fixed with the help of the share operator. Import it and add it to the end our users stream.
// call fetchUsers function when we click the refresh button
const users = reload.pipe(startWith(null), mergeMap(fetchUsers), share());
Watch the network tab now.
You can also add a few more operators if you want to enhance the UI interaction, but we will stop here. I recommend that you go to the original article instead and look for more inspiration there if you are interested.
It's not DRY!
With the final solution now done, there was one thing left, that was still bothering me. A think that I couldn't stop thinking about. The way suggestions are created. The DRY principle. The current solution is ugly. Code is repetitive.
André, the author, also effectively lures you in by saying:
This is not DRY, but it will keep our example simple for this tutorial, plus I think it's a good exercise to think how to avoid repetition in this case.
Of course I had to give it a try. I mean, how hard can it be?
Can we do better?
And this is where I should have stopped. Should have gone on with my life. Done something fun instead. But the stubborn donkey in me took over. "I mean, how hard can it be," I thought.
Well. If you look at all the hundreds of comments in the original article, everyone is saying how awesome the article is, but NOT A SINGLE ONE offered a solution to the problem.
Why is that, you may ask? Because it's hard.
The hill is too steep and you are not in shape
In RxJs land you can't just take the next step, because that step is too steep.
Before you are able to do that you have to stare at the screen for hours, trying to understand the code and the flow, and why that small change you introduced borked everything you just got working.
You have to read all the articles on the Internet and desperately google for information until your fingers hurt.
You have to curse yourself with very strong words for being stupid and cry yourself to sleep.
But suddenly, it just clicks and it's like a messiah coming down from the clear blue sky while the angel choir sings. You become almost euphoric and people might ask you what pill you just popped.
Don't worry, that high won't last long. It will actually wear off pretty quickly when you realize that there is another step you have to climb and it's just as steep as the previous one.
That's exactly the process I went through. Every. Single. Thing. What soothed the pain a bit was that I worked in bursts. You know, HDD, Hammock Driven Development.
I learned it years ago and it really works!
Onward.
Making things dynamic
My only goal was to get rid of static suggestion list and make it dynamic, so we can easily change how many users we would like to display.
The task seemed easy - instead of returning separate suggestion, we want to return a list of user suggestions that we can iterate over. When clicking 'x' (suggest) button, we should replace that user in our list.
We can reuse many of our existing Lego parts we have already built. To start off we can delete all individual suggestions and individual refresh streams. Both from code and exports.
Next, we can rename our users stream to userPool, because it will be a pool of users that we want to choose three random ones from.
// call fetchUsers function when we click the refresh button
const userPool = reload.pipe(startWith(null), mergeMap(fetchUsers), share());
Now we can select a well, semi-random, first three top users from our userPool stream. This will be our starting point.
The 'refresh' button will not work, but this is something we will fix soon.
Like this. Create a new stream called suggestions.
const suggestions = reload.pipe(
  // emulate the first click to trigger the chain
  startWith(null),
  // replace `null` with `users` stream
  mergeMap(() => users),
  // log to console. useful for debugging
  tap(console.log),
  // start with an empty array to keep Svelte store happy
  startWith([])
);
The flow explained:
We derive our suggestions stream from reload button stream
We emulate the first click to trigger the chain
We replace the outer observable with inner observable (users stream)
We console log the result of the mergeMap
We start with an empty array to keep Svelte's each loop happy
I think that suggestions is actually a better word in this context than users.
Import suggestions in our App.svelte and replace all references to $users with $suggestions.
Everything should work just as it did before except we can now refresh our suggestions list. Yay! Winning!
Adding slowness
In our App.svelte we have a null check were we don't show the list if it's null. The thing is that reloads are happening so fast that we don't even notice. To make it visible we can replace mergeMap operator line with this one. I will leave it up to you to figure out what it does.
This is the thing with RxJS. By entering right things at the right places you can get lots of things done quickly. I didn't say it was easy though.
Reloading user suggestions
Alright, we finally have come to the part that was the most painful for me. Generating new suggestions for the individual user.
Because no matter how I tried I kept coming to the same fact, that I needed to keep state somewhere somehow, but I really didn't want to use external state variables. Hey, that would be cheating!
After lots of experimenting and googling I finally got it to work. Turns out we don't need any state at all.
First, let's think what we need to do. We already have a suggestions stream so we need to:
Create and wire up individual suggestion reload button
When button is clicked we we need to know what user that was clicked for
Somehow take that user and replace her in our suggestion list
Doesn't sound to hard, right?
Implementing individual suggestion reload
For triggering individual reloads we will again use RxJS subjects, but this time we will use BehaivorSubject instead of the plain one.
BehaviorSubject is special. It keeps track of the latest state and upon every new subscriber it returns the latest state to them when they subscribe. We can also initialize it with as starting state and that's exactly what we need.
Why do we need that? Glad you asked! It's because we will need to use combineLatest operator again and this operator will not emit anything until all of the streams it depends on emit. Remember?
If we decide to use the plain Subject we end up in a limbo state. We would need to click the 'x' button it so it emits, but we cannot access it because it's not visible since the combineLatest operator is waiting for our subject to first emit something.
We will start simple, and refactor the code as we go.
// users.ts
// the suggest 'x' button stream // we initialize it with an empty string as starting state const suggest = newBehaviorSubject('');
// wrap the suggest stream in the helper function that we export constreplace = (username: string) => suggest.next(username);
// our main suggestions stream const suggestions = reload.pipe( // emulate the first click of reload button to trigger the chain startWith(null), // replace `null` with `users` stream mergeMap(() => users), // log to console. useful for debugging tap(console.log), // this is where we handle new user suggestions combineLatest(userPool, suggest, (users, pool, suggest) => { console.log(users, pool, suggest); return users; }), // start with an empty array to keep Svelte store happy startWith([]) );
export { users, replace, refresh, suggestions };
Import replace in the App.svelte and wire it up as an action in the 'x' button.
If you click the 'x' button now and open dev tools you will see the console.log output in our "project" function we supplied last in our combineLatest statement. This is where we will implement the actual suggestion replacement.
I recommend you to click the button a few times, inspect its output and think on how we can replace the individual user in our user list before continuing.
Did you do it? No? OK then, I will show you how I solved it.
First, let's extract our "project" function so we can concentrate on it.
// our project function which contains the suggestion logic constreplaceUser = (users: any[], pool: any[], login: string) => { console.log(users, pool, login); return users; };
// replace `combineLatest` in `suggestions` stream to this // combineLatest(userPool, suggest, replaceUser)
Cool. In that function we get the users (our suggestions) list, a pool of all users and the login (username) of the user that needs to be replaced in the list.
Here is how we can solve it.
Find the username to be replaced in the users array
If user is not found, return the users array
If user is found, pick a new random user from the user pool
If new random user already exists in the users array, pick new one
Replace old user in users array with new one
Return mutated users list
And here is the actual code. I hope I got it right!
while (true || idx !== -1) { let newUser = randomUser(pool); if (getIndex(newUser.login) === -1) { users.splice(idx, 1, newUser); break; } } return users; };
Add this code, save your files and you should see everything work.
Try changing the number of displayed suggestions to five and see that it still works.
Our final goal is now complete. We have a truly dynamic suggestions list that it also totally DRY!
But how does it work?
Remember that almost everything in Javascript is passed by reference and therefore we are actually mutating the array returned from the users stream.
You can validate this if you want by importing users stream in App.svelte and doing cheap man's debugging aka pre + JSON.stringify.
We can say that our suggestions stream sits and listens at two points in code:
When reload button is clicked it kicks off the whole stream chain again
When some dependant stream in combineLatest operator changes only it gets executed
Takeaways
Did you notice how we used Svelte just as a thin view layer? Our script statement in App.svelte contains only imports. All of the logic is encapsulated in separate files.
One nice side effect of doing it this way is that it makes our code very TDD-friendly.
With that said, here are the main takeaways:
Mind bending stuff. Learning RxJS is super hard, but also super rewarding. Declarative programming makes your life easier, but it also requires more of you.
Less writing, more thinking. I don't like writing imperative code, because I often already know what I need to write, and it's so damn boring to type. Writing FRP code actually involves less writing and more thinking. Thinking about how to solve the problem with streams.
RxJS is not for beginners. You need some functional programming experience and a solid knowledge of Javascript. Add Typescript to the mix and you will start crying. Personally, I think that RxJS is even harder to learn than Vim!
One-to-many. Every problem can be solved in many different ways in RxJS. There is no right or wrong. Only more and less efficient, feels like.
RxJS not a hammer. RxJS is super cool, but don't use it for everything just because you can. Most of the small problems can be solved in much more simple (boring) way instead.
Svelte + RxJS = WINNING. In my opinion, Svelte is a perfect fit for RxJS. Both are truly reactive and Svelte has almost native RxJS support with its auto subscriptions. It's a beautiful marriage.
Better developer. Even if you are not planning on using RxJS it's still a very good exercise to learn it. It will level up your game. Guaranteed.
Conclusion
This was a very long article. Thanks for sticking all the way to the end with me!
As always, I hope that you learned something, even if you head might hurt slightly right now.
If you know of a different way of solving this please make a PR so I can learn. It would make me really really happy!
]]>Svelte bind directive explained in-depthI spent a few hours digging into Svelte's bind directive statement with focus on forms2020-06-06T00:00:00Zhttps://codechips.me/svelte-bind-directive/I spent a few hours digging into Svelte's bind directive statement with focus on forms. Read on if you want to want to learn more!
In this article you will learn how to:
Bind input values to variables
Bind to objects instead of variables
Manipulate text input values dynamically
Create dynamic select binds
Work with dynamic select controls such as radio buttons
Group multiple inputs such as radio buttons
Bind DOM elements to local variables
Bind Svelte components to local variables
You will also learn about how Svelte compiler wires up everything together.
If you want to follow along create a basic Svelte app using Snowpack CSA.
Binding input values
Most of the bind examples have to do with Svelte forms. Why don't we start there with simple text input bindings that binds to a local variable?
This makes our code a bit cleaner. One important thing to know is that Svelte is smart enough to coerce the type for us. It the example above it will parse the year as type number.
Manipulating text input values
We can easily manipulate text dependant text fields with Svelte's reactive statements. Let's calculate the slug from our company name.
First, install Slugify by running npm add -D slugify.
Every time the value of values.company changes we will dynamically calculate the slug field. Try it using a company name with multiple words, like "Ali Baba Inc."
This is a prime example of Svelte's reactivity. Accomplishing a lot with very little code!
Unfortunately, this is a one-way binding. Nothing stops you from changing the slug to regular text later on. It's doable, but involves a little more code. I will save it for a future article.
Checkbox bindings
Checkbox bindings are straight forward. Add this code to our form.
<label> <inputtype="checkbox"bind:checked={values.agree} /> I agree to sell my personal information to evil corporations </label>
If you set the initial value to true in our values.agree property, the checkbox will be checked when the form is rendered.
Select bindings
This is where things get interesting. If you a building forms they will most likely involve dropdown lists.
In Svelte you can bind to pure values or to objects. The simplest way is to bind to a list of static values.
Last thing I want to talk about is how to bind Svelte components to local variables. Or more precisely, how to bind child component properties to local variables.
What Svelte compiler does behind the scenes is that it attaches correct event handlers to our inputs. That's all there is to it.
If you look at the amount event handler you will also notice that it knows it has type of number and Svelte compiler converts it for us. How kind of it!
Summary
That's all there is to it! Svelte bindings works just like you expect them too, or want them to. With very little code we can build pretty sophisticated forms in Svelte.
Form handling is hard in any framework and I will explore this topic more in-depth in the near future. Stay tuned and subscribe on the main page when I publish a new article!
]]>5 essential job application tips from a CTOAfter seeing a little too many poor job applications recently I feel that I need to put my CTO hat on.2020-06-07T00:00:00Zhttps://codechips.me/5-essential-job-application-tips/After seeing a little too many poor job applications recently I feel that I need to put my CTO hat on. Learn how you can increase your chances by 500% of getting the interview by following few simple tips.
This type of text is actually much easier for me to write than a tech article, because I don't need to do any research. I know this stuff by heart. I see it almost daily. And what I see makes me frustrated.
I've been on both sides of the table. I have interviewed lots of developers. I know what works and what doesn't and I am here to teach you.
It's not as hard to get the interview as you think.
It's not about you, it's about them
Replace all I's with You's in your application letter. Seriously. Try to write an email without a single I in it.
Companies don't care what you know or where you worked. They have problems to solve, and the only thing that matters is how you can help them.
Once I received an application where I counted 13 I's and not a single You. The person had the tech skills, but she didn't put them in context. I wrote back short feedback email where I explained the problem, because I am nice, but most often this kind of email goes straight to trash in other companies.
Also, please never send mass emails. They are so see-through. Never write "your company" in an email. Always use a company name and also include the name of a person you are writing to. People love hearing their own names.
Do your research. Learn the company and it's products and tell them why you think their company is cool, how you can help and why you would love to join the journey.
People are busy. They have problems to solve. How can you help them?
Always include a photo
A very low hanging fruit here. People often want to see the face behind the words.
No mugshots. No fake smiles. No professional shots.
Just a simple photo of you where you smile and look friendly. You don't even have to look into the camera.
Find a pic of you were you look happy and where you look like you are enjoying life. It can even be from a party, but you shouldn't look drunk of course.
Always include a photo of you. Period.
Forget tech skills, it's all about learning skills
Many developers are worried that they are not skilled enough to apply for a specific job. I used to be one of them.
If you are still green it's a valid concern, but here is the thing.
The technology wheel is spinning so fast today that your skills quickly become outdated.
The only thing that matters is how fast you can learn new stuff. You have to prove that you are a fast learner. That you can learn news things quickly.
When a company hires you, they hire you mostly for your talent and your ability to learn. Company invests in you and people don't expect you to be productive from day one.
At first the company loses money on you. They pay more than they get. After some time they expect you to become productive. They expect to get a return on their investment plus some more, so to say.
When I say more, I mean they expect you to learn new skills and also their tech stack. It's a win/win situation.
How to prove people that you are a fast learner is a topic on it's own, but if I could give one tip it would be this.
Start your own blog and include a link to it on your resume.
What are you hobbies?
This is often a neglected part of the resume and unfortunately the most underappreciated too.
What makes you unique? What makes you stand out from the rest?
Here are a few of my hobbies for example.
BJJ. Rolling around with sweaty people dressed in pyjamas is my thing.
Summer Carpenter. I prefer active vacations with good hardware.
Hunting. Not so much for the shooting part, as for spending time in nature.
Now, did that catch your interest? Wouldn't you like to know more?
This is the thing. You want to get people interested in you, get them curious. You want to make them say "I want to meet this person!"
And here is the best part. It doesn't even have to be work related.
What makes you you?
Bypass the gate keepers
This might be the most important tip of all. You have to bypass the job boards, application emails, recruiters and try to find your way into the company. Find the right people to email or call.
If you send your application the "recommended" way it will end up with the rest of the applications. You will be just one of many.
Even if you got the skills, people who will have to go through all applications will probably not give much attention to yours. Especially if the job offering is a popular one where you compete with hundreds of people.
You get the point, right?
You want to stand out. You need to find your way in. Do your research, find the people that you think are good contact points. Ask around with people you know. There is always someone that knows someone.
If the company is using external recruiters you will also save company money by bypassing the process. Always go straight to the source.
For example, when someone emails me directly, I often feel obliged to reply or to forward the email to the right people.
Find your way in.
In Summary
Of course there is a lot more to it than the tips above. Things like email copy, phone calls, resume format and pitch, your online presence, etc.
Remember, people often read between the lines.
But, if you do any of the things above, I guarantee that you will increase your chances of getting the interview.
In the end, it's all about psychology, timing, right message, right tone and a little luck.
Maybe I will write a book on the subject one day.
]]>Svelte form validation with YupLearn what Yup is, why it's awesome and how to use it with Svelte2020-06-10T00:00:00Zhttps://codechips.me/svelte-form-validation-with-yup/Form validation is hard. That's why there are so many different form handling libraries for the popular web frameworks. It's usually not something that is built-it, because everyone has a different need and there is no one-fit-all solution.
Svelte is no exception. There are a few form handling frameworks in the market, but most of them look abandoned. However, there is one specific library that comes to mind that is being actively maintained - svelte-forms-lib. It's pretty good and I've used it myself. Check it out!
I work a lot with forms and nowadays I don't use any library. Instead, I've developed a set of abstractions on top of Svelte that work well for me and my needs.
Today I am going to teach you how to do a simple form validation using the awesome Yup library, because it's a pure Joi to use. Pun intended.
We will build a simple registration form where we will validate user's name and email, if passwords match and also check if the username is available.
Onward.
What is Yup?
Yup is a library that validates your objects using a validation schema that you provide. You validate the shapes of your objects and their values. Let me illustrate with an example.
Bootstrap the project
If you want to follow along here is how you can quickly create a new Svelte app.
# scaffold a new Svelte app first
$ npx create-snowpack-app svelte-yup-form-validation --template @snowpack/app-template-svelte

# add yup as a dependency
$ npm add -D yup
Define the schema
We will be validating fields in the registration form which consists of the following fields:
name
email
username
password
password confirm
To start off gently we will only validate that field values are not empty. We will also validate that email address has correct format.
Create an new file in src directory called schema.js.
As you can see we defined a schema to validate an object's shape. The properties of the object match the names of the fields and it's not hard to read the validation schema thanks to Yup's expressive DSL. It should pretty much be self-explanatory.
There are a lot of different validators available in Yup that you can mix and match to create very advanced and extremely expressive validation rules.
Yup itself is heavily inspired by Joi and if you ever used Hapi.js you probably used Joi too.
Validating an object
Let's do the actual validation of an object by using our schema. Replace App.svelte with the following code.
<script> import { regSchema } from'./schema';
let values = { name: 'Ilia', email: 'ilia@example', // wrong email format username: 'ilia', password: 'qwerty' };
const result = regSchema.validate(values); </script>
The validate method returns a promise and we can use Svelte's await to render it on the page.
When you start the app you will the following validation error exception.
{ "name":"ValidationError", "value":{ "name":"Ilia", "email":"ilia@example", "username":"ilia", "password":"qwerty" }, "path":"passwordConfirm", "type":"required", "errors":[ "passwordConfirm is a required field" ], "inner":[], "message":"passwordConfirm is a required field", "params":{ "path":"passwordConfirm" } }
Although we provided a wrong email address our schema doesn't catch that and only tells us that we didn't provide the required passwordConfirm property.
How come? It's because Yup has a default setting abortEarly set to true, which means it will abort on the first error and required validator comes before the email format validation.
Try providing the passwordConfirm property and you will see that now Yup will give back "email must be a valid email" error.
If we want to validate the whole object we can pass a config to the validate call.
const result = regSchema.validate(values, { abortEarly: false });
I recommend that you play around by passing in different values to get a feel for what errors are returns before continuing.
Building a registration form
Next, we need to build a simple registration form. Replace App.svelte with the following code.
Nothing fancy yet. We can fill out the form and submit it. Next, we will add validation and then gradually improve it.
Validating the form
Now we will try to add our Yup validation schema in the mix. The one we created in the beginning. We can do that in our submitHandler so that when the user clicks the form we will first validate the values before submitting the form.
The only thing we need to do is to change our submitHandler to this.
It might look like a pretty advanced function, but what it basically does is to loop over the Yup's validation error.inner array and return a new object consisting of fields and their error messages.
We can now add it to our validation chain. Like this.
If add that code and try to submit the form you will see the validation errors. It doesn't look pretty, but it works!
Adding password validation
We now need to check if the passwords match and therefore we need to go back to our validation schema.
As I wrote in the beginning you can do some advanced validation gymnastics in Yup. To compare if our two passwords match we will use Yup's oneOf validator.
Now if the passwords don't match Yup will show us the error "Passwords do not match".
Checking the username availability
Not many people know this, but you can also do custom validation in Yup by using the test method. We will now simulate a call to the server to check if the username is available.
import * as yup from'yup';
// simulate a network or database call constcheckUsername = username => newPromise(resolve => { const takenUsernames = ['jane', 'john', 'elon', 'foo']; const available = !takenUsernames.includes(username); // if we return `true` then validation has passed setTimeout(() =>resolve(available), 500); });
The test function needs to return a boolean. If false is returned then the validation will not pass and error will be displayed.
Notice that we introduced 500ms timeout to username check and since we validate the whole form it will take 500ms for our form to validate itself. The slowest wins.
The case would be different if we validated individual fields instead.
Providing custom error messages
The message "passwordConfirm is a required field" is not very user friendly. You can provide your own error messages to Yup.
import * as yup from'yup';
// simulate a network or database call constcheckUsername = username => newPromise(resolve => { const takenUsernames = ['jane', 'john', 'elon', 'foo']; const available = !takenUsernames.includes(username); // if we return `true` then validation has passed setTimeout(() =>resolve(available), 500); });
const regSchema = yup.object().shape({ name: yup.string().required('Please enter your name'), email: yup .string() .required('Please provide your email') .email("Email doesn't look right"), username: yup .string() .required('Username is a manadatory field') .test('usernameTaken', 'Please choose another username', checkUsername), password: yup.string().required('Password is required'), passwordConfirm: yup .string() .required('Please confirm your password') .oneOf([yup.ref('password'), null], 'Passwords do not match') });
export { regSchema };
Ah! Much better!
Prefer async?
If you fancy async/await over promise chains this is how you can rewrite the submitHandler.
This was a very basic example of how you can do custom form validation in Svelte with the help of external and specialized validation library - Yup. Hope that you got the idea.
Form validation is a big area to explore and everything would not fit into a single article. I've not included onfocus and onblur field validations for example. Not error CSS classes and nested forms either.
If you liked the article you will love my book - Svelte Forms: From WTF to FTW!. By reading it you will learn everything about working with forms in Svelte effectively, while learning deeper Svelte concepts at the same time.
]]>Smooth local Firebase development setup with Firebase emulator and SnowpackTurns out it's not that simple to get local Firebase emulators up and running. I went through the process and documented it on the way.2020-06-18T00:00:00Zhttps://codechips.me/local-development-with-firebase-emulator-and-snowpack/Setting up Firebase for local development is not too hard, but it's pretty tedious to connect everything together. I had to go through this for one of my side projects and documented the steps on the way. Read on to find out how to start local Firebase firestore and functions emulator together with Snowpack with just one command.
Why Firebase?
If you are thinking of doing a small POC or if you are on a tight budget it's hard to beat Firebase. You get everything you need out of the box. Storage, database, serverless functions, hosting, messaging plus a ton other stuff. And the best thing is that it won't break your bank.
Plus, you get a generous free quota and also the full power of Google Cloud Platform in case you need it.
Creating Snowpack project boilerplate
I am using Snowpack with Svelte as examples, but the concepts of this setup can be applied to any web framework or bundler.
You should now see our app's start page in the browser with the local dev server running on port 8080.
Installing Firebase
Next step we need to do is add Firebase to the mix.
Note: before continuing make sure you have a functioning local Java runtime environment since the Firebase emulators are built on top of Java.
To get a required firebase CLI command we need to install firebase-tools. The easiest way is to install it globally with npm.
$ npm i -g firebase-tools
There are other methods of installing Firebase CLI, here is more information.
Now we need to add Firebase to our project. For that we need to do two things.
Login to Firebase
Before we can use Firebase CLI we need to login to Firebase console. We can do that from the command line.
$ firebase login
Firebase will open a webpage for us in the browser where you can authenticate yourself.
Initializing Firebase
Before continuing we need to create a new Firebase project in the Firebase console, if you don't already have an existing one. There is also an option to create a new project straight from the Firebase CLI, but I found it a little glitchy. That's why I recommend to do it in the Firebase console instead.
Did you do it? Nice! We are now ready to add Firebase integration to our project.
$ firebase init
You will be presented with a few options.
Select Firestore and Emulators options by pressing Space key. Press Enter when done.
Next select Use existing project option and select our new Firebase project we created earlier in the Firebase console.
Accept the defaults for the rest of the options. Just say "Yes" to everything. We can always change it later.
If everything went smoothly, you will end up with the following new files in out directory.
The most important file is firebase.json. It's a main config file which tells Firebase where to find stuff, what is enabled in the project and what local ports emulators should use.
From the file above we can see that we will have two local emulators running - functions and Firestore. The Firestore emulator's port is a little problematic as it listens on the same port as Snowpack (8080).
Note: If you want to see what default ports are used for Firebase emulators see this page.
Let's add the Firebase start script to our package.json so that we can start the Firebase emulators with npm CLI.
Add this row to the scripts part in the package.json.
"start:firebase": "firebase emulators:start"
Now we can start Firebase emulators with npm run start:firebase command. Neat!
Firebase Emulator UI
The output also tells that we have an emulator UI running on http://localhost:4000.
If you visit that page you will see this page.
Each emulator has its own status card and the only active is the Firebase emulator which is running on port 8080.
If you would like to know more about how Firebase emulator can be setup and used here is a link to the official documentation.
Adding Firebase functions
We could have added Firebase functions support from the start, but I didn't do it on purpose just so I could show how you can add it later.
If you look at the terminal screenshot above, you saw that Firebase emulator complained that it couldn't find any functions.
Let's fix it.
$ firebase init functions
Choose Typescript and say no to the tslint part. We don't need it, because Typescript compiler will catch most of the errors for us. Plus tslint has been deprecated anyway.
Note: Firebase functions aka Google Cloud Functions support only Node.js v10. Well, Node.js v8 too, but my guess is that you don't want to use it. A more resent LTS Node version should work fine for local development, but that's something to keep in mind if you get any weird behaviour when deploying to live environment later.
As you can see Firebase initialized our Firebase functions project in the new functions directory. It's actually a separate subproject with it's own package.json and all.
If you look at our firebase.json file, you will see the new section in it.
{ "functions":{ "predeploy":"npm --prefix \"$RESOURCE_DIR\" run build" } }
What is this you may ask and what is the $RESOURCE_DIRenvironment variable? That's actually a Firebase functions predeploy hook and that variable is just an alias for word functions, or more precise, it defaults to the functions word and allows you to change the default location and name of your Firebase functions directory.
We might as well have written this.
{ "functions":{ "predeploy":"npm --prefix functions run build" } }
The predeploy hook's job is to build your functions the last time before deploying them to live environment.
Unfortunately it does not fire in the dev environment when we use our emulators. Let's try to start the Firebase emulator again.
That's because we haven't built our functions yet. The emulator expect to find the transpiled Javascript code in the functions/lib directory and right now it's empty. We need to build our functions by executing the same command as in the predeploy hook - npm --prefix functions run build, but before you do please edit the functions/src/index.ts and uncomment the function body.
If you start the emulator now and go to the Firebase Emulator UI you will see that our functions emulator is now running too. If you click on the logs button you will see the function url.
If you visit the function URL you will get back a friendly "Hello from Firebase!" greeting back.
Automatic Firebase functions recompilation
Nice! But not quite. We still have a small problem. Every time we change the function code we need to rebuild it. Lucky us that Typescript compiler has a --watch option!
To take advantage of it we can add the following row to our functions/package.json scripts section.
"watch": "tsc --watch"
We can now run npm start watch in our functions project and Typescript will watch for file changes and recompile them every time they change.
Note: you can also run the command from our main project with npm run watch --prefix functions.
Making everything run smoothly
Alright, we can now run our main app, start the Firebase emulator and do automatic Firebase function recompilation. That alone requires three different terminals. It's there a better way?
Good news! There is. You see, there is a small NPM package called npm-run-all that will solve all our problems.
It's like a Swiss Army knife. One of the tools it has it the ability to run multiple npm scripts in parallel with its run-p command. That's exactly what we need to start our Snowpack app, Firebase emulator and Typescript compiler at once.
No time to waste. Let's get straight to it.
First, add the package as a dependency to our project npm add -D npm-run-all. Next, we need to remix our scripts section in package.json a bit.
{ "scripts":{ "start":"run-p dev start:*", "build":"snowpack build", "test":"jest", "dev":"snowpack dev", "start:firebase":"firebase emulators:start", "start:functions":"npm run watch --prefix functions" } }
You can see that we replaced the start property with the magic run-p dev start:* command.
What it does is to execute all script passed as arguments in parallel. The star after the start: is a pretty neat way to tell that all scripts prefixed with start: should be run. Think of it as a glob function.
However, there is still a small problem with our setup. Both Snowpack and Firestore emulator use port 8080. We need to change one of them to use a different port.
Let's change Snowpack's. We will run Snowpack on port 8000 instead. Open snowpack.config.json and add a new devOptions section.
// Naive implementation of Firebase init. // For education purposes. Never store your config in source control! const config = { apiKey: 'your-firebase-key', projectId: 'testing-firebase-emulators' };
firebase.initializeApp(config);
const db = (): firebase.firestore.Firestore => { if (firestore === null) { firestore = firebase.firestore(); // Snowpack's env variables. Does now work in Svelte files if (import.meta.env.MODE === 'development') { // firebase.firestore.setLogLevel('debug'); firestore.settings({ host: 'localhost:8080', ssl: false }); } } return firestore; };
if (import.meta.env.MODE === 'development') { // tell Firebase where to find the Firebase functions emulator functions.useFunctionsEmulator('http://localhost:5001'); } } return functions; };
export { db, funcs };
Boom! We now have a basic Firebase setup that we can use in our code.
Using local Firebase functions and Firestore your code
Let's use the new setup in our Svelte app. For the sake of examples to prove that everything works we will make a call to our helloWorld Firebase function and create a simple TODO list backed by local Firestore.
// Firestore collection reference let todoCollection = null;
// Firestore server timestamp function const timestamp = firebase.firestore.FieldValue.serverTimestamp;
onMount(async () => { // reference to our cloud function const helloFn = funcs().httpsCallable('helloWorld'); const response = awaithelloFn();
// assign result to message variable message = response.data.message;
// assign collection to a variable todoCollection = db().collection('todos');
// create a firestore listener that listens to collection changes const unsubscribe = todoCollection.orderBy('createdAt', 'desc').onSnapshot(ss => { let docs = []; // snapshot has only a forEach method ss.forEach(doc => { docs = [...docs, { id: doc.id, ...doc.data() }]; }); // replace todo variable with firebase snapshot changes todos = docs; });
// unsubscribe to Firestore collection listener when unmounting return unsubscribe; });
constsubmitHandler = async () => { if (!todo) return; // create new todo document await todoCollection.add({ action: todo, createdAt: timestamp() }); todo = ''; }; </script>
<h2>Functions Emulator</h2> <!-- result from the helloWorld Firebase function call --> <p>{message}</p>
<h2>Firestore Emulator</h2> <formon:submit|preventDefault={submitHandler}> <inputtype="text"bind:value={todo}placeholder="Add new todo" /> <buttontype="submit">add</button> </form>
{#if todos.length} <ul> {#each todos as todo (todo.id)} <li>{todo.action}</li> {/each} </ul> {:else} <p>No todos. Please add one.</p> {/if}
If you start the app now, you will get a CORS error from our Firebase HTTP function. That's expected because Firebase HTTP functions don't have CORS support built-in. We could add it to our cloud function, but there is a better way - Firebase Callable functions.
Fixing Firebase function error
The fix is easy. We just need to change the type of our Firebase cloud function to callable. Firebase will then call it differently and we don't have to worry about CORS at all.
Change the code of our helloWorld function to this.
The object is returned as response.data. That's pretty nice as we don't have to worry about the HTTP response/request at all. We just return a plain object and Firebase will take care of serialization for us.
What about Firebase auth?
As of time of writing Firebase Authentication is not yet supported in the Firebase emulator, but it's hopefully coming very soon.
But not to worry, you can effectively mock it in your tests if you need to. There are a few different ways you can do it, but it's a little too long to explain here. Maybe in another article.
Testing Firebase
I won't touch the subject of testing now, but 'firebase emulators:exec' is your friend here. With its help it possible to start the local Firebase emulators, run your tests, and then shut down the emulators.
Summary
We should now have a pretty nice setup where we can fire up all the emulators and code with just one command. Mission accomplished!
Firebase have really matured during the last couple of years and if you want to do a quick prototype or have to build an internal app with storage needs please take another look at Firebase.
Thanks for reading and I hope that you learned something new!
]]>Ace your first job interviewYou don't get a second chance to make a first impression. Make sure you nail it.2020-06-22T00:00:00Zhttps://codechips.me/ace-your-first-job-interview/You don't get a second chance to make a first impression. The person you meet makes a judgement of you in just a few seconds, if even that long. How can you make sure you nail it?
But as I sit down and write this I realize that there is no blueprint, no script. It's not something you can rehearse as every situation is different.
Same for the interviews. Every company has their own interview process, their own set of questions.
But one thing is always universal - you are invited to the interview because they believe you might be the right person for the job.
So congrats for making it this far! The battle is almost half won. You just have to convince the person across the table that you are the right one.
I've been in quite many interviews in my career myself, but now I mostly sit on the other side of the table interviewing developers.
What follows are some tips on top of my head. Things that I noticed people do wrong or could do better at. Maybe "patterns" is a better word than tips.
Note: I am not talking about technical interviews or screening calls, but "soft" interviews. Technical interviews are different, but many tips below will apply to them as well.
Start with a hello and a smile
Remember I said that first impression lasts? This is the moment. The critical part. This is the moment that sets the tone for the whole interview. The moment the person across the table decides if she likes you or not. It's the first time they meet you.
Don't screw this up.
This is also the simplest part of the interview. Just say "Hello! I am [name]. Nice to meet you!" with a genuine smile. That's it!
Appear self-confident
You have to appear self-confident and not nervous. People can sense that. It's normal to get nervous, especially if you haven't been to many interviews before.
My advice would be not to try and paint a picture of this in your head before hand. Try to go into the interview with a blank state of mind.
Imagining that you are meeting your friend's parents for the first time or your friend's friend might help as well.
If it's a physical interview (not a video call), PLEASE do a firm handshake. Nobody likes to hold a dead fish in their hand.
Do your research
Before going on the interview, find as much information about the company as you can, so you can ask the right questions. Companies love candidates that come prepared and ask smart questions.
Search around on the Internet, on the company's website, LinkedIn, Twitter and write down a set questions. Search for news, announcements, tech blogs. Do some research on the space the company is in.
Write down all your questions, but don't bring them to the interview of course. The writing part is just for your mind to process and internalize them.
Tell me about yourself
Most of the interviews starts with this question. It's a tough one.
Make sure you can give a short sales pitch about yourself. It should be no more than five sentences and provide a clear picture of what you are about. A summary, if you please.
Try writing one down and then ask a friend for feedback by reading it out loud to them. When satisfied with results, try to memorize it.
Listen actively
The best interview is a dialog. Try to listen actively and ask follow-up questions. Always save a few questions to the "Do you have any more questions?" part at the end of the interview.
Know your strengths and weaknesses
I cannot stress this highly enough. Questions such as:
Name a few of you strengths and weaknesses
What do you consider yourself good at
Why should we hire you?
You will get them sooner or later. I've met way too many people that stumble on this one.
My best tip is to do a Myers-Briggs personality test. Seriously. There are plenty of free ones on the Internet. They will tell you in great detail about your strengths and weaknesses.
Use the results and try to weave them into your story.
Do not hesitate to answer straight away
When asked a question, start answering before you know the answer. The best thing to do that is to paraphrase the question. It will give you some extra time to figure the answer on the way.
Why? You will appear more self-confident and avoid the sometimes awkward silence.
What it important to you in a job? What do you value?
This is the question I always ask. Free lunches and beer pong is not the right answer.
Know what's important to you and what you value.
Be honest
Never lie about your skills. Honesty lasts a long way. If there is some technology you haven't worked with before try to find an angle. Maybe you have worked with similar technology before. The principles are, after all, universal.
Often it pays off to be honest, because you appear vulnerable. You admit that you don't know things, and that's OK. Remember that I told that people often are not looking for skills, but for fast learners? If you convinced the people across the table that you are one, saying no should not be a problem.
Create a timeline of your professional career
Most of the people will use you resume as a base for the interview. One question I like to ask is to draw a timeline of your professional carrier. Workplaces you have been to and what you have done there.
This is not a bragging contest. Keep it short and to the point. If you accomplished something special, sure, tell that.
People like statistics. If you have any interesting numbers to share feel free to do so.
If you don't have any professional experience yet, try to prove that you are a fast learner. Maybe you have done some school projects or some gigs on the side. Try to weave in time constraint factors here.
Show how you helped other companies succeed
People often want to know how you helped other companies. Don't talk so much about yourself. Concentrate on your work projects and tell interesting details about them.
Never complain or say bad things about your previous or current employers or bosses. You don't want to be that person. Trust me on this one.
Ask smart questions
Always save a few questions till the end. Try to make mental notes during the interview and come back to them later.
Never ask direct questions about bicycle parking possibilities and similar. If it's important to you, try to do it indirectly.
Sell yourself
If you are meeting with other developers or a team lead you have to make them feel that you will be a valuable addition to the team.
There are countless times where I've heard: He is a little junior, but we think he's got potential!
You want them to say "I really liked the candidate" after the interview.
If they are not sure, they are sure. Make them sure.
Black Hat tip
If you want to speed up the whole process and create a sense of urgency, tell the interviewer that you are currently involved in another recruitment process too.
Just don't tell them I told you!
Recap
Interviews are hard. There is not right or wrong. It's a lot about personal chemistry and psychology.
Interviews are all about finding the right candidate with right skills and culture fit, as they are for you to find the place where you can grow.
Remember, companies are looking for help just as much as you are looking for a job.
Don't get discouraged if you don't pass the interview. Maybe it wasn't the place for you anyway.
Mistakes are your best teacher.
Reflect, adjust, move on.
]]>Building a notification center with Svelte storesYou have seen them everywhere. That little bell icon in the upper right corner with unread messages count. Learn how to build one with Svelte stores and Tailwind CSS.2020-06-30T00:00:00Zhttps://codechips.me/building-notification-center-with-svelte-stores/You have seen them everywhere. That little bell icon in the upper right corner with unread messages count. Learn to build one with the help of Svelte stores and Tailwind CSS.
The Setup
We will use Snowpack and pnpm to create out project, because I find them pretty nice to work with, but you can of course use any bundler and package manager you want.
When prototyping an idea I like to work outside in. It helps me to identify the needed data and then write my logic on the shape and flows defined by that data.
<!-- this button will be used for closing the popup later --> <button tabindex="-1" class="fixed inset-0 w-full h-full cursor-default focus:outline-none" />
<!-- this button will be used for closing the popup later --> <button tabindex="-1" class="fixed inset-0 w-full h-full cursor-default focus:outline-none" />
<!-- show only if true --> {#if show} <!-- clicking anywhere on the page will close the popup --> <button tabindex="-1" class="fixed inset-0 w-full h-full cursor-default focus:outline-none" on:click|preventDefault={() => (show = false)} />
We added a show variable and two event handlers to our buttons that will toggle the visibility state.
If you now click on the bell button the messages should popup on the screen and toggle every time you click on the bell button.
When the message popup is visible you can also click anywhere on screen to close it. That's the trick with the invisible fullscreen button.
We now have everything in place to start building the actual notification center logic.
Svelte state management
When people talk about State management in Svelte they often talk about Svelte stores. There are three store types in Svelte.
Readable - not possible to assign values
Writable - possible to assign values
Derived - sub-store derived from other stores
The whole topic on stores is quite big, but the concept itself is quite simple. You can maybe compare them to React's state, but I don't think it would be quite accurate.
I like to view Svelte's stores as global reactive variables.
Below is Svelte's implementation of writable store. As you can see it's written in Typescript and returns an object with three methods: set, update and subscribe.
When you subscribe to a store in your Svelte component, your callback function is added to the list of subscribers. When you set or update a value, it will loop through the list of subscribers and notify each one of them.
functionset(new_value: T): void { if (safe_not_equal(value, new_value)) { value = new_value; if (stop) { // store is ready const run_queue = !subscriber_queue.length; for (let i = 0; i < subscribers.length; i += 1) { const s = subscribers[i]; s[1](); subscriber_queue.push(s, value); } if (run_queue) { for (let i = 0; i < subscriber_queue.length; i += 2) { subscriber_queue[i][0](subscriber_queue[i + 1]); } subscriber_queue.length = 0; } } } }
return() => { const index = subscribers.indexOf(subscriber); if (index !== -1) { subscribers.splice(index, 1); } if (subscribers.length === 0) { stop(); stop = null; } }; }
return { set, update, subscribe }; }
There are, of course, some other internal mechanisms, but the rough idea of managing, updating and notifying subscribers should be straight forward.
Creating the notification store
Now that we know how what Svelte store is and how it works, let's use one to build our notification store.
We will create a custom store, built on top of Svelte's writable store. That is because we need to expose a few custom methods on it and also hide the direct access to writable's set and update methods.
Let's also write it in Typescript just for the sake of it. I like writing my non-Svelte components in Typescript as it gives me nice autocomplete in the editor and also some type safety.
If you want to learn more how to use Typescript together with Svelte I wrote an extensive tutorial on the subject - How to use Typescript with Svelte.
Before we start writing code we need to think what methods our store needs. Here are some that come to mind.
init - we want to populate the store with a list of messages on app start
add - we want to be able to add a new message to the store
dismiss - we want to mark a message as read
clear - we want to clear all messages
Now that we have a rough plan let's implement our store. We will use plain strings as messages to keep it simple.
Create an new file called notifications.ts in the src directory and add the following code.
import { writable } from'svelte/store';
// constructor function constcreateStore = () => { // initialize internal writable store with empty list const { subscribe, set, update } = writable<string[]>([]);
// mark message as read by removing it from the list constdismiss = (message: string) => update(messages => messages.filter(mess => mess !== message));
// add new message to the top of the list constadd = (message: string) => update(messages => [message, ...messages]);
return { subscribe, add, init: set, // alias set method to init dismiss, clear: () =>set([]) }; };
// initialize the store const center = createStore();
export { center };
We now have a notification store with five methods. Do you see what we did here? We've hidden the internal writable store inside our own custom store.
The only thing Svelte cares about is that you return an object with a subscribe function, because that function is required for auto-subscriptions to work.
This leads us straight into the next section where we will leverage the feature in our own code.
Using the notification store
You can remove a lot of boilerplate code by prefixing your store variable name with a dollar sign. The compiler will then generate the subscription code for you on the fly. I personally love this feature.
Here is the code needed to wire up our store in the Messages.svelte component with explaining comments in the right places.
<!-- Messsages.svelte --> <!-- style tag is omitted -->
<script> // import the custom store import { center } from'./notifications';
<!-- show number of messages or hide if zero --> {#if $center.length} <spanclass="badge">{$center.length}</span> {/if}
</button>
<!-- show only if there are messages --> {#if show && $center.length} <!-- clicking anywhere on the page will close the popup --> <button tabindex="-1" class="fixed inset-0 w-full h-full cursor-default focus:outline-none" on:click|preventDefault={() => (show = false)} />
If you view the app you should not see any badge and when you click the bell button no popup will not be shown, because we haven't added any messages yet.
Svelte's autosubscriptions under the hood
How does Svelte's autosubscription work? If peek under the hood and look at the generated code we will see this.
functioninstance($$self, $$props, $$invalidate) { let $center; validate_store(center, "center"); component_subscribe($$self, center, $$value => $$invalidate(1, $center = $$value)); // ... }
Svelte compiler searches for all variables prefixed with a dollar sign, validates that it's a store by checking for subscribe method and then subscribes to it.
You will also find that Svelte compiler creates custom code blocks where we refer to $center in the code such as if statements and each loops.
Adding new messages
Alright, we have the functionality in place. Let's test-drive our store by adding some messages on app start.
// seed out notification store on component mount onMount(() => { center.init([ 'Suspicious login on your server less then a minute ago', 'Successful login attempt by @johndoe', 'Successful login attempt by @amy', 'Suspicious login on your server 7 min', 'Suspicious login on your server 11 min ago', 'Successful login attempt by @horace', 'Suspicious login on your server 14 min ago', 'Successful login attempt by @jack' ]); }); </script>
Now you can see the message count and our messages in the popup. We can also dismiss individual messages and clear them all.
We had to create custom handlers for our actions with guards in them in order to prevent the UI from ending up in the weird state.
But what about if we have many messages to show? Our popup list will be very long in that case.
It's possible to limit the number of messages by using another reactive feature of Svelte - computed variables.
Limiting the number of displayed messages
<!-- Messages.svelte --> <script> // import our custom store import { center } from'./notifications';
// ...
// limit the number of displayed messages to 5 exportlet count = 5;
// create a list of messages to display $: messages = $center.slice(0, count); </script>
Change the variable reference in the each loop to messages instead of $center
{#each messages as message} ... {/each}
This way we will always display five latest messages, plus we can override the number of displayed messages if we want to by passing a count variable to Messages component like this <Messages count="3" />.
Pretty neat, right?
Adding new messages
Just for the sake of it let's add a form that allows us to enter a new message.
Create a new AddMessage.svelte file in the src directory with the following code.
<script> // Main stylesheet. Snowpack will inject it in the head tag import'./main.css'; importMessagesfrom'./Messages.svelte'; import { onMount } from'svelte'; import { center } from'./notifications'; importAddMessagefrom'./AddMessage.svelte';
// seed out notification store on component mount onMount(() => { center.init([ 'Suspicious login on your server less then a minute ago', 'Successful login attempt by @johndoe', 'Successful login attempt by @amy', 'Suspicious login on your server 7 min', 'Suspicious login on your server 11 min ago', 'Successful login attempt by @horace', 'Suspicious login on your server 14 min ago', 'Successful login attempt by @jack' ]); }); </script>
Thank you for reading and hope you found this useful!
]]>How to build a Todo app with RxJS, Svelte and FirebaseLet's continue playing with Firebase by building a Todo app with Svelte and RxJS.2020-07-12T00:00:00Zhttps://codechips.me/how-to-build-todo-app-with-svelte-rxjs-firebase/In my previous article on local Firebase setup I created a simple Todo app as an example. Today, I plan to take it further and create a full blown Todo app.
Also, we will use RxJS, and its Firebase bindings - RxFire, to showcase how you can use RxJS together with Firebase's Firestore and why it's such an awesome combination.
What you will learn:
How to use RxJS with Firebase Firestore
How to use RxJS with Svelte
How to use RxJS with Typescript
How to keep business logic outside Svelte
The power of Svelte's computed variables
As a base for business logic and UX we will take the classic TodoMVC app as example. To get a feel for what we will build take a look at Firebase + AngularJS example.
Here is the final final result of what we will build.
We won't build it exactly according to the TodoMVC spec, but rather use it as an inspiration. We will however reuse its stylesheets and HTML layout. Why reinvent the wheel, right?
That's the base. You see that we have a startWith operator. It's required for Svelte's each template directive to work. We provide it with an initial empty list on start. The empty list will be replaced by the actual Firebase data right after.
Adding new item
Next step is to create a function to add new item to the list.
// todos.ts
exportconstcreateTodo = async (action: string) => { // guard function to check if todo is not empty if (!action) return; await todoCollection.add({ action, completed: false, createdAt: timestamp() }); };
We now have all the business logic in place to create at new todo item. Let's put it to use.
Open Header.svelte and replace it with the following code.
<headerclass="header"> <h1>todos</h1> <formon:submit|preventDefault={createHandler}> <input class="new-todo" type="text" bind:value={action} bind:this={ref} placeholder="What needs to be done?" /> </form> </header>
Nothing complicated. We bind the input's value to the action variable and when the form is submitted we call our createTodo function and reset the action variable.
According to the TodoMVC specification the input field must have focus when the app is loaded. We achieved that by using Svelte's onMount lifecycle event.
One trick I like to use when developing is to JSON stringify output on page. I know, poor man's debuging, but it's nice to see data visually when developing.
<!-- App.svelte -->
<script> // ... import { todos } from'./todos'; </script>
Add this line at the end of the file
<pre>{JSON.stringify($todos, null, 2)}</pre>
It should now be possible to create new todo items and see them serialized as JSON on the page.
When we add a new item to Firebase collection, RxFire notices it and refreshes the list for us.
You might have noticed that we prefixed our todos RxFire observable with a dollar sign - $todos. The reason it works is that RxJS observables have a subscribe method on them and Svelte treats them as plain readable Svelte stores.
Extracting the item component
Now we need to extract the individual item component. Create a Todo.svelte in the src directory with the following code.
<!-- Todo.svelte -->
<script> exportlet todo; $: completed = todo && todo.completed; </script>
You can see that we will pass a todo item to the component and we also created a computed property called completed that we use in CSS logic - class:completed. It might look weird, but that's a Svelte shortcut for working with CSS classes.
The reason we extracted component together with an li HTML element is that we need to be able to set CSS classes on it.
We now need to adjust our App.svelte component, by introducing an each loop. Also, according to TodoMVC spec, the main section should be hidden when there are no todo items.
// import Todo component importTodofrom'./Todo.svelte';
import { todos } from'./todos'; </script>
<sectionclass="todoapp"> <Header />
<!-- display only if there are todo items --> {#if $todos.length} <sectionclass="main"> <inputid="toggle-all"class="toggle-all"type="checkbox" /> <labelfor="toggle-all">Mark all as complete</label> <ulclass="todo-list"> <!-- iterate over todos stream --> {#each $todos as todo (todo.id)} <Todo{todo} /> {/each} </ul> </section> {/if}
<Footer /> </section>
<pre>{JSON.stringify($todos, null, 2)}</pre>
Cool! We can now see todo items when we add them.
Toggling an item
Let's implement the toggling of the individual item.
For that we need to add a toggle function to our todos.ts.
The UI part, not so much. The spec says when you double click an item it should toggle the editing mode on and focus the input field. We should also revert the changes if the user clicks outside the form or hits the Escape key.
Double clicking is not a problem, Svelte has on:dblclick event handler, nor are the other requirements that can be satisfied with on:blur and on:keyup events.
What took the most time was to figure out how to focus the input field. For that we need a reference to the input element and keep track if the component is in "editing" mode. Only then we should focus the input element.
I tried to use Svelte's action directive, but failed, so I ended up using Svelte's afterUpdate lifecycle event.
Sounds complicated, let's put words into code. This is our updated Todo.svelte component. I've added explaining comments in the right places.
exportlet todo = null; // keep action in own variable. needed for reverting editing changes let action = todo.action; // editing state let editing = false; // reference to the input field let ref = null;
constupdateHandler = async () => { awaitupdateTodo(todo.id, action); // turn off editing state editing = false; };
consteditHandler = () => { // turn on editing state editing = true; // copy todo item's action action = todo.action; };
// handler for blur and keyup events constdoneEditing = event => { // if match, turn off editing state if (event.type === 'blur' || event.key === 'Escape') editing = false; };
afterUpdate(() => { // focus input field if component is in edit mode if (editing) { ref.focus(); } }); $: completed = todo.completed; </script>
This was the hardest part to implement and I am not sure I've done it in the most efficient way possible, because we re-focus the input field on every keypress when component is in edit mode. But hey, it works!
Implementing filtering
This is the fun part of the app and the part where RxJS really shines.
First, we need to create a filter observable. Its job will be to keep track of the current view.
RxJS BehaviourSubject is perfect for the job. We can initialize it with a default value and it will always return its latest state to us.
// todos.ts
import { BehaviorSubject } from'rxjs';
// default value is 'all' todos const todoFilter = newBehaviorSubject('all');
// Export the Subject's next function as setFilter exportconst setFilter = todoFilter.next.bind(todoFilter);
For the filter to be useful we need to create a few filter functions. We will keep them in a dictionary.
We need to be able to show completed, active and all todo items. For that we can create two RxJS sub-streams. Think of them as of Svelte's derived stores.
We can use the filter functions we defined earlier. Don't forget to import map operator from rxjs/operators.
// active todos stream exportconst activeTodos = todos.pipe( map(todos => todos.filter(filters.active)) );
Next, we will concentrate on our Svelte filter component. The TodoMVC spec dictates that filter footer should only be visible if there are any todo items and the "items left" indicator should respect singular and plural.
Here we will deviate from the TodoMVC spec a bit, because we are not using any routing library, so we will use good old radio buttons instead of links.
For the filtering and "items left" indicator we will use Svelte's computed properties as they are a perfect candidate for the job.
Enough talking. Here is the annotated code for the Footer.svelte component.
You should now be able to see the working remaining items indicator, but when we change filter options nothing is happening. This is expected as we need to create another RxJS stream for that.
Creating a filtered view
When the filter changes we need to filter our items on their completed status. We already have filter functions and a filter. Let's implement the actual stream.
For that we need to use a combineLatest observable. It's pretty straight forward. You give it a number of streams and it will emit them all to a function we specify when any of the supplied stream emits. Here is how it looks.
exportconst filteredTodos = combineLatest(todos, todoFilter).pipe( map(([todos, filter]) => { // filter todos on current filter, default to all if not found return todos.filter(filters[filter] || filters.all); }) );
Now, we need to use our new filteredTodo stream in our App.svelte. Import it form todos.ts first and replace $todos with the $filteredTodos stream.
<ulclass="todo-list"> <!-- iterate over filteredTodos stream --> {#each $filteredTodos as todo (todo.id)} <Todo{todo} /> {/each} </ul>
Voila! We have now implemented a filtered view! Change the filters and admire your work.
Clearing completed items
We are almost done. Only two features left to implement. One of them is clearing all completed items. No need to involve RxJS. Raw Firebase library will do.
// todos.ts
exportconstclearCompleted = async () => { // query reference to all completed todo items const completed = await todoCollection.where('completed', '==', true).get();
// loop over items and delete each one completed.forEach(async doc => { await todoCollection.doc(doc.id).delete(); }); };
And now we need to import the function in our Footer.svelte component and wire it to the "Clear completed" button.
Last thing we need to do according to the TodoMVC spec is to toggle all items as complete when we click the arrow to the left of the create action field.
It's actually a hidden checkbox and we can use its checked value as an indicator and pass it into our status modifier function that looks like this.
// todos.ts
exportconstcheckAll = async (completed: boolean) => { // get reference to all todo items const allTodos = await todoCollection.get();
allTodos.forEach(async doc => { // change the item status if not the same as supplied if (doc.data().completed !== completed) { await todoCollection.doc(doc.id).update({ completed }); } }); };
The checkbox should also become checked if all items are complete. Again, we can use the power of Svelte's computed variables.
Here is the final version of App.svelte component in all its glory.
// used for checkbox auto status $: allCompleted = $todos.length === $completedTodos.length; </script>
<sectionclass="todoapp"> <Header />
<!-- display only if there are todo items --> {#if $todos.length} <sectionclass="main"> <input on:change={markAll} id="toggle-all" class="toggle-all" checked={allCompleted} type="checkbox" /> <labelfor="toggle-all">Mark all as complete</label> <ulclass="todo-list"> <!-- iterate over filteredTodos stream --> {#each $filteredTodos as todo (todo.id)} <Todo{todo} /> {/each} </ul> </section> {/if}
<Footer />
</section>
<pre>{JSON.stringify($todos, null, 2)}</pre>
All our requirements are now implemented, which means we are done!
Test drive the app and pat yourself on the shoulder for a job well done!
Recap
That was a fun exercise. If you followed along you should have learned:
How to use RxJS with Firebase Firestore
How to use RxJS with Svelte
How to use RxJS with Typescript
How to keep business logic outside Svelte
The power of Svelte's computed variables
The most painful feature to implement was the edit form autofocus, when the item enters the edit state. I am still not sure if I've done it correctly. But it works and that's the most important.
Remember: your users don't care if your code is linted, tested or uses the right abstractions. They just want to get things done and move on with their life.
I am, of course, joking, but there is some truth in every joke. Linting and testing helps you gain the confidence of shipping things that work faster, but it's also dangerous. I've been burned by it so many times. It's very easy to get ignorant and over-confident and start relying on your automated tests too much.
As always, here is the full code (for those of you too lazy to type):
This was a long article. If you made it this far, and actually wrote the code on the way, like typed it out on your keyboard, you hopefully learned a lot.
Thank you for reading!
]]>Firebase authentication with SvelteLearn how build Firebase authentication in Svelte.2020-07-24T00:00:00Zhttps://codechips.me/firebase-authentication-with-svelte/Most apps need some kind of authentication, but authentication is hard to get right. You can either do it yourself or use an off-the-shelf solution. The most popular ones are Google Firebase and Auth0. Both are free to use for smaller apps.
In this article we will explore Firebase Authentication. If you want to know how to use Auth0 I've written an article on the topic - Svelte Auth0 integration in 66 LOC.
Some of the things you will learn:
How to wrap Firebase Authentication in a pure Svelte component
How to use Svelte slots
How to expose a slot's properties
How to keep business logic outside Svelte
How to use Svelte's readable stores
How to use Svite bundler with Tailwind CSS
No time to waste. Let's get started!
The Setup
For this experiment I decided to try a new Svelte bundler - Svite. I will also use Tailwind CSS because I want to see how good Svite works with PostCSS, plus Tailwind CSS blog-friendly. It lets you concentrate on the actual problem and not writing CSS.
Here are the commands needed to bootstrap our project.
Notice that I added a lang="postcss" attribute to the style tag. That is required for the code editor to understand that it's dealing with PostCSS and not pure CSS. I think that you can also use type="postcss" to achieve the same result.
If you did everything correctly the result should look like this.
We are now ready to write some authentication logic, but before we start we need talk a little about Firebase Authentication.
Firebase Authentication Explained
Before we start, we need to create an app in the Firebase Console if you haven't done that already.
Assuming you already created a project, go to Firebase project and you should see an "Add app" button right below the project title. Create a new app, choose web, complete the process and the result will be a Firebase config code snippet.
Save it, because we are going to need it soon.
Next, we need to enable Firebase authentication. There are quite a few different options available, but we will only enable email/password and Google, because they work out of the box.
We also need to create a Firebase user that we will use to test our email and password authentication. You can find it in the Authentication section.
Done? Good! Because we need to talk about how Firebase authentication works.
Firebase Initialization
I often find it easier to look at the code than reading about how the code works. Below is the annotated code that explains how Firebase authentication works and what methods we will use.
// import firebase app (required) import firebase from'firebase/app'; // firebase auth mixin (required for every firebase feature) import'firebase/auth';
// initialize firebase app. required as first step firebase.initializeApp(firebaseConfig);
// get the firebase auth object const auth = firebase.auth();
We are now ready to use Firebase authentication.
Firebase Authentication Methods
Since this article is only about Firebase authentication we will skip the registration, password reset and other features and concentrate only on login and logout logic.
Below are the Firebase authentication methods we are going to use.
// a promise that returns an error in case of error // or nothing in case of success auth.signInWithEmailAndPassword('email@example.com', 'qwerty');
// sign-in with Google provider // same concept for Github, Twitter, etc const google = new firebase.auth.GoogleAuthProvider();
// redirect to Googles login page auth.signInWithRedirect(google);
// show a login popup without leaving the app auth.signInWithPopup(google);
// Firebase listener that fires when auth state changes. // Will be fired on login, logout and also check and fire // when you load or reload the page auth.onAuthStateChanged(auth => { // if user is not logged in the auth will be null if (auth) { console.log('logged in'); } else { console.log('not logged in'); } });
The most important concept to understand is that Firebase authentication is decoupled from the login/logut actions. When you login, Firebase onAuthStateChanged listener will be fired and it's in that code block that you must perform your specific app logic. Such as loading user data, redirecting to another page, etc.
Doing it The Svelte Way
I've noticed that people in Svelte community often like to write code The Svelte Way. What do I mean by that? They tend to keep the logic in Svelte components instead of external JS or TS files. Let's try that and see how it turns out.
We will start by creating an Auth.svelte component that we will use in our main file. Svelte slot seems like a good solution to our problem. Let's use it.
// will be fired every time auth state changes auth.onAuthStateChanged(async fireUser => { if (fireUser) { // in here you might want to do some further actions // such as loading more data, etc.
// if you want to set custom claims such as roles on a user // this is how to get them because they will be present // on the token.claims object const token = await fireUser.getIdTokenResult(); user = userMapper(token.claims); } else { user = null; } });
<!-- we will expose all required methods and properties on our slot --> <div> <slot{user}{loggedIn}{loginWithGoogle}{loginWithEmailPassword}{logout} /> </div>
Now, let's turn our attention to our main file App.svelte.
This is how our main file looks now. Svelte slots let us use their exposed properties by the let:property directive.
All good, but there is a small problem. We need to access loginWithEmailPassword function outside slot's scope.
We need to use it in our login form handler and also check for potential login errors.
Slot's properties are only available inside its scope, but we can change the let:loginWithEmailPassword to a bind:loginWithEmailPassword and in that way bind it to a local variable.
It works because we prefixed that function with export statement in our Auth.svelte component.
While we are on it we will also create our login form handler and add an error message. We will also use Svelte's fade transition just for fun.
Try it out and see that it works. Hint: it should.
I don't know about you, but even if it works, the code feels a bit awkward to me.
Personally, I would not write authentication code directly in a Svelte file, but write it in a separate Javascript file.
Why don't we do that and then compare our solutions?
Redoing it the Javascript way
As I said earlier, I prefer to keep as little logic as possible in Svelte files and instead try to use them as a thin view layer that binds everything together.
It helps me separate the business logic from the view and makes it easily testable. Here is how I would roughly write the authentication logic.
Create an auth directory in src directory and create an index.js file with the following code.
// construction function. need to call it after we // initialize our firebase app exportconstinitAuth = (useRedirect = false) => { const auth = firebase.auth();
We've now switched to the new JS-only solution and everything should work just as before.
Conclusion
By now you should know how to use Firebase authentication in Svelte in two different ways. The Svelte way and the JS way. Only you can answer which one feels more intuitive to you.
As for me, I find it more convenient to keep most of my logic out of Svelte. Call me old school.
But, there is one thing bothering me. The whole authentication process feels binary. You are either logged in or you are not.
It also looks weird when you first load the page or reload it. You start with the login form, but when the authentication listener kicks in and sees that you are logged in, the login form disappears. Not a good user experience.
An authentication flow in real app has many states like authenticating, signed in, signed out, signing in, signing out, loading user data, etc.
Wouldn't it be nice if we could somehow show the user the current authentication state she is in?
The good news is that we can. We can do it with the help of a small (and awesome) state library called XState.
That will be the topic for my next article. We will pick up where we left off and gently explore XState's capabilities to see if it can help us enhance our current authentication flow and make it more robust.
]]>Firebase authentication with XState and SvelteLearn how build Firebase authentication in Svelte with the help of XState.2020-07-31T00:00:00Zhttps://codechips.me/firebase-authentication-with-xstate-and-svelte/This is a follow-up to my previous article on Firebase authentication. I was not satisfied with the binary solution and decided to enhance it with XState.
It's hard to understand XState just with light bulb and red light examples. I need something concrete, something to chew on. A practical use case. That's why I asked myself if I could use XState for Firebase authentication.
XState is hard to learn. In order to understand the concepts you must actually sit down and type out the code.
Take 20 minutes of your busy schedule. It will be time well spent. I promise!
What you will learn
Below is a list of the things you will learn:
Creating XState machines
Using XState in Svelte
Encapsulating external libraries in XState
Using Firebase authentication in XState
This is what the final result will look like.
Onward.
Requirements
Since this is a follow-up article to Firebase authentication with Svelte we will base all the code on it. Read it first if you want to understand how Firebase authentication works.
What is XState?
XState is a small (and lightweight) library that helps you manage state in your application. The gist of XState is that you application can only be in one state at a time and from that state you can only move to other predefined states by the rules you define. Because of that, it makes working with state very predictable, but notice I didn't say easy.
Even though, XState has one of the best documentations I have seen, it's not easy to understand all its concepts. You have to start with a blank state of mind and take your time to absorb all the new ideas it offers.
Many people think that XState can only be used in UI when working with forms, but that not true. You can use it anywhere you need predicable state.
State machines briefly explained
I won't explain the XState in-depth, because XState's documentation does it 1000 times better that I ever could, but I want to briefly explain state machines.
State machines are the core of XState and you will be writing many when working with the XState library.
Here is a very basic and oversimplified example of an auth state machine just to get an idea on how to work with XState.
import { createMachine, interpret } from'xstate';
// create a state machine config const config = { id: 'auth', initial: 'signedOut', states: { authenticating: { on: { 'SUCCESS': 'signedIn', 'FAILURE': 'signedOut' } }, signedIn: { on: { 'LOGOUT': 'signedOut' } }, signedOut: { on: { 'LOGIN': 'authenticating' } } } };
// create a machine instance from config const machine = createMachine(config);
// create an instance of an interpreted machine, // also known as a service. const service = interpret(machine)
// start our service service.start();
service.state.value === 'signedOut'; // true
// send an event that initiates a state transition // to the 'authenticating' state service.send('LOGIN');
service.state.matches('authenticating'); // true
service.send('SUCCESS');
service.state.matches('signedIn'); // true
service.stop();
You can do many fancy things with state machines, as you will learn. The basics of the state machines - you make decisions on the current state by sending events to the instance of the state machine.
Identifying all possible states
With our newly gained basic state machine knowledge, let's try to identify the states we have when it comes to our Firebase authentication.
We have three obvious states:
Authenticating, when checking user's authentication status
Signed out, when the user is logged out
Signed in, when the user is logged in
But if we think hard about it we have two more states:
Signing in, when the user is logging in
Signing out, when the user is logging out
You might think they are actions, but they are actually states. At least in my eyes.
When I am trying to identify states I often start with an action, such as "log in", and try to convert action to state - "logging in". If it makes sense, then it's probably a state.
We can also have additional states that are related to authentication such as loading, where we enrich the user with additional data like roles and permissions.
With our naïve assumptions let's try and build an initial version of our state machine.
Initial auth machine version
Let's get cranking! Create an authMachine.js file in the src/auth directory.
const config = { id: 'auth', // we want to start by checking if // user is logged in when page loads initial: 'authenticating', // context is where you keep your app state context: { auth: null, error: null }, // all possible authentication states states: { authenticating: {}, // we will enrich the user profile // with additional data loading: {}, signedIn: { // when receiving 'LOGOUT' event // transition to singingOut state on: { LOGOUT: { target: 'signingOut' } } }, signedOut: { // when receiving 'LOGIN' event // transition to signingIn state on: { LOGIN: { target: 'signingIn' } } }, signingIn: {}, signingOut: {} } };
That will do for now. But how do we check if the user is authenticated or not? That's where XState's effects come in.
Doing side effects in XState
In XState you can invoke different actions when you transition to a state. You can invoke callbacks, promises, observables and even other state machines.
The options are many, but in our example we will use promises to keep things simple. Because everyone knows how promises work, right?
When we want transition to a different state (by sending an event for example) we can invoke a XState service, a function that return promise in our case, with the invoke property.
When invoking the service XState will pass two arguments to it - machine's context and event that triggered the state transition.
Here is a pseudo-example of it could look for our authenticating state.
states: { authenticating: { // when entering a state invoke // the service invoke: { id: 'checkAuth', // can be inline or we can refer to it // by an identifier as we will see later src: (ctx, event) => { console.log({ctx, event}); returnnewPromise((resolve, reject) => { // simulate a slow auth method setTimeout(resolve, 1000); }); }, // called on Promise.resolve() onDone: { target: 'signedIn' }, // called on Promise.reject() onError: { target: 'signedOut', } } }, // ... signedIn: {}, signedOut: {} }
Are you with me so far? In the example above when our auth machine starts, it will start in the authenticating state and immediately invoke the promise with the checkAuth id.
The promise will in this case resolve and therefore call the onDone hook, which will transition from authenticating to signedIn state. In the onDone hook it will pass in the current app context and event as arguments.
One important concept to understand is that XState uses events to transition from one state to another. They are external and also internal stimulus that we can act on.
If you ever worked with Redux you can think of events as Redux actions. Every event always has a type, its name, and along side with that you can pass in data.
As an analogy we can think of (context, event) arguments as Redux (state, action) concept.
Don't know if its a fair comparison, but that's how I see it. More on that later.
Wiring up the machine
To make things more clear let's play around a bit our auth machine in its current state and wire it up to few buttons that we can push.
First, we need to wrap it in a Svelte readable store. Create a useMachine.js file in src/auth directory.
exportconstuseMachine = (config, options) => { // interpret the machine config const service = interpret(config, options);
// wrap machine in a svelte readable store with // initial state (defined in config) as its starting state const store = readable(service.initialState, set => { // every time we change state onTransition // hook is triggered service.onTransition(state => { set(state); });
// start the machine service.start();
return() => { service.stop(); }; });
// return a custom Svelte store return { state: store, send: service.send }; };
Before we can use machine we need to create it. Adjust the authMachine.js to following.
There are a few unused functions, but don't worry, we will put them to use later.
We can finally wire up the machine in our App.svelte file. You can find the complete setup code for the app and styles for the main file in my previous tutorial on Firebase authentication.
<!-- debugging: show current state --> <divclass="p-3 mt-5 bg-blue-200"> <pre>{JSON.stringify($state.value, null, 2)}</pre> </div> </div> </div>
You might have noticed that we only have "if" statements in our code. By using XState you can only be in one state at a time. Pretty neat!
Manipulating app state using XState actions
We've come far, but without app state our app is useless. Let's do something about it.
Remember that we defined a context property in our auth machine config? That's where we are going to keep our app state.
For manipulating it, XState has the concept of actions, fire-and-forget side effects.
XState actions are functions that take context and event as arguments. Actions can do many useful things, but you will most likely use actions to manipulate the XState context.
To understand the concept we will continue with a pseudo-example of transitioning from authenticating state, but instead we will reject the promise and put that error on the context.error property.
import { assign } from'xstate';
// ...
states: { authenticating: { invoke: { id: 'checkAuth', src: (ctx, event) => { console.log({ ctx, event }); returnnewPromise((resolve, reject) => { // simulate a slow auth method setTimeout(() =>reject('wrong password'), 1000); }); }, // called on Promise.resolve() onDone: { target: 'signedIn' }, // called on Promise.reject() onError: { target: 'signedOut', // assign the error to the `context.error` // that comes in event.data from the Promise.reject. // assign is a helper function that you import from XState // that we will use later actions: assign({ error: (_, event) => event.data }) } } }, // ... signedIn: {}, signedOut: {} }
XState is flexible when it comes to defining its config. You can supply a list of actions and also pass them in a separate external dictionary and refer to them by key name instead of writing them inline.
Actions are kind of hard to understand, but stick with me. Everything will clear as we progress further.
Defining side effects as XState services
Now that we know how to perform side effects in XState we need to wrap all Firebase authentication methods in XState services and also add actions to manipulate our app state.
Remember that I told that we can supply both actions and services as external objects and refer to them by name in our config? Let's do that.
We will start with XState services. Open the auth/index.js file and replace initAuth function with this code.
// auth/index.js
// constructor function. need to call it after we // initialize our firebase app exportconstinitAuth = (useRedirect = false) => { const auth = firebase.auth();
// pass the services as argument const authMachine = initAuthMachine(services);
returnuseMachine(authMachine); };
It's time to fix our auth machine config.
Fixing the auth machine config
I can talk a lot about how to adjust our config, but code speaks louder than words, even if it's made up of words.
Here is updated authMachine.js in all its glory, with comments and all.
// authMachine.js
import { createMachine, assign } from'xstate';
const config = { id: 'auth', // we want to start by checking if // user is logged in when page loads initial: 'authenticating', // context is where you keep state context: { auth: null, user: null, error: null }, // all possible authentication states states: { authenticating: { // when entering a state invoke // the authChecker service invoke: { id: 'authChecker', src: 'authChecker', onDone: { target: 'loading', actions: 'setAuth' }, onError: { target: 'signedOut' } } }, // we will enrich the user profile // with additional data loading: { invoke: { id: 'loader', src: 'loader', onDone: { target: 'signedIn', actions: 'setUser' }, onError: { target: 'signedOut.failure', actions: ['setError', 'clearAuth'] } } }, signedIn: { // when receiving 'LOGOUT' event // transition to singingOut state on: { LOGOUT: { target: 'signingOut' } } }, // signedOut has two sub-states // we will transition to failure in // case of wrong password, username // or network error signedOut: { initial: 'ok', states: { ok: { type: 'final' }, failure: {} }, on: { LOGIN: { target: 'signingIn' } } }, signingIn: { invoke: { id: 'authenticator', src: 'authenticator', onDone: { target: 'authenticating', // clear error if successful login actions: 'clearError' }, onError: { // transition to failure state // and set an error target: 'signedOut.failure', actions: 'setError' } } }, signingOut: { invoke: { id: 'logout', src: 'logout', onDone: { target: 'signedOut', actions: ['clearAuth', 'clearError'] }, onError: { target: 'signedOut.failure', actions: ['clearAuth', 'setError'] } } } } };
exportconstinitAuthMachine = services => { // define XState actions so that we can // refer to them by name in machine config const actions = { // clear user info on logout clearAuth: assign({ user: null, auth: null }), clearError: assign({ error: null }), // put Firebase auth object on context setAuth: assign({ auth: (_, event) => event.data }), // put user on context in loading service setUser: assign({ user: (_, event) => event.data }), setError: assign({ error: (_, event) => event.data }) };
// create an options object containing // actions and services const options = { actions, services };
returncreateMachine(config, options); };
And this is what it looks like in the XState's visualizer.
If you start at the authenticating state, and follow a path, it will all make sense. Notice that in configuration we refer to our services and actions by their names (keys) instead of writing them inline.
One thing to know is that if you have a transition with no action you can omit the target keyword and just use a string. XState is flexible, but in my opinion, it's good to be consistent and not take any shortcuts.
You can also see that we supplied an options object with our actions and services to createMachine functions. XState has plenty of different options to create your machines.
Understanding XState events
Just like in Redux, you define an action, but it's called event in this case.
In the event you can also supply event data. Here is the link to the XState documentation that explains it in great detail.
Below are a few examples of XState events.
// simplest case possible send('LOGIN');
// same as above, this is what XState tranforms to internally send({ type: 'LOGIN'});
// provide an object payload send('LOGIN', { provider: 'google'});
It's crucial that you understand the concept of XState events, because they are the base of everything in XState.
Using auth machine states in UI
Empowered by our new knowledge, let's do a final adjustment to our UI in App.svelte. We already logic for state management in place. We only need to adjust our handlers with correct events and also take care of error handling.
Here is the final version of App.svelte sprinkled with comments.
<!-- uncomment if you want to be explicit about signingIn state --> <!-- {#if $state.matches('signingIn')} <h2 class="text-2xl text-center">Signing in ...</h2> {/if} -->
{#if displayLoginForm} <form on:submit|preventDefault={loginHandler} class="px-8 pt-6 pb-8 bg-white shadow-md" > <divclass="mb-4"> <labelfor="email">Email</label> <input class="input-field" id="email" type="email" placeholder="name@acme.com" /> </div> <divclass="mb-6"> <labelfor="password">Password</label> <input class="input-field" id="password" type="password" placeholder="******************" /> </div> <!-- show auth errors --> {#if $state.context.error} <divclass="bg-red-500 p-3 mb-6"transition:fade> {$state.context.error} </div> {/if} <div> <buttontype="submit">Sign In</button> </div> <divclass="mt-3"> <!-- tell auth machine that this is a Google login --> <button type="button" on:click|preventDefault={() =>send('LOGIN', { provider: 'google' })} > Sign In with Google </button> </div> </form> {/if}
</div> </div>
If you look carefully you will see that we added data to our events and we also show an error to the user in case of authentication failure.
Notice that we communicate with our machine by sending events. The logic is encapsulated in the machine itself.
I don't know about you, but I actually find it quite beautiful.
While our states are now explicit, I am struggling to show user correct information (or state transitions).
But this is not a code problem, only my lack of UX skills.
To compensate for it I created a reactive variable displayLoginForm. That way login form is visible even in the signingIn state.
Conclusion
This was a fun and educating experience. We achieved our goal and have a fully functioning Firebase authentication solution.
There are many ways to structure your application state with XState and if you are not careful you will end up with an unmanageable config that is hard to understand. The key is to write small, single purpose machines.
XState is also flexible in how you define your state machines. Its flexibility is also one of its weaknesses, because it's easy to get lost in all the options available and what to use where. It's easy to get into an analysis paralysis state, especially when you are just starting out learning the library.
With that said, I am happy with results and look forward to exploring XState further. Hope you do too!
]]>9 neat ES features that save you lots of typingA short article showing how Javascript has evolved for the better in recent years.2020-08-10T00:00:00Zhttps://codechips.me/9-neat-es-features/Believe it or not, many of the Javascript syntax features that developers take for granted today did not exist in the language just a few years ago.
Yes, even promises are new. Javascript use to be a verbose language with lots of quirks and it still is. For example, are you sure you understand how this works? Do you know why you sometimes need to use bind method? What about scoping and hoisting?
I started programming in Javascript professionally when jQuery was cool, Node.js was just announced on HackerNews and all the cool devs were working with Backbone.js.
It was not all roses and sunshine. Trust me. Callback Hell and Pyramid of Doom were real. Sometimes I dreamed about double-callbacks at night. It was very hard following the code at times.
Thankfully, things have greatly improved since, but we as developers always take things for granted without giving them any thought or appreciation.
That's why I decided to show what Javascript used to look like back in the days, (old school) and how much it has evolved in just a few years (new school).
Without further ado, here are nine of the ES features I am glad exist.
Arrow functions
Default parameters
Destructuring
Object literals
Default returns
Spread operator
Async/await
Optional chaining
Nullish Coalescing Operator
There features save my fingers from hurting and make my code more concise and easier to understand.
Read on to learn them all!
1. Arrow functions
This is probably the ES feature I use and love the most. It makes code so much easier to read in my opinion.
Note: Something to keep in the back of the head, when using arrow functions, is that this works just as you expect it to inside them. Or maybe better to say: arrow functions don't have their own this. It's taken from the outer scope instead. Sometimes it's actually not what you want.
Pretty neat and much easier to read. Don't you agree?
2. Default Parameters
Default parameters is a real life-saver sometimes. A simple code example is the best explanation.
// old school
const createUser = function (firstName, lastName, role) { return { firstName: firstName, lastName: lastName, role: role || 'user' }; }
There are other useful things you can do with desctructuring, such as rest parameters. I encourage you to explore it further on your own. You will find a list of resources at the end of the article.
4. Object Literals
The name "object literal" says nada. That's why I like to call it object property initializer shorthand. Maybe that's even its official name. Not sure.
Anyhow, it's one of the features that can save you a lot of repetitive typing. If the variable name and property name are the same you only have to specify variable name when creating an object's property.
// old school
functioncreateUser(firstName, lastName, dob) { const id = generateId(); return { id: id, firstName: firstName, lastName, lastName, dob: dob }; }
Don't take simple things like this for granted. Be thankful for all the typing they save you in the long run.
6. Spread Operator
I actually not sure if it's an operator or a syntax change, but I use it all the time.
It's a very useful feature and if you have worked with Redux or any other modern Javascript library you have probably used the pattern, or operator, or syntax.
It often used to create shallow copies of objects and arrays, or to merge objects or arrays.
Let's start with the arrays, since A comes first in the English alphabet.
const one = ['a', 'b', 'c']; const two = ['d', 'e', 'f'];
Now, here is what we can do with spread operator and objects.
let user = { uid: 'jdoe', name: 'Jane Doe' }; let status = { loggedIn: true };
// create a new object by combining other objects // properties with the same name will be overwritten // by the last object in argument chain let state = Object.assign({}, user, status, { createdAt: Date.now() });
// or by simply using the spread operator state = { ...user, ...status, createdAt: Date.now() };
Spread operator (or syntax) is very versatile. I only scratched the surface of what it can do.
If you learn the inside and outs of it, you will have a powerful tool in your toolbox.
How could I even work effectively before it existed? I actually don't remember right now, but I suspect it was painful.
7. async/await
Promises are also new to Javascript and they might be the most significant new addition to the language. Before promises we had callbacks, which could lead to Callback Hell and the dreaded Pyramid of Doom.
Promises improved that, but I still found them a little hard to read. Today, I often find myself reaching for the async/await pattern, which makes my code easy to read and reason about.
Plus, async/await pattern can make the code easier to structure.
// fake function to return a user by id constfetchUser = id => newPromise((resolve, reject) => { if (id === 1) { resolve({ id: 1, username: 'jdoe' }); } else { reject(newError('no such user')); } });
// the promise way
constgetUserInfo = id => fetchUser(id) .then(user =>fetchInfomation(user)) .then(userInfo => { if (userInfo.address) { // how do we get user? we need to pass it down somehow enrichProfile(user, userInfo); }
if (userInfo.age && userInfo.age < 18) { // hmm ... how do we access user here? addAgeRestrictions(user); } }) .catch(err =>console.log(err));
// the async/await way
constgetUserInfo = async id => { // error handling with try/catch blocks try { const user = awaitfetchUser(id); const userInfo = awaitfetchInformation(user);
// both user and userInfo are available in the function scope if (userInfo.address) { enrichProfile(user, userInfo); }
As you can see above, prefixing your function with async keyword and using await to get the promise result can make your code easier to structure, read and reason about.
8. Optional Chaining (ES2020)
This new feature is my recent favorite as it saves me a lot of typing. It actually comes from Typescript, but has now been accepted into ECMAScript standard spec.
You will not get runtime errors if some deeply-nested property does not exist on the object.
Errors like the one below, that you have probably seen many times before.
const customer = { name: 'Jane' };
console.log(customer.address.doorCode); // Uncaught TypeError: Cannot read property 'doorCode' of undefined
Here is a better example of what this operator brings to the table (or screen).
// old school
const sendInstructions = function (customer) { // old, cumbersome way to check for a property const hasDoorCode = customer && customer.address && customer.address.doorCode;
if (hasDoorCode) { messageToCourier(carryIn()); } }
// new school
constsendInstructions = customer => { // optional chaining operator at work const hasDoorCode = customer?.address?.doorCode;
if (hasDoorCode) { messageToCourier(carryIn()); } }
Simply explained, the optional chaining operator short circuits and returns undefined for the first non-existent property.
9. Nullish Coalescing Operator (ES2020)
This operator with a weird name is new, so thread carefully and use a bundler setup that supports it.
What it does it to strictly check if the value is either null or undefined. Why is that important? Because one of Javascript's quirks is that many values can be falsy or truthy. Empty string, zero and boolean false are all falsy values, so is undefined and null.
Sometimes we need to strictly check if value is null or undefined and not only falsy.
Let me demonstrate with a few examples to make it more clear.
// the actual value is false, but it incorrectly defaults to true, // which can lead to hard to find bugs const showWelcomeScreen = (user && user.settings && user.settings.showWelcomeScreen) || true;
// the animation value is actually 0, but we incorrectly set it to 100 // since 0 is a falsy value in Javascript const duration = (user && user.settings && user.settings.animation) || 100;
// new school
// this behavior is correct. We now only set a value if // the property is null or undefined const showWelcomeScreen = user?.settings?.showWelcomeScreen ?? true; const animation = user?.settings?.animation ?? 100;
Even though this operator is very new, I find myself using it more often. It's really useful when dealing with user-controlled settings in user interfaces.
Conclusion
There you go. 9 Javascript features I am glad exist.
Of course, there are many more new cool and useful ES features, but these are the ones I use the most.
I strongly recommend you to get familiar with them all. They will make you level-up your game and help you impress your colleagues.
If you want to dig deeper, here are some great learning resources:
An ECMAScript explainer - ECMAScript spec, that Javascript is based on, is constantly evolving. If you are curious about how Javascript versioning works and what feature requests get accepted, here is a great article explaining the process.
MDN - Many great in-depth tutorials from the trusty Mozilla Developer Network.
javascripttutorial.net - another great resource. More like a reference with good examples than a tutorial.
Learn ES2015 (ES6) - dense, but good tutorial from Babel.js that covers many modern JS features.
Even though these new syntax features and operators make your code more concise, always remember the trade-off between conciseness and readability. It's you who might be reading the code in the future.
]]>Is Vite currently the best bundler for Svelte?I tested Vite bundler for Svelte development together with Typescript and PostCSS.2020-08-24T00:00:00Zhttps://codechips.me/svelte-with-vitejs-typescript-tailwind/Testing different bundlers for Svelte development is an odd hobby of mine. I like my development environments smooth as butter and my feedback loops tight.
First up is Vite. A young bundler from the creator of the popular Vue.js framework, Evan You. I've heard many good things about Vite and decided to try it out.
The Purpose
I am on the quest to find the best bundler setup for Svelte development. My requirements are simple.
It must be fast
It must support Typescript
It must support PostCSS
It must produce small and efficient bundles
It must produce correct sourcemaps for debugging
It should support HMR (Hot Module Replacement)
Let's proceed with this list as our benchmark for a good Svelte bundler setup.
Test App
For the purpose of testing I created a simple Svelte app. Its functionality is simple. You press a button and it fetches a random Kanye West tweet from Kanye as a Service.
The app might be simple, maybe even naïve, but it has a few interesting parts.
Svelte components in Typescript. I want to see if transpiling and type checking works correctly for TS.
External Svelte library. Not all bundlers support libraries written in Svelte efficiently.
External library dependency. I want to see if Vite supports tree shaking when bundling for production.
External Assets. It should be possible to import SVG, PNG, JSON and other external assets in our code.
PostCSS with TailwindCSS. A good bundler should make it easy to work with SASS and PostCSS.
Business components in Typescript. Typescript is here to stay. A good bundler should support it out-of-the-box.
With that checklist in place, let's proceed and see if Vite can handle all our requirements.
Although, I built the app specifically for testing different Svelte bundlers, I will walk you though how to set up Vite from scratch using a simpler Svelte app as an example.
Vite Overview
As I write this Vite haven't had an official release yet, but it's nearing one. Currently it's on 1.0.0-rc.4. There are probably still a few wrinkles to iron out.
Vite is not a traditional bundler, like Webpack or Rollup, but an ESM bundler.
What does it mean? It means that it serves all your files and dependencies via native ES modules imports that most modern browsers support. This means superfast reloads during development as only file that was changes needs to be recomplied.
It comes with "batteries included", meaning it has sensible defaults and supports many features that you might need during development.
Vite, just like Snowpack, is using ESBuild as its Typescript compiler.
If you want to know more details about please read the How and Why section in Vite's README.
What's the difference between Vite and Rollup?
This can be a little confusing to many. Why should you use an ESM bundler instead of a traditional one line Webpack or Rollup?
Vite Installation
There is an option to create Vite backed apps with create-vite-app command, but as of now there is no Svelte template, so we will setup everything manually for now. I will try to find some time to create a Svelte template based on my findings.
For my examples I will use pnpm, a fast and disk space efficient package manager, but all the commands apply to npm as well.
Let's get cranking!
Creating the project
First, we need to initialize our project and add Vite. Here are the steps.
$ mkdir vite-svelte-typescript $ cd vite-svelte-typescript $ pnpm init -y $ pnpm add -D vite
Creating required files
Now we need to add an index.html file and a src directory where we will be keeping our app's source files.
Create a src directory and add an index file in the root directory with the following contents.
This file will be used by Vite as entry or template to our app. You can add anything you want there. Just make sure to point the entry JS/TS file to your app's main file.
Vite Configuration
You configure Vite by creating a vite.config.js in the root directory. It's in there that you can change Vite's dev server port and set many other options.
The configuration documentation is lacking behind at the moment. The best place to see what options are available is to look at Vite's config source.
We don't have anything to configure yet, so we will postpone this task for now.
Vite and Svelte with vite-plugin-svelte
We are building a Svelte app, so we need to tell Vite how to deal with Svelte files. Luckily, there is a great Vite Svelte plugin we can use - vite-plugin-svelte. Install the plugin and also the Svelte framework.
$ pnpm add -D vite-plugin-svelte svelte
The time has come to write some Vite configuration. We will just follow recommendation from the plugin's README file. Edit your vite.config.js and add the following.
Start the app by running pnpx vite and open the browser on localhost:3000.
Bam! Now Vite knows what Svelte is. While we are on it, let's tackle the Typescript and Svelte part next.
Vite and Typescript Support
Vite has Typescript support out of the box for normal Typescript files. As many other modern ESM bundlers it uses esbuild which is written in Golang and is very fast. It's fast because it performs only transpilation of .ts files and does NOT perform type checking. If you need it, you must to run tsc --noEmit in the build script. More on that later.
If you ask me, a better choice would have been SWC compiler. It's written in Rust, is just as fast and handles things a little better than ESBuild.
Let's add a simple timer written in Typescript and use it in our file.
We are using enums, a Typescript feature, in order to not get any false positives.
Let's add it to our App.svelte file.
<!-- App.svelte -->
<script> import { init } from'./timer';
const counter = init(); </script>
<h1>Hello Svelte {$counter}!</h1>
Yep. Seems to work. Vite transpiles Typescript files to Javascript using ESBuild. It just works!
Svelte and Typescript Support
When it comes to various template and languages support in Svelte files, svelte-preprocess is king. Without this plugin, Typescript support in Svelte would not be possible.
Simply explained, svelte-preprocess works by injecting itself as a first-in-line preprocessor in the Svelte compilation chain. It parses your Svelte files and depending on the type delegates the parsing to a sub-processor, like Typescript, PostCSS, Less or Pug. The results are then passed on to the Svelte compiler.
Let's install it and add it to out setup.
$ pnpm add -D svelte-preprocess typescript
We need to change out vite.config.js and add the svelte-preprocess library.
We initialized our counter with 5s interval and everything works as advertised. svelte-preprocess for president!
Notice how little configuration we have written so far. If you ever worked with Rollup, you will definitely notice!
svelte.config.js
If your editor shows syntax errors it's most likely you forgot to add svelte.config.js.
const preprocess = require('svelte-preprocess');
module.exports = { preprocess: preprocess() };
This configuration file is still a mystery to me, but I know that it's used by the Svelte Language Server which is used in VSCode Svelte extension and at least one other bundler - Snowpack.
Vite and PostCSS with TailwindCSS
There are actually two parts of working with PostCSS in Vite and Svelte. Fist one is the Vite part. Vite has out-of-the-box support for PostCSS. You just need to install your PostCSS plugins and setup postcss.config.js file.
Let's do that. Let's add PostCSS and Tailwind CSS support.
If you did everything right the page background should have a light indigo background.
PostCSS in Svelte files
When it comes to Svelte and PostCSS, as usual, svelte-preprocess is your friend here. As Vite, it has support for PostCSS.
However, we need to tweak the settings a bit as it doesn't work out of the box.
According to the svelte-preprocess documentation you can do it in two ways. Specify PostCSS plugins and pass them to the svelte-preprocess as arguments or install a postcss-load-conf plugin that will look for an existing postcss.config.js file.
This seems like the best option. I mean, we already have an existing PostCSS configuration. Why not (re)use it?
Yep. Works fine. Notice that I added lang="postcss" to the style tag in order to make the editor happy.
Vite and SVG, or external assets support
Vite has built-in support for importing JSON and CSS files, but what about other assets like images and SVGs? It's possible too.
If you import an image or an SVG into your code it will be copied to the destination directory when bundling for production. Also, image assets smaller than 4kb will be base64 inlined.
Let's add an SVG logo to our App.svelte.
<!-- App.svelte -->
<scriptlang="ts"> import{ init, Intervals }from'./timer'; import logo from'./assets/logo.svg';
However, in our case, since we are using Typescript in Svelte we will get a type error. That's because Typescript doesn't know what an SVG is. The code will still work, but it's annoying to see this kind of error in the editor.
We can fix this by adding a Typescript type declaration file for most common asset types. While we are on it we can create a Typescript config file. It's actually not needed by Vite, because it does not do any typechecking, only transpiling, but it's needed for the editor and also for our TS type checker that we will setup later.
First, install the common Svelte Typescript config.
$ pnpm add -D @tsconfig/svelte
Next, create a tsconfig.json in the root directory of the project.
Last thing we need to do is to add a Typescript declaration file in the src directory. The name is not important, but it should have a .d.ts extention. More of a convention than a requirement.
If you did everything correctly you should not see any errors in your editor.
Vite and Environment Variables
It pretty common to make use of the environment variables in your code. While developing locally you might want to use a development API instance for your, while in production you need to hit the real API.
Vite supports environment variables. They must however be prefixed with VITE_. Vite support many ways to import your environment variables through different .env file. You can read more about it here.
For the sake of demonstration, let's setup and require and use an environment variable in our code.
Create an .env.local file with the following contents.
VITE_KANYE_API=https://api.kanye.rest
We now need to import it in our app. The way you do it is through import.meta.env object.
<!-- App.svelte -->
<scriptlang="ts"> // import meta.env types from vite import type {}from'vite'; import{ init, Intervals }from'./timer'; import logo from'./assets/logo.svg';
When bundling for production Vite injects CSS and JS tags into index.html automatically. However, it leaves the script tag as type="module. Thread carefully if you need to support old browsers.
It must be fast. Check. Vite's cold starts and reloads feel superfast.
It must support Typescript. Check. Was easy to setup.
It must support PostCSS. Check. Works out-of-the-box.
It must produce small and efficient bundles. Check. Rollup is used for bundling.
It must produce correct sourcemaps for debugging. So-so. Could be better.
It should support HMR (Hot Module Replacement). Check. Works great.
Conclusion
My goal was to see how good Vite is for Svelte development and also to show you how to setup an efficient local development environment.
I must say that I am happy with results. That happy, that I even dare to ask whether not Vite is currently the best bundler for Svelte.
If you have made it so far, you should not only learned about Vite, but also about how to effectively setup your development environment. Many of the things we went through apply to many different bundlers, not only Vite.
Vite is built by the creator of Vue.js. Although, it's a framework agnostic bundler, you can tell that it's probably has a tighter connection to Vue. You can find Vue specific things sprinkled here and there.
What I like most about Vite is its speed and flexibility. It has sensible default configuration options that are easy to change. I was also surprised how little configuration I had to write!
Probably the best thing is that Vite uses Rollup for creating production bundles. I've learned to trust Rollup by now after testing many different module bundlers.
You can find the full app setup on Github. Watch this repo as I test more bundlers for Svelte development.
]]>Would you recommend Svelte and what router do you like?Thoughts on Svelte, Sapper, SSR vs SPA and the best Svelte router2020-09-01T00:00:00Zhttps://codechips.me/svelte-ssr-and-router-recommendation/The other day I received an email from a reader with a few interesting questions and I thought I would share my answer as a blog post. Hope you find it interesting as well. It's about Svelte, Sapper, SSR vs SPA and Svelte router recommendations. Raw and unedited.
Email
Hi Ilia,
I found your blog about Svelte and Js development really well written.
It seems that you’re liking Svelte a lot. My company uses VueJS for now but was trying to use Nuxt because of the SSR aspects.
However I found the SSR part to be brittle, like if it was an add on not well thought out.
Would you recommend Svelte and what Router do you like? We’re a small team of 3 so we do need some structure and some “best practices “.
Laurent
My Answer
Hello Laurent,
And thank you for the kind words! I will try to answer your question in detail. These are, of course, my personal thoughts.
Correct, I like Svelte because it "fits" in my head. Its simplicity is what attracted me in the first place. I've used both React and Vue at work. While both are fine, we never clicked. Call me old school, but while I understand the concept and the need behind JSX, I find it weird. It's not for me. The Vue model fits "my style" better than React, but I find some of its design and architecture decisions weird. But let us not deviate from your question!
Second reason I like Svelte is that it doesn't use virtual DOM, which I always thought is pure overhead. Svelte is not a framework, but a compiler, right? You can do so much more with a compiler, than with a virtual machine, which React actually is. For example, one obvious thing is that a compiler catches compile time errors. Add Typescript to the mix and you just halved your potential runtime errors. Also, with compiler you end up with smaller bundles, as all the code is optimized at compile time and you don't have to bake in a Virtual DOM machine.
Now, back to the first part of your question - Would you recommend Svelte?
Definitely! It's stable and is used successfully in production by many companies. Now when it finally has official Typescript support hopefully more developers will start taking it seriously.
One big concern I often hear is that Svelte has a small ecosystem. By that I mean supporting tools and libraries. That's a valid point, Svelte is still young, but I found that I actually don't need and use many external Svelte libraries in my projects. Why? Because there's often no need. Svelte has a lot of common features built-in, its state management is simple, and you can easily integrate any external Javascript library you need. In Svelte, you are often not constrained by a framework specific code or syntax, it's just plain Javascript.
And for the second part of your question - What router do you like?
I am a big fan of DYI, but up to a certain degree. If something takes me a few hours to implement, I will often do it instead of using some library. For my projects I use Page.js as my router. It's a battle-tested library that I've used before and that I trust. I've created a simple Svelte wrapper on top of it that fits my needs. If you are interested, here is the link to the article - Svelte routing with Page.js, Part 1.
Routify seems to be a popular option, but I haven't had the chance to try it yet. Spontaneously, I don't like a library that forces you to use it in a certain way. With Routify you have to start your app from Routify, so to say. I understand the reason behind. It's a file-based router, it needs to use the file system in order to build up its router tree. Routify also supports SSR if that's important to you.
With that said, one Svelte router I've been digging lately is svelte-navigator. It's actively maintained, has an intuitive API and seems to be feature complete. Check it out!
Just like Vue has Nuxt and React has Next, Svelte also has an official SSR solution - Sapper. But Sapper's development haven't been very active for the past year. It's currently on version 0.28, but looks like the development is picking up again. I don't know when and if it will reach version 1.0, but expect a few breaking API changes on the way. With that said, many companies are already using it successfully in production today.
Let's talk a bit about SSR vs SPA debate. Why and when should you use SSR instead of a SPA?
In my opinion, if you are building an app that needs to be crawlable by search bots, SSR is the way to go. Blogs, forums and news apps come to mind. The rest is a grey area.
There are pros and cons when it comes to SSR apps. Sapper in Svelte's case.
Some of the pros:
Because of code splitting, your app will load faster. Sapper has a router built-in, so you get the routing for free. When you first load the page it loads only necessary JS code and then starts to hydrate the rest of the application. Each application page has its own JS and CSS bundle.
You offload initial page rendering to the server. Because Svelte components is just compiled Javascript, it's faster compared to Next. No virtual DOM is required on the server, only string concatenation.
Sapper has a cool prefetch feature built-in. When you hover over a link or touch the link on you phone screen, you can start prefetching the page ahead of time.
If you know that your app will grow in terms of features, SSR helps you to keep the page load times small, because of code splitting, unlike SPA where your total bundle size will increase.
In Sapper, like other SSR apps, the router is file-based. This is a nice constraint that makes it easy to understand the mapping between Svelte files and pages.
In Sapper you can build a JSON API as part of your app, which can be really helpful to keep separation of concerns at bay.
Sapper has support for service workers built-in, which when used correctly can help you cache effectively and make your app work offline.
Some of the cons:
SSR is more complex than SPA. You end up with more generated code that can be hard to debug when something breaks.
SSR is more expensive to operate. You have the server costs vs just serving a JS bundle from a CDN. The costs might be marginal, but still.
Your page can be rendered on the server and on the client. You don't know when and you have to anticipate both scenarios. The line is blurred, which can lead to weird code.
Authentication flow is more complex in a SSR app than in SPA, because of the point above.
Because of Sapper's router you have to be smart on how and where you cache your data when navigating between pages, otherwise you can end up with a lot of unnecessary data calls.
Service workers can be complex to understand and implement correctly.
What about SPA's pros and cons?
Some of the pros:
You often end up with less generated code, which can be invaluable if something breaks and you need to debug.
You serve the app from a CDN, which can be cheaper than involving a server.
You are free to structure your app in any way you like.
Some of the cons:
When your app grows, so does your final JS bundle size.
Your app is usually not SEO friendly out-of-the-box.
Your app's perceived load speed will be slower because you have to load the whole app first.
You are not forced to use any specific app structure. Sometimes constraints aka best practices can be good.
Your templates are bundled together with JS, which leads to increased final bundle size.
I just realized that this was a very long answer to your email, so I will stop here, even though I love talking about these topics!
In summary:
Svelte is a safe bet. It's successfully used in production by many companies already, and it's growing in popularity every day.
Sapper, Svelte's SSR solution, hasn't reached 1.0 yet, but that doesn't stop companies from successfully using it in production.
If your app is small (final bundle size below 1MB), will not grow bigger and doesn't need SEO, I would build it as an SPA.
If you build it as SPA and later decide to re-write it as SSR, you can reuse almost all of your Svelte components.
Good luck! I am sure you will have lots of fun and "no, it can't be that easy" moments on the way if you choose Svelte!
All the best, Ilia
]]>Solid Sapper setup with PostCSS and TailwindI spent some time trying to get Sapper to play nice with PostCSS and Tailwind CSS2020-09-06T00:00:00Zhttps://codechips.me/sapper-with-postcss-and-tailwind/While it's straight forward to integrate PostCSS and Tailwind into plain Svelte projects, Sapper is a totally different beast. There are many moving parts. Rollup configuration is super complex, code is generated. It can be hard to grasp what's going on.
The Problem
I needed to integrate PostCSS together with Sapper. Meanwhile it's not so hard to integrate plain Tailwind CSS into Sapper, turns out integrating PostCSS together with TailwindCSS requires a little more work. After trying a few different approaches I finally landed on something that works for me.
Why PostCSS?
Plain CSS can take you far, but I often prefer to use Tailwind CSS. I find it really nice to work with declarative CSS instead of writing everything from scratch. I like Tailwind as it is, but I often use a few other PostCSS plugins too that help me work with Tailwind CSS more efficiently. Maybe a better word would be "augment" and not "help."
How Sapper manages CSS
Sapper has an internal router built-in. Which is helpful. The router intercepts all link clicks and fetches each page individually when you visit it. When you click on the link that leads to another page in your app, Sapper will fetch the page in the background and replace the content in your Sapper app.
It will actually put the content into the slot in the src/routes/_layout.svelte page. That's how it's setup in the official boilerplate at least.
Sapper injects the styles for different components and pages when you navigate between the pages. When you visit a page, Sapper will fetch that page and also inject the style for that page and for the components it uses into the head tag of the document.
Sapper and Svelte scope CSS classes defined in the components to the components themselves, reducing the risk of overriding the CSS.
It's actually a really nice feature that you get out of the box in Svelte! You can see that by inspecting elements in the dev tools console. Each styled element will have a svelte-[hash] class defined on it.
The Solution
After wrestling with rollup-plugin-postcss for some time, I gave up and went with the simplest setup possible.
Instead of trying to integrate PostCSS into Rollup itself, I moved PostCSS processing outside of Rollup's pipeline. It's fast too, because the processing is done outside Rollup.
Here is how I did it.
Create a Sapper project
In order to fully understand what's needed, we will start from scratch by creating a standard Sapper project.
$ npx degit sveltejs/sapper-template#rollup sapper-with-postcss $ cd sapper-with-postcss && npm i
You can now start the app by running npm run dev.
Setting up Tailwind
Let's add Tailwind and Tailwind's typography plugin that we will use to style the blog posts.
We now need to replace Tailwind's configuration file with this.
// tailwind.config.js
module.exports = { future: { removeDeprecatedGapUtilities: true, }, experimental: { uniformColorPalette: true, extendedFontSizeScale: true, applyComplexClasses: true, }, purge: { // needs to be set if we want to purge all unused // @tailwind/typography styles mode: 'all', content: ['./src/**/*.svelte', './src/**/*.html'], }, theme: { container: { center: true, }, extend: {}, }, variants: {}, plugins: [require('@tailwindcss/typography')], };
Next thing we need to do is to create Tailwind's base file. We will put it in src/assets folder, that you need to create first, and we will name it global.pcss.
We are using .pcss extension just to distinguish that it's a PostCSS file. It's not something you have to do. Plain .css extension works just a good. I like to distinguish PostCSS files from plain CSS.
/* global.pcss */
@tailwind base;
body { @apply bg-indigo-100; }
@tailwind components; @tailwind utilities;
Alright. Now that we are done with Tailwind configuration, let's wire it up into our PostCSS pipeline.
Setting up PostCSS with Tailwind
First things first. We need to install PostCSS cli and a few PostCSS plugins that we will use.
Cool! We are almost there. Theoretically, we have everything we need. We just need to wire everything up.
PostCSS in Svelte files
Actually, I forgot something. We want to style our Svelte components with Tailwind and PostCSS too. In order for that to work we need to use the good ol' svelte-preprocess plugin.
$ npm add -D svelte-preprocess
Let's cheat a bit. We will create a svelte.config.js and setup the preprocessor there. Svelte config is needed for the editors to be able to work correctly. Syntax highlighting, intellisense and all those things.
We will later re-use the exported preprocessor in our Rollup config to keep things DRY.
There are a few different ways to setup Svelte prepocessor, but I found this the most minimal. The reason it works is that we installed postcss-load-config plugin earlier. It will automatically load postcss.config.js file if it exists. No need to require it in our code!
Now that we have finished setting up the preprocessor, we need to import it in our Rollup config.
// rollup.config.js
// svelte.config is a CommonJS module // it needs to be imported this way const { preprocess } = require('./svelte.config');
// add preprocess to Svelte plugin in client section svelte({ dev, hydratable: true, emitCss: true, preprocess, // <-- add this }),
// add preprocess to Svelte plugin in server section svelte({ generate: 'ssr', hydratable: true, dev, preprocess, // <-- add this })
Phew! Everything is now configured correctly. Hopefully.
Adjust your NPM scripts
Last thing we need to do is to wire everything together. We will do it by changing the scripts section in our package.json.
We have to install npm-run-all cli utility for this to work - npm add -D npm-run-all.
This requires some explanation. You can see that we have a watch:css script. What it does is replaces Sappers static/global.css with our Tailwind base file. We also need to explicitly set NODE_ENV to "production" in build:css since we are doing our PostCSS processing outside Sapper. It's needed by Tailwind in order to purge unused CSS styles from its base file.
Be careful not to set NODE_ENV to production in the Sapper build and export scripts. If you do, and you set any :global styles in your components, they will be purged leading to missing styles.
Oh, just another tip. If you what to use a background image in you CSS put it in the static folder. You can then use it your CSS like this.
.hero { background-image(image.png); }
Test-driving the new setup
To check that Tailwind and PostCSS works in Svelte components, replace your src/routes/index.svelte with this code.
<divclass="space-y-10 text-center"> <h1class="text-7xl uppercase font-bold">Great success!</h1> <buttonclass="btn">DO NOT PRESS THIS BUTTON!</button> </div>
You can see that we set lang="postcss" in the style tag. That's not something that is required, PostCSS will still be processed. It's only so that editor understands it's dealing with PostCSS.
To see Tailwind's typography plugin in action change src/routes/blog/[slug].svelte to the code below.
<scriptcontext="module"> exportasyncfunctionpreload({ params, query }) { const res = awaitthis.fetch(`blog/${params.slug}.json`); const data = await res.json();
if (res.status === 200) { return { post: data }; } else { this.error(res.status, data.message); } } </script>
Implementing PostCSS in Sapper becomes clear when you understand how Sapper deals with CSS files.
We set up two separate PostCSS pipelines in our example app. First is processing Sapper's global CSS file. Second is replacing Sapper's component styling with PostCSS. We didn't actually change the way Sapper handles and serves CSS files, we only replaced it with PostCSS. Maybe "augmented" is a better word.
]]>Svelte, PostCSS and TypeScript with Svite bundlerIs Svite the fastest way to get your new Svelte project off the ground?2020-09-06T00:00:00Zhttps://codechips.me/svelte-postcss-and-typescript-with-svite/Svite has been on my radar for quite some time now and I finally found some time to play with it. I was surprised by the results.
I am on the quest to find the easiest, fastest and most flexible bundler for Svelte development. I think I just did.
My requirements
Testing different Svelte bundler setups is a weird hobby of mine. I get a kick out of connecting different plugins together, while trying to setup a smooth development workflow.
The requirements are pretty straight forward.
It must be fast
It must support Typescript
It must support PostCSS
It must produce small and efficient bundles
It must produce correct sourcemaps for debugging
It should support HMR (Hot Module Replacement)
My testing application
For my tests I created a simple Svelte app. Its functionality is simple. You press a button and it fetches a random Kanye West tweet from Kanye as a Service.
While simple, the application has some interesting parts.
Svelte components are written in Typescript. I want to see if transpiling and type checking works correctly for TS.
External Svelte library. Not all bundlers support libraries written in Svelte efficiently.
External library dependency. I want to see if a bundler supports tree shaking when bundling for production.
External Assets. It should be possible to import SVG, PNG, JSON and other external assets in our code.
PostCSS with TailwindCSS. A good bundler should make it easy to work with SASS and PostCSS.
Business components in Typescript. Typescript is here to stay. A good bundler should support it out-of-the-box.
Svite is a pure Svelte bundler built by dominikg on top of Vite. I've already tested Vite with very impressive results, and since Svite is almost Vite, I expect the results to be equal or better.
What's great about Svite is that it has many different templates you can use when creating your app. Currently there are four:
minimal
routify-mdsvex
postcss-tailwind
svelte-preprocess-auto
It has also a few other useful options you can use too.
Creating a new project
Let's create an app by using postcss-tailwind template and adding TypeScript support.
$ npx svite create -pm pnpm -ts -t postcss-tailwind -sc svelte-svite-typescript $ cd svelte-svite-typescript $ npm run dev
That was easy! Let's look at the files it produced.
$ ls -1 index.html node_modules package.json pnpm-lock.yaml postcss.config.js public src svelte.config.js tailwind.config.js tsconfig.json
And in the src directory you have these files.
$ ls src App.svelte index.css index.ts
Nice! Almost the same files I had to write by hand when testing Vite.
Why almost? If you worked with Vite, you might notice that there is no vite.config.js. Because Svite has build in support for Svelte, there is no need to have one.
App.svelte
The file is small and with helpful comments in the right places.
<scriptlang="ts"> const world = 'postcss'; // edit world and save to see hmr update </script>
<style> h1 { color: orangered; /* change color an save to see hmr update */ /* you can also use css nesting & .world { font-size: 2rem; } */ } .world { @apply text-teal-500 italic; /* here's some tailwind apply */ } </style>
Svite is a nice little abstraction of Vitejs specifically tailored for Svelte development. It's fast, small and doesn't get in your way. Everything just works.
It feels thought though. For example, one thing I like is that Svite allows you to choose which package manager you want to use. It might be a small thing, but it's really nice that the author has thought of this.
If you feel you need to use some other Vite plugins that Svite doesn't offer, you can always create vite.config.js and wire them up there.
I didn't bother to setting up other useful scripts this time, like continuous linting, but if you are interested check out package.json in my Vite setup in the Github repo.
Svite might just be the easiest way to get your new Svelte project off the ground. The documentation is excellent and you have many different boilerplate templates to choose from. Just make sure to read the docs for all the possible options!
]]>Tailwind UI dropdown menu - React vs SvelteWhich framework is better for Tailwind UI - React or Svelte?2020-09-21T00:00:00Zhttps://codechips.me/tailwind-ui-react-vs-svelte/The other day I was prototyping a new internal app at work in React using Next.js. To get it off the ground quickly I used Tailwind CSS. In my app I needed to create a simple dropdown menu and I looked at the Tailwind UI example on how they did it.
Actually, creating a dropdown menu is not as simple as it sounds. First, you have to handle mouse clicks outside of it and close the menu if it's currently open. Second, you should support pressing Escape key and close the menu if it's currently open. Third, you should add nice animation to the menu so it feels more alive.
Implementing the menu in React wasn't quite as straight forward as I hoped for. The Tailwind styling itself is not a problem, but it took me some time to figure out how to handle "click away" or "click outside" functionality and handling the escape key. On top of that I had to research how to do CSS transitions in React. Turns out that creators of Tailwind created a helpful transition library as React does not have the functionality built-in.
Doing a Google search for "react click away listener" didn't really help. A search on NPM for "react click outside" and "react click away" returned way too many more results than I needed. Sure, there are plenty of React libraries, but I felt that there should be a much simpler way of handling that.
Here is the Next.js (React + TypeScript) code I ended up with.
When I was done with React implementation, I thought to myself of how I would implement the same menu in Svelte. So I took some time to port it to Svelte.
One of the many niceties about Svelte is that it has CSS transitions and animations built in. Here is my take on it.
let show = false; // menu state let menu = null; // menu wrapper DOM reference
onMount(() => { consthandleOutsideClick = (event) => { if (show && !menu.contains(event.target)) { show = false; } };
consthandleEscape = (event) => { if (show && event.key === 'Escape') { show = false; } };
// add events when element is added to the DOM document.addEventListener('click', handleOutsideClick, false); document.addEventListener('keyup', handleEscape, false);
// remove events when element is removed from the DOM return() => { document.removeEventListener('click', handleOutsideClick, false); document.removeEventListener('keyup', handleEscape, false); }; }); </script>
Sure, the amount of code is little less in Svelte than in React, but what about the cognitive load? Which one is easier to read and understand? You be the judge.
]]>Learn Fast, Earn FastLife is all about learning, but what is the best way to learn?2020-10-01T00:00:00Zhttps://codechips.me/learn-fast-earn-fast/Life is all about continuous learning. You are always learning something new whether you like it or not. If you don't, you quickly become outdated. You don't learn, you don't earn.
The world around us is spinning faster and faster. It's not only stressful enough just to keep up to date with the information, but also constantly learn something new.
The Internet is a blessing, but also a curse. There is so much information out there! It's hard to find and process it all. My children don't see me reading many books at home nowadays, but only if they knew how much text I consume on a normal day! Blogs, Slack, Twitter, emails, manuals, forums, work documents. These things add up!
Today everyone competing on the same terms, but you can gain competitive advantage over others by being a fast learner. This brings me to the core question of this essay: What is the fastest way to learn?
Know your learning style
Everyone is different, therefore there is no ultimate learning process. You have to find what works best just for you. Are you a visual, auditory, reading/writing or kinetic learner? You are often not only one type, but a mix of different combinations.
Of course, you can learn by using any style - doing, watching, reading, listening, but in order to maximize your learning you have to know which one of those suits you best.
I personally is definitely a reading/writing type, but I like to watch videos too in order to get a better understanding of the topic I am learning.
Podcasts are not really my thing. I can't listen to podcasts because I need to concentrate while listening. I tried to do it in bed before sleeping, but that only made me fall asleep faster.
How about watching videos? Coding videos are also not high on my list. I hate to scrub and pause in the video player, plus I want to be able to copy and try out the code while I am watching.
Note: I know there are platforms that show video and code side-by-side, but they are rare.
Reading, on the other hand, is different. It's fast. You can easily skim to the juicy parts, plus copying and pasting text is much faster than typing it.
Style vs Process
We've talked about the learning styles, but what about the process? Which process should you follow in order to learn fast?
There are a few different approaches. Some people like to dive heads down and figure things on the way. Some like to understand what they are dealing with first.
I am definitely the second type. I like to understand before I start.
Not sure how and when I finally understood this, but I've now used it for many years with great success.
My learning process
Below are the steps I normally follow in order to learn a topic as fast and as efficiently as possible. It's not rocket science, but works great for me. Maybe it will work for you too?
1. Know what you need to learn
Before learning something it's important to know what you want, or need, to learn. What's the minimum you need to know in order to reach your goal? What questions need answers?
Often you already might have some idea or some kind of goal in your mind. Make sure you know it beforehand. It will make judging sources of information easier.
If you are not sure, go for a walk and think about it. Somehow things tend to clear up in motion.
2. Find quality information
The first thing I do is to find as much useful slash interesting information on the topic as possible. It can be blog posts, Youtube videos, official documentation, code examples, Github repositories, Github issues, Stack Overflow threads. Anything goes here. As long as you think it can help you reach your goal.
The important part in this step is to find as much information you think might be useful as possible. Don't judge it at this stage. Just skim through it quickly, if something catches your interest, keep it and continue with your quest. Go with your gut feeling. If something seems interesting or useful, save it, otherwise scrap it.
I also often search for bad or negative parts. Parts that people struggle with or complain about. Review posts are super useful here, even if they are only someone's opinions and not necessary the truth. I try to get a sense if it worth it and if there are any known problems or pitfalls.
Following links I find in the articles is also something I do often. If some link catches my attention I open it in a new browser tab.
When I feel I have enough potential sources of information I stop. At the end of this session I usually have 20-30 browser tabs open, 10-15 bookmarks and 5-10 Youtube videos added to my "Watch Later" list.
This step usually takes me 30-60 minutes.
2. Overwhelm yourself
During this phase I start to process the found information one by one. I don't go deep here. My goal is to find interesting bits of information and extract the core concepts. I usually read only a paragraph or two, maybe look at some diagrams or glance briefly at some code examples.
If I had to describe the level of my concentration between 1 being glancing over text and 10 being fully emerged, I would say it's around 3. I am fully concentrated, but not on the whole text. My goal at this stage is to only understand the concepts and not the details. I want to get a rough idea of what this is all about.
When it comes to videos I usually play them at 1.5X speed and often forward to the parts I find interesting.
I branch out to other related things I find on the way that I don't yet understand.
I do this to the point where I am feeling completely lost and nothing makes sense any more.
This phase usually takes me between 1-5 hours depending on the size of the subject in question.
When my brain is completely fried with information I step away from the research phase and go and do something else. Something that doesn't require brain power.
3. Sleep on it
This is a very important step, don't skip it! It's called Background Processing. You have overwhelmed your brain, bombed it with information. Now you have to give your unconscious mind a chance to process and sort it all. Go to bed early and try to get 7-8 hours of good sleep.
4. Review yesterday
Now it's time to take some notes. To try to recap what you learned and make your own understanding of the subject. I usually grab a pen and paper and try to write down core concepts using lists and keywords. Sometimes I draw a sloppy mind map. Remember, this is only for you! Nobody will read this!
Here, I am using pen and paper. It allows me to draw doodles and other stuff and it's fast too. Plus, physically writing it down on paper has a totally different effect than typing it out on a computer. It feels more free form and your brain processes this differently. At least that's what I've noticed.
5. Distill everything
You mind has already background-processed all the information. You helped it structure it further by your review. Things and concepts suddenly start to make sense. Look at you notes and rewrite them once again, but this time only picking out the core parts and concepts.
6. Synthesize important parts
Now that you have an idea of the concepts and all the dots are connected, think through what is important. What concepts, terms, patterns have you learned? Try to identify them.
7. Play around
It's time to have some fun. Try to do something very simple. Baby steps. There is no pressure at this stage. You are in exploration mode.
Once you get something going, try to expand it. Do some more, play around. View it as a POC. You are only trying to do something here. There are no "musts."
While playing around and getting stuck you will notice that somehow you already know where to look for the solution to your problem. You will either remember it from the "overwhelm" session, or you will somehow know how and where to search for the solution.
Again, thanks to the power of your mind and its background-processing ability. It helped you distill and internalize the core concepts and connect the dots.
8. Do the work
It's now time to do the real work. Here I often use the outcome of the "play" phase as my base.
Proof
All these steps can take differently long time, it depends on the size and complexity of the topic. For example, I had to learn a lot of new things in the past few weeks. One of them was Next.js.
By following my learning process I went from knowing nothing about Next.js to building a fully functional app with authentication and other bells and whistles running in production in just 3 days.
If I can do it so can you!
Useful links
Hammock Driven Development - one of my favorite talks on Youtube by Rich Hickey, creator of Clojure language. He talks about the background-processing and this is where I got the idea from.
Hacking Your Head: Managing Information Overload - a short talk by Jo Pearce on how to deal with Cognitive Load. It touches the same subjects I mention in the article, but with scientific proof.
Takeaways
Developing an effective learning process is a must if you want to stay ahead of competition, but it's not only about learning fast, but also about learning smart.
Experiment with different approaches. Evaluate. There is no universal approach to learning. Find out what works best just for you.
The more I learn, the less I know, but also the less stressed I get. Because in the end, it's not about knowing, but about understanding. Even if you don't know, somehow you get a feeling that you have seen it before. You brain is good at making connections. By constantly learning you are building your brain capital.
By having developed my own learning process I always know that I can learn fast and effectively and that keeps me calm.
Stay curious and always be learning!
]]>Managing Svelte UI state with Robot FSMSimplifying UI state in Svelte with Finite State Machines using Robot FSM library2020-10-11T00:00:00Zhttps://codechips.me/svelte-and-robot-fsm/Ever worked with building complex UIs? If yes, you probably know how challenging it can be to keep track all UI states. It's very easy to end up with a big hairy ball of all the state variables.
If you are building semi-complex UIs Finite State Machines can help you deal with state. Learn what FSMs are and how you can use them with a simple example.
What is a Finite State Machine?
Shortly, Finite State Machine or FSM is an old, but recently rediscovered pattern, to help us deal with complex state.
The gist of FSM is that your application can only be in one state at a time. If you think about it, it actually makes sense. Just like in real life, you can only be in one state at at time. Unless you are a quark.
I find Finite State Machines a great fit when working with complex UIs. Applications are getting more and more interactive and keeping track of UI state can quickly get challenging.
What is Robot FSM?
There are currently two popular FSM libraries in JavaScript that I know of. XState and Robot.
I would say that XState is the most popular. It has a lot of features and really great documentation. However, FSM can be intimidating to learn and XState especially, because there you can achieve the same result by different ways.
For this example I decided to use Robot FSM library. First, it's much smaller than XState - 1kb vs 13kb. Second, it's also easier to learn, because it has less bells and whistles.
Robot doesn't have as good documentation as XState, so you have to read between the lines and experiment a bit to understand it's concepts and how to work with it.
But that's why I am here! Hopefully by the end of this article everything will click, you will know what an FSM is and understand where you can use them.
I promise to keep things simple. Let's code!
Setting up project
First, we need to create a new Svelte project. We will use Svite with pnpm package manager to save some disk space. I find this combination the fastest way to get going.
We will be building a panel menu with different sections. Think tabs component, only prettier.
Next step is to create a few Svelte components.
Creating panel components
We will create a simple panel component called Section.svelte. It will take a title and a close function handler as parameters.
Close handler will be wired up to the Close button in the component. When clicked, it should hide the menu. We will also add Svelte's slide transition for some neat visual FX.
If you start the app (pnpm run dev), all of the three sections should be visible. That's not something we want. Let's add some interactivity logic next.
Doing it the normal way
Adding interactivity to these panel sections is straight forward. For that we need to add three boolean variables, one for each section, and then manipulate their state.
Here is the updated App.svelte file with state variables and on:click handlers.
You can see that we added basic on:click handlers to buttons and we also pass in close handlers that set state variable to false.
If you've done everything right you should now be able to open and close each panel. Good times!
But what about the scenario that only one section should be visible at one time? Meaning if you open a new one, the currently visible section should close.
It's doable, but things can get pretty hairy, because you have to track individual state of every section. That's something Finite State Machines can help us with.
Let's bring in the Robot
Let's add Robot FSM library to our project.
$ pnpm add robot3
Now we need to create our Finite State Machine. We will name it panelMachine as it will be responsible for keeping track of our panel's state.
Add this code to App.svelte and I will explain it in a second.
As you can see we used Robot's createMachine function to define a state machine. The machine consists of total four states - closed, one, two and three. Our first state is closed and that will be the state machine will start with. If you look carefully you can see that our state machine is just a simple dictionary.
Each dictionary value is then defined by a state function. The state function is used to define state in Robot FSM library. But what going on inside the state functions?
State function is the meat of the Robot library. It's in there that you define your state and transitions to other states. Transitions? States? What?!
Yes, I understand if you are confused and I promised to keep things simple for that reason. Let me explain.
As I wrote earlier, an state machine can only be in one state at at time. When our panel FSM is started it starts in the closed state, because it's first in the dictionary.
If you imagine that you are in the closed state you can see that inside it we have defined three transition functions. Transition function dictates the states you can go to from the state FSM that is currently in. They are used to move from one state to another.
Every transition function takes a trigger event as first argument and the destination state as second argument. You can name events however you like, but I like to prefix mine with verbs as I like to think of them not as events, but rather commands or actions. By sending an event to the state machine you command it to go to another state than it's currently in.
One important concept to understand is that you can only move those states that you have setup transitions for. So, from our closed state we can only go to states one, two or three. If you send in some other event name than showOne, showTwo or showThree our FSM will simply ignore them and just stay in the current state it is in.
Similarly, you can only go to closed state from other states by sending a close event to our state machine. Are you with me so far?
Interpreting our state machine
Alright, we have defined our state machine. Now we have to activate it by using interpret function from the Robot library.
The interpret function takes a machine and wraps it into a service that can send events into the machine to change its states. A service does not mutate a machine. Instead it creates derived machines with the current state set.
You can find the current state of the machine by the machine.current property. If you wrap it in the service it will be located under service.machine.current.
Here is the code that demonstrates how a machine service works.
// Wrap machine into a service. Every time state changes it's printed. // A service has a `send` command that we can use to send it events. const service = interpret(panelMachine, service => { console.log('current state: ', service.machine.current); });
console.log('current state: ', s.machine.current) // current state: closed
// Transition from `closed` state to `one` [legal] service.send('showOne'); // current state: one
// Transition from `one` to `two` [illegal] service.send('showTwo'); // current state: one
// Send non-existent event service.send('foo'); // current state: one
// Transition from `one` to `closed` [legal] service.send('close'); // current state: closed
As you can see from the example above, if we send in a valid event, that we defined in our state transition in the current state we are in, we can switch to a different state in our state machine.
Wrapping our state machine service in a Svelte store
Robot does not have Svelte support per default, but it's not hard to wire it up. For that we will can write a custom Svelte store.
exportconstuseMachine = (machine, event = {}) => { // every time the state changes we will update our Svelte store const service = interpret( machine, (service) => { set({ state: service.machine.current, context: service.context }); }, event );
const { subscribe, set } = writable({ state: machine.current, // we want the service context and not machine context context: service.context, });
return [{ subscribe }, service.send]; };
As you can see we defined a useMachine constructor function. It takes a Robot FSM as its argument and returns an array. First value is our custom Svelte store with our machine's context and state as two properties. Second value is the service send method. It will allow us to send events to our machine.
We have everything we need. Next step we need to do is to replace our on:click and close handlers. We also need to use our new panelService store for state checking instead of individual state variables.
I won't bore you with all the code changes needed. Instead, here is the updated App.svelte file in all its glory.
// constructor function to interpret the machine and wrap // the FSM service into a custom svelte store. // `event` will be used as initial context if passed exportconstuseMachine = (machine, event = {}) => { // every time the state changes we will update our Svelte store const service = interpret( machine, (service) => { set({ state: service.machine.current, context: service.context }); }, event );
const { subscribe, set } = writable({ state: machine.current, // we want the service context and not machine context context: service.context, });
You can see that we have replaced our individual state variables with our state machine. We have also create two handlers - close and toggle.
If you start the app now, you will notice that we can only open one panel at a time. But I must say, it's not a correct behaviour. We cannot open other panel before we close the currently open one.
Why? If you look at our machine definition you can see that the only valid transition from a panel is to the closed state. This means the only valid event we can sent to the open panel is close event.
We can actually use this knowledge to our advantage by changing our toggle handler to the following.
Before sending our show event, we first send the close event so that our machine enters closed state.
I don't know about you, but I find it pretty elegant.
Implementing toggle functionality
But what if we want our button not only to open, but also toggle a panel's state. Meaning if the panel is currently open clicking the same button should close it.
For that we need add a guard that checks if the current state our machine matches the desired state. If it does, it just closes the panel.
consttoggle = (action, state) => { // if current state matches desired panel state, close it if ($panelState.state === state) { send('close'); return; } // else first close, then open desired state send('close'); send(action); };
We also need to provide the desired state in our buttons' on:click handlers.
Finite State Machines are hard to understand if you haven't been exposed to them before. They also offer so much more than I showed in my example.
In Robot there is also context that lets you work with state, guards that allows you to enter a state only if condition is met, invoke that helps us work with promises and sub-machines, and immediate transitions.
XState has even more to offer. It's easy to get lost if you don't have a solid understanding of the basics first.
I chose the simplest example I could think of on purpose that only shows how to setup state and transition from one state to another by sending events.
If you want to test you skills try building a tabs component. The concepts are exactly the same and you can re-use a lot of the code we have written.
When you understand the concepts and how to work with state, all other FSM concepts become easy. In the end, it's all about states, sending events and transitions.
Start simple, experiment and I can guarantee that you will quickly start seeing places in your codebase where a state machine makes sense to use. Plus, as a bonus, you will get one more powerful tool in your toolbox.
Thanks for reading! Now go and replace something in your codebase with an FSM FTW.
]]>Snowpack for Svelte development revisitedI tested Snowpack for Svelte before v2 was released. Has anything changed since?2020-10-30T00:00:00Zhttps://codechips.me/snowpack-for-svelte-revisited/As I am writing this I realize that I have no good introduction. This is another post about finding the best bundler for Svelte and this time it's Snowpack's turn to be evaluated.
Building a good bundler is not easy. Building a fast bundler is almost impossible. Mad props to those who dare.
I discovered Snowpack before version 2 was officially released and was very excited about it. Today I decided to revisit it to see how and if things have changed since.
My goal is to compare different bundlers for Svelte development in order to find the best one. I've already tested Vite, Svite and now it's Snowpack's turn.
Requirements
For the purpose of evaluation I created a simple web app. Its functionality is simple. You press a button and it fetches a random Kanye West tweet from Kanye as a Service.
While simple, the application has interesting parts.
Svelte components are written in Typescript. I want to see if transpiling and type checking works correctly for TS.
External Svelte library. Not all bundlers support libraries written in Svelte efficiently.
External library dependency. I want to see if a bundler supports tree shaking when bundling for production.
External Assets. It should be possible to import SVG, PNG, JSON and other external assets in our code.
PostCSS with TailwindCSS. A good bundler should make it easy to work with SASS and PostCSS.
Business components in Typescript. Typescript is here to stay. A good bundler should support it out-of-the-box.
I also have a list of my own requirements when it comes to bundlers.
It must be fast
It must support Typescript
It must support PostCSS
It must produce small and efficient bundles
It must produce correct sourcemaps for debugging
It should support HMR (Hot Module Replacement)
Let's see if Snowpack can satisfy all of them.
Bootstrapping the app
Snowpack comes with many official framework templates that you can use as base for your apps. Since the app is written in TypeScript we will use @snowpack/app-template-svelte-typescript. It's not listed on the website, but in Github.
I like how Snowpack lets me specify the package manager. pnpm, the package manger I often use, is not in the main documentation, but I found the option somewhere in Github.
Dev server starts instantly and Snowpack is nice enough to open the browser for me. I appreciate it, but I don't like it or need it.
Another thing I like about Snowpack is that it uses npm start script and not dev to start everything up. The npm run dev command is so 2015, right?
I also noticed that app template's config file has changed from JSON to JS. I like it because it makes it easy to comment and do other advanced JS gymnastics.
Let's see what files Svelte template generates for us.
$ ls -1 babel.config.json jest.config.js jest.setup.js LICENSE node_modules package.json pnpm-lock.yaml public README.md snowpack.config.js src svelte.config.js tsconfig.json types
Not bad. I don't know why Babel config has to be explicit and I am usually not writing any unit tests, so jest has no use for me. But other that that it looks nice and clean.
The app entry file comes with an explicit HMR section. I like that it's explicit and how it tells you where to find more information. Good!
importAppfrom"./App.svelte";
var app = newApp({ target: document.body, });
exportdefault app;
// Hot Module Replacement (HMR) - Remove this snippet to remove HMR. // Learn more: https://www.snowpack.dev/#hot-module-replacement if (import.meta.hot) { import.meta.hot.accept(); import.meta.hot.dispose(() => { app.$destroy(); }); }
By now I've copied the code from my test web app, added missing dependencies and tried to start the dev server. Things don't quite work yet.
External Svelte libraries
This is where I hit the first road block. Looks like Snowpack uses pkg.module file if it exists. The svelte-inline-svg library I am using had the module property defined, but the file was missing in the NPM package. Showpack borked on this. I wish that it could have fallbacks in place and try with something else if the file is missing. The author of the SVG library has fixed it after I filed a bug report.
PostCSS + TailwindCSS
Snowpack has no PostCSS support out-of-the box, because in Snowpack it's all about plugins and build scripts, but it offers instructions on the main documentation page on how to enable PostCSS. But turns out there is some ambiguity. The main documentation webpage tells one thing while Github tells another. Which one to trust?
Alright, let's go with the second one and use Snowpack's plugin-postcss. Not sure I understand why I have to explicitly install postcss and postcss-cli. Wouldn't it be better if they were baked into the Snowpack's PostCSS plugin?
Talking about plugins. Snowpack has quite strange plugin configuration. You can either supply plugin as string, or as an array if plugin needs some arguments, where first item is the name of the plugin and second is an object of the arguments that will be passed to the plugin.
Svelte template comes with dotenv pre-packaged as Snowpack plugin. This is nice as it doesn't require a working dotenv environment in the shell.
The ES2020 import.meta.env works out of the box, but not in my Vim editor.
VS Code works fine and you get autocompletion too. I figured that coc-svelte plugin I am using is way behind VS Codes Svelte extension. As soon as I forked and updated dependencies, Vim stopped complaining.
NOTE: If you are using Vim, coc.nvim and coc-svelte extension, you can use mine. It's more up-to-date than the original one @codechips/coc-svelte.
You have to prefix all env variables with SNOWPACK_ if you want them to be accessible in the app. Most bundlers today follow this convention in order to avoid environment variable clashes.
For my app I had to create an .env.local file so that dotnenv could pick it up, but any dotenv convention works.
As I understand svelte.config.js file is mostly only used by code editors for autocompletion. Not with Snowpack. Snowpack is one of the few bundlers that relies on that file to exist. It's used by its Svelte plugin. Good thing that it comes with the template.
Snowpack, Svelte and TypesScript
TypeScript is nice, but getting TypeScript configuration right is usually a game of trial and error for me. Snowpack's Svelte template has a dependency on the @tsconfig/svelte NPM package, but from what I can see it's not used anywhere?
The svelte-inline-svg module does not come with any TypeScript declaration. We need to fake it locally.
Create svelte-inline-svg.d.ts in the types directory with the following contents.
declaremodule'svelte-inline-svg';
By the way, I really like how the svelte-check tool, which comes already injected into the build pipeline, warns me about it and provides instruction on what to do.
I also like that Snowpack has a dedicated types directory for your own TypeScript definitions. Somehow, I always struggle to configure type paths. Snowpack is the first bundler that makes this clear for me.
Building
The test app is now finally working! Lets build it for production.
$ pnpm build > snowpack build ...
[@snowpack/plugin-typescript] src/index.ts(2,17): error TS2307: Cannot find module './App.svelte' or its corresponding type declarations. [@snowpack/plugin-typescript] Error: Command failed with exit code 2: tsc --noEmit src/index.ts(2,17): error TS2307: Cannot find module './App.svelte' or its corresponding type declarations. ERROR Command failed with exit code 1.
Oops. Something is wrong, but what? I actually never figured out what, so I recreated the whole project from scratch, which helped. Who told you that this was going to be easy, right?
When building Snowpack shows you a nice stats table of all the build artifacts.
You have __dist__ folder with all your application files, __snowpack__ folder with the env variables, and web_modules folder with all the dependencies.
Snowpack bundles your assets (CSS, SVG) files as JS files, the .proxy.js ones. I wonder why it also puts raw SVG and CSS file in the build directory if they are not used in production.
The dependencies are not bundled, but server to browser as ES modules. After all, Snowpack is an ESM bundler.
This has its advantages and drawbacks. The development is super-fast as only the files changes need to be recompiled and reloaded. The files and dependencies are not optimized and served as is, which leads to many more requests if you have many dependencies and also to larger downloads as you need to download the whole module even if you only use one function in it.
You might need to only do it once on the first load, then the files might be cached, but I am not the expert on this.
Bundling a Snowpack project
Ah! The ultimate test for a bundler. How efficient bundles a bundler can produce. Snowpack doesn't have bundler support built-in, but there are some plugins that we can use.
Some time while ago Snowpack released an optimization plugin. It's not a bundler plugin, but more of a minifier. It helps you minify CSS, HTML and JS. From what I have read, this plugin uses ESBuild's minifying functionality and from what I understand it's almost on par with Rollup's.
Enough talking, let's test!
$ pnpm add -D @snowpack/plugin-optimize
We need to add it to the list of plugins in snowpack.config.js and do a new build.
Strange. I see no difference in the stats table output.
The terminal output is saying that file size didn't change, but if I look at the actual file on disk it's actually 21K and not 83K as Snowpack tells me.
Weird. I don't know if it's cached somewhere or if the numbers are showing something else.
Testing @snowpack/plugin-webpack
Looks like Snowpack's plugin-optimize does some light optimization, but Showpack also has a real official bundler plugin - plugin-snowpack. It actually use to have an official Parcel plugin, but looks like it has been removed.
Last time I tried Snowpack's Parcel and Snowpack plugin none of them worked. Has anything changed? Let's try Webpack plugin.
Nope. Still getting the same "'babel-loader' not found" error from it.
Entry module not found: Error: Can't resolve 'babel-loader'
It installed it, but it didn't help. I give up. Don't feel like I want do go down the rabbit hole.
As of Rollup, no official Rollup plugin exists (yet), but Svelte crew promised that it's coming soon.
Building an SWC compiler plugin for Snowpack
Snowpack is all about plugins and they have great documentation on how to build your own. They actually encourage people to build them.
I decided to test and build an SWC compiler plugin for TypeScript files to see how hard it would be. Just for fun.
Let's get dirty. Install the SWC compiler and create a plugins directory.
$ pnpm add -D @swc/core && mkdir plugins
In the new plugins directory create a file named plugin-swc.js with the following contents.
module.exports = function (snowpackConfig) { // read options from the main Snowpack config file const useSourceMaps = snowpackConfig.buildOptions.sourceMaps;
Start the dev server and be amazed. Your TypeScript files are now being transpiled by the SWC compiler.
Well, I am not actually 100% sure about that, because Snowpack comes with ESBuild plugin baked-in and I don't know if my SWC plugin overrides it or not.
Anyhow, this was for demonstration purpose only to show how easy it is to build a plugin in Snowpack with only a few lines of code.
If you look at Snowpack's official plugins, most of them are really simple to understand and only a few hundred lines long.
I really like this plugin approach. It makes it very easy to build your own and developers have already started building all sorts of plugins.
Requirements Revisited
Sorry for getting side-tracked. The test web app now actually works. Let us revisit the list of initial requirements and see how well Snowpack did.
It must be fast. Check. Snowpack is very fast to start.
It must support Typescript. Check. Works out-of-the-box with the TypeScript plugin.
It must support PostCSS. Check. Works with PostCSS plugin.
It must produce small and efficient bundles. Nope. No bundler plugin works with Svelte.
It should be possible to import external Svelte libs. Check.
It must produce correct sourcemaps for debugging. Nope. All files are transpiled to JS.
It should support HMR (Hot Module Replacement). Check. Works great.
Snowpack's underlying build pipeline design is very good. It feels thought through.
There are a few parts that I like. I like that it uses start script as the entry point to start the dev server. It always felt more intuitive to me than npm run dev.
When the dev server is disconnected the web app does not spam Dev Tools console log trying to reconnect to the dev server.
SvelteKit, the newly announced Svelte framework that will replace Sapper, is betting on Snowpack. According to Svelte's crew they evaluated Vite.js as an alternative, but found it not to be framework agnostic enough.
Snowpack does not have any official bundler plugin that works with Svelte, but as I understand the Svelte gang will work on making a Rollup plugin. Don't know if it will be only as a part of SvelteKit's build pipeline or an official framework-agnostic Snowpack Rollup plugin.
But maybe Rollup plugin is not needed at all? From what I've read esbuild has tree shaking functionality that is almost on par with Rollup's. I don't think that it's used in Snowpack yet and don't know either if there are any plans to implement it.
As I wrote earlier, the official Webpack plugin didn't work for me, but since it's easy to build plugins in Snowpack and the documentation is good, I bet that we can expect a lot of new and interesting plugins from the developer community in the near future. Like this one for example, Svelte with Snowpack with Google Closure Compiler.
Overall, Snowpack is an interesting and future-glancing project with a helpful community and a fierce development speed. But somehow it feels like it's rushing forward a little too fast for its own good. A lot of features feel half-finished and documentation, although great, often lags behind or is outdated.
Sorry Snowpack, I like you, but I will use another bundler for my Svelte projects for now. But don't be sad! I will come and visit in a few months. I am sure it will be a nice visit.
]]>Transforming an object to array in JavaScriptDifferent ways to transform an object to an array in JavaScript2020-11-09T00:00:00Zhttps://codechips.me/object-to-array-with-js-and-rambda/When working with objects in JavaScript sometimes it's convenient to transform them to arrays. In this short post I will show you how to do it in plain JavaScript and also with Rambda.js.
Let's say that we have a nested JavaScript object that looks like this. If you work with Firebase Firestore, or some of Google Cloud Platform's or AWS API, you might have stumbled on structures like these.
Say we want to display the services property as a list on the page. While it's possible to loop over the object itself, it's more convenient to loop over a list that looks like this.
The toPairs operator loops over object's keys and returns key and property a list with two items in it - [key, prop].
In functional programming you often work with lists as they are easier to manipulate.
Rambda - pipe vs compose
What the difference when it comes to the two composition operators in Rambda - pipe and compose? It's subtle. In my opinion it's a matter of taste.
The pipe operator feels most intuitive to developers. It works like a pipe in Unix (ls -l | grep js), passing the results from one function to another in the chain from left to right. First function can take multiple arguments, but the rest of the functions in the chain can only have one argument as input. It reminds me a lot about the proposed pipeline operator in JavaScript.
The compose operator does the opposite of pipe. It performs its operations right to left.
I find it intuitive to think of it as the Russian Doll pattern - f4(f3(f2(f1([1,2,3])))), where each function is called inside out.
There are probably a few more ways to transform an object to array. Let me know then so I can learn something new.
]]>How to send transactional HTML emails with Mailgun, Handlebars and FirebaseLearn how to use Handlebars and Mailgun to send emails to your users from Firebase2020-11-25T00:00:00Zhttps://codechips.me/send-html-emails-with-mailgun-and-firebase-functions/If you are building any serious app chances are big that you have to send some emails. I needed to send transactional emails for a web app I am building, so I reached for the trusted Mailgun.
The app itself is based on Firebase and Firebase Functions was an obvious choice for sending emails. What was not so obvious is how to put everything together. I went through the pain and finally figured it out.
There are many transactional email providers, but I chose Mailgun. Mostly because of their cool name and logo, and also because they have a generous free quota (5K emails/month) and a nice Javascript SDK.
I won't go through setting and configuring Mailgun, DNS and all that jazz. They already have good documentation on how to do it. Instead, I will concentrate on wiring everything up in code.
There are several Mailgun libraries on NPM, but we will go with the official one. It's written in Javascript and if you are using Typescript you have to install the types.
$ npm add mailgun.js @types/mailgun-js
Because Mailgun SDK is written in Javascript you have to add esModuleInterop to your tsconfig.json.
exportconstsend = (subscribers: string[]) => mg.messages().send({ from: 'Mailgun Test <noreply@mg.example.com>', to: subscribers, subject: 'Mailgun test', text: 'Hello! How are you today?', html: '<h1>Hello!</h1><p>How are you today?</p>' });
So far, so good. With this code we can send an email to a bunch of subscribers whose email addresses are passed in as a list of strings.
Firebase Remote Config
Mailgun SDK requires an API key to send email. While you can hardcode it in your code, as we did in the example above, you should never do it. Instead, we can leverage Firebase Remote Config for this and keep our Maingun API key securely stored in it.
Also, make sure to keep all your config keys lowercase or Firebase will complain!
Now, when the Firebase emulator starts it will pickup the local config. This means that we can get the key from the functions config.
// email.ts
import * as functions from'firebase-functions'; // ...
const apiKey = functions.config().mg?.key;
Our basic email function is now done. Let's continue with setting up our Handlebars templates.
HTML email templates with Handlebars
HTML email design is hard. It's like going back to the 90s again. Tables and all. Luckily there are plenty of apps that can help you with that. Maybe you even have an old copy of Adobe Dreamweaver laying around somewhere? If you a feeling adventurous.
But, we are aiming for the MVP here as this article's focus is on the technical implementation and not on email design.
My goal was to keep the email templates separate from code and Handlebars is a good fit for that. With that said, it was not as straight forward as I first thought.
Handlebars.js is one of the templating languages that allows you to precompile your templates, so you can later import them in code. It took me a while to get it right, but here is how you do it.
First, let's install Handlebars and npm-run-all utility package that we will use for the precompile step.
$ npm add handlebars npm-run-all
Next we need to create two Handlebars templates. One for html emails and one for text emails.
Create an emails folder in the root of the project and then create two files in it - html.handlebars and text.handlebars.
{{!-- html.handlebars --}}
<h1>{{title}}</h1>
<p>{{body}}</p>
<p>All the best, John</p>
Text template is needed for email clients that can't display HTML. I am looking at you Mutt!
{{!-- text.handlebars --}}
{{title}}
{{body}}
All the best, John
Now that we have created the templates we need to precompile them with this command.
// import our email and text precompiles templates const html = Handlebars.templates['html']; const text = Handlebars.templates['text'];
exportconstsend = (subscribers: string[]) => { const data = { title: 'Mailgun Test', body: 'How are you?' };
return mg.messages().send({ from: 'Mailgun Test <noreply@mg.example.com>', to: subscribers, subject: data.title, text: text(data), html: html(data), }); };
Our email send function is now complete, but let's streamline our development environment a bit, so that Handlebars templates are precompiled automatically before we build our functions.
Change the scripts section in functions' package.json to this.
When we now execute npm run build Handlebars will compile the templates first before we compile function. This is done with run-s (s is for serial) which is a part of the npm-run-all utility package.
Wiring everything together
Now that we have all the different parts done, let's wire them all together.
// functions/src/index.ts
import * as functions from'firebase-functions'; import { send } from'./email';
That's it! Now you can send transactional emails with Mailgun through Firebase Functions. I kept the example minimal in order to keep things simple, but you can fetch data from Firestore or send the email in the Firebase trigger functions. Imagination is the limit!
BONUS: Firebase Functions Emulator Startup
If you what to start both Firebase emulator and function compilation watch, when you start the project, change the scripts section of your main project's package.json to this.
This is just one way to send transactional emails from Firebase functions. To keep templates separate from code we had to precompile our email templates as Firebase functions can't deal with file system very well. I am sure there are other templating languages that support precompilation, but Handlebars is good enough for the task.
]]>RxJS beginner learning resourcesCarefully curated list of best RxJS learning resources for beginners2020-12-05T00:00:00Zhttps://codechips.me/rxjs-beginner-learning-resources/RxJS is such a wonderful technology. Seriously. It's too bad that not many people outside Angular use it. But I totally get it. The entry bar is really high. Some say it's even higher than Vim's.
I learned Vim and I learned RxJS. I didn't say it was easy. Was it worth it? 100%. The key is being persistent and not give up. If I could learn so can you!
I've compiled a list of some of the best RxJS resources for people who are just getting started on their wonderful journey to become RxJS masters.
What is RxJS?
Observables, multicast, share, subscriptions, hot, cold, async, streams, forkJoin, switchMap, concat. Oh my! Those terms alone can scare one off. But don't be afraid! Once you follow this guide everything will start making sense.
The way I like to think about RxJS is that it's a library that helps us process our data through a data-processing pipeline we define.
When you hear people talk about RxJS you often hear the word streams. Well, it kind of makes sense. The data flows through the processing pipeline just like water flows through a pipe.
RxJS also contains the word reactive in it. Let's talk about it and what reactivity means in this context. I like to think of it as the data pipeline only activates (reacts) only when we tell it to. What do I mean by that? Let me explain.
Reactivity means that we can trigger our data processing pipeline by various inputs or events that we define in the pipeline. But there is a catch. The pipeline is not activated, even when triggered by our defined events, unless we tell it that we are interested by subscribing to it. No subscribers, no reactivity, no data.
This works as a kind of pull model, even though the data is pushed through the pipeline. Let me explain. When we subscribe to our pipeline (pull), we activate the pipeline. It then activates the pipeline from the bottom all the way up by saying "Hey, we have a subscriber! Let's start working!" All the events listeners and triggers will get activated and they will start processing (pushing) data through our pipeline all the way down to us when something is triggered. When we unsubscribe, the pipeline will become inactive again, because there are no subscribers.
Does it make sense? It's reactive because it's lazy. Nothing happens until you subscribe. Only then it starts reacting (or working).
RxJS is also a declarative framework. This is another concept that can be hard to understand. With imperative (normal) programming you describe exactly what you want to happen, step by step. You give precise instructions. With declarative programming, on the other hand, you write code that describes what you want to do, but not necessarily how to do it. You say what you want, but you don't specify exactly how. It's compiler's job to figure it out. You give the compiler commands instead of telling it exactly what to do. These commands consists of RxJS operators chained together. The implementation details are abstracted away from you. You specify the desired outcome and compiler will figure it out for you.
This is good, because you are forced to work on the higher level of abstraction. The implementation details are already in place for you. Less code to write. You just have to define the desired outcome in your program and RxJS will take care of it.
Another hurdle, and maybe the hardest to jump over, is thinking in streams. Thinking in streams is super-hard and will take you some time to learn. But it's really cool once you grok it. When you finally reach that "Aha!" moment you will for sure get a rush. Suddenly, it will all make sense and you will realize how to merge, delay, filter, split and do lots of other cool things with streams.
One essential thing when learning RxJS is to take it slow and be patient. You head will hurt, for sure. Try not to get frustrated. It will all click together soon if you are persistent. Later, you will wonder why you didn't learn RxJS earlier and will be telling all your friends how cool it is and you will start prompting it in your circles.
How to use this guide
I've compiled a list of resources that helped me learn RxJS. RxJS is built into Angular, that's why many articles on the internet are Angular based. But you can ignore all Angluar stuff and concentrate only on the juicy RxJS parts.
The guide is broken down into different sections. Start at the top, it will help you learn the core concepts. Later, feel free to jump around to the articles that catch your attention.
When you read an article and learn a new concept, it's not guaranteed to be crystal clear at first. Come back to it sometimes later and re-read it.
After you learn a new concept or operator, try to play around with it to get that hands-on feeling. Spend 20-30 minutes on it. It will be time well invested.
Also, many of the articles included are on Medium. Sorry about that.
Note on Svelte and RxJS
I am a Svelte fan, so I also threw in a couple of Svelte related articles for other Svelte fans out there. One thing about Svelte and RxJS combo is that they go very well together. I like to say that RxJS is Svelte's stores on steroids. You get 200% reactivity if you use RxJS.
Another cool thing is that you don't have to use onMount, when fetching data for example. Why? Because RxJS is lazy (reactive). Since Svelte views RxJS pipelines as Svelte stores, Svelte compiler manages subscriptions for us automatically. Now, how cool is that?!
Basics
The hardest part is getting started. RxJS has many operators, but you only need to learn a handful of them to be productive. Once you learn them, others will start making sense.
Classic introduction to Reactive Programming. This should be your starting point. It's a little dated, but explains the concepts well and teaches you how to think in streams.
My own take on the tutorial above with Svelte and newer version of RxJS. Plus I went a bit further than the original article by removing code duplication.
Coming from imperative background you might wonder where the if statement is. Well, there is no if statement sort of. Instead you use operators like map and filter to achieve the desired branching logic.
Hot and cold observables. You will hear it a lot when learning RxJS and will most likely get burned by it sometimes. This short article explains the concepts very well.
You will get errors and exceptions when working with RxJS and you need to know how to handle them. This in-depth article explains how to deal with errors the RxJS way.
Little dated, but still very good RxJS concepts overview from Fireship. With complementary video too!
Intermediate
Once you get down the basics your imperative mind will still struggle to translate it to declarative thinking. You need to revisit the concepts and examine them closer, more in-depth.
After you learn the basics, you only need to learn a handful of operators. Like, really learn them. Especially different mapping operators. Higher-order observables can be tough to grasp.
Below is a collection of intermediate resources. They all require basic RxJS knowledge. Without it they will be either overwhelming or will just not make any sense to you.
Continuing on the topic of custom RxJS operators. Here is a very good article explaining how to create a custom tapOnce operator. You will be using tap operator a lot when you need to debug your pipelines and see what data flows through them.
Lots of good resources and short interactive animations comparing different operators together. Site feels a bit messy, but the information is really good.
Advanced concepts talk that goes very deep. Expect to scrub a lot in order to understand everything.
Personal tips
Here are some tips from me that can help you on your RxJS learning journey.
Don't give up! If will be hard, but if you give it time, it will all come together soon. Things will click, I promise!
Use tap operator for debugging your pipelines. Inject tap(console.log) anywhere in your pipeline to view the data flowing through it.
You will probably start by composing very large pipelines. It's OK. Later, try to write small single-purpose operators instead and learn how to combine them. View them as Lego bricks.
Learn of, from, merge, BehaviourSubject, combineLatest, startWith and all the mapping operators. They will give you a solid base to stand on.
Exercises
You can read articles and watch videos all you want, but in order to truly learn and understand you have to do some coding. Here are some good problems you can try to tackle with RxJS.
Timer App
Try to create a simple timer app. You should be able to start, stop and reset the timer. Bonus points: be able to set a countdown time.
Typeahead Search
Try to implement a simple typeahead TV show search by using Episodate API.
Closing words
RxJS is a wonderful technology, but it's not widely adopted yet. One of the main reasons might be the lack of good learning resources. Hopefully this resource will help your discover its super-powers.
My main advice is to take it slow and don't give up! It will all click soon enough if you are persistent. Soon you will be wondering how you even could do something without RxJS and will mutter for yourself how easy you could have solved the problem if only this project used RxJS.
]]>How to setup Vim for Svelte developmentLearn how to configure Vim as the ultimate IDE for Svelte and TypeScript development2020-12-10T00:00:00Zhttps://codechips.me/vim-setup-for-svelte-development/I like Vim. I like its simplicity, its ugliness. There is something appealing about its GUI constraints too.
Let's be honest. Trend sensitivity in tech is a big problem. Developers are jumping from editor to editor whenever something new, hot and trendy comes out. Always searching for the Holy Grail. Sublime, Atom, VSCode. What comes next?
Vim is a very old editor. It's 25 years old. That's ancient in the tech world. What can possibly justify this piece of software's existence? Something must be good if it still lives, right? What are the benefits?
One of Vim's powers is its simplicity and extensibility. It's a very extensible editor. It's also scriptable. It has macros and tons of other useful features. It's small, doesn't hog your CPU and make your computer fans go crazy. It often comes prepackaged with almost every Unix-like operating system.
It's also a powerful editor for Javascript, TypesScript and Svelte development.
Neovim
Neovim is the modern fork of Vim. Its goal is to clean and extend Vim with modern features. Personally, I don't use Neovim. I tried it, but I can't honestly tell what makes it better than the original Vim. The gains are not obvious to me. I am sticking to original Vim for now, currently version 8.2.
Ever Heard of Emacs?
You might say "But what about Emacs?" I tried Emacs too for a while after getting inspired from watching Emacs Rocks videos. Tried only to realize that I was spending most of my working time configuring Emacs instead of doing the actual work. Also, I already have an operating system, thank you.
Oh, and you know, all those people who just have to crack a joke about exiting Vim, why don't you ask them to try and exit Emacs next time? Look who is laughing now!
Side note: Vim + Tmux = Power
I always use Tmux and Vim together. What it Tmux? I would describe it as a tiling window manager for the terminal. You have to tweak it a bit to you liking, but once you master it, windows will start flying.
This is out of scope for the article. I just wanted to mention it.
Svelte Syntax Highlighting
First things first, we have to configure Vim syntax highlighting for Svelte, Javascript and TypeScript.
For Svelte, vim-svelte is the plugin to use. It provides indentation and syntax highlighting for Svelte components. There is also vim-svelte-plugin that does the same thing.
For Javascript language highlighting, you have a few different options. The most popular seem to be vim-javascript and this is what I use.
There is also vim-js and jats. If you are feeling adventurous check out vim-polyglot, a plugin with more language syntax hightlights that you probably will ever need.
When it comes to TypeScript, I settled on yats.vim. I find it the best, but typescript-vim is another good option.
I am using vim-plug as my Vim plugin manager and if you do too, this is how to add them to Vim config file.
Syntax highlighting is a nice to have, but autocomplete is essential for a good coding session. Let's tackle that next.
Svelte Autocomplete with Coc.nvim - Conquer of Completion
Honestly, how did I write code in Vim before this extension existed? Apparently I did, but I bet it was painful.
Coc.nvim is a must-have if you are a Vim user. It's an "Intellisense engine for Vim8 & Neovim, full language server protocol support as VSCode" according to their website.
What does it mean? It means it supports the same language protocol standard as VScode, which in turn means you can easily implement an autocompletion for a language if that language has a language server. Crystal clear, right?
Installing Coc.nvim is straight forward. Add the line below to your .vimrc in the right place and run :PlugInstall.
Plug 'neoclide/coc.nvim', {'branch': 'release'}
Coc.nvim has many extensions and we will install one for Svelte next, along with a few others we will need too.
coc-svelte
If you are coding Svelte in Vim coc-svelte is a must. Unfortunately, the original extension's Svelte dependencies are lagging behind, so I keep my own fork of it where I try to keep upstream dependencies in sync.
Beside Svelte extension we also need to install TypeScript Coc extension. It will help us with autocompletion for TypeScript and JavaScript. Install it in Vim by running :CocInstall coc-tsserver command.
Coc.nvim autoupdates dependencies in the background, but you can always update them manually by running :CocUpdate command.
Setting up svelte.config.js
If you are using TypeScript, SASS or PostCSS in your Svelte components you have to create a svelte.config.js file in the root of your project. That file is needed by coc.nvim in order to interpret those parts of the Svelte files correctly. Read my TypeScript and Svelte article on how to do that - How to use Typescript with Svelte.
Formatting Files with Prettier
We also want our files to look nice and therefore we need to format them. There is a coc-prettier extension that does that, but for some reason it breaks Svelte files for me instead. Sometimes it doubles the lines at the end of the file. For that reason I decided to go with vim-prettier extension instead.
For Prettier extension to work properly it needs to find a prettier CLI and Prettier configuration. There are multiple ways of configuring and setting it up, but I always do it locally for every of my projects. It's the easiest.
$ npm add -D prettier prettier-plugin-svelte
You also need to add Prettier vim plugin to your Vim config and tweak some of its settings.
" Prettier Settings let g:prettier#quickfix_enabled = 0 let g:prettier#autoformat_require_pragma = 0 au BufWritePre *.css,*.svelte,*.pcss,*.html,*.ts,*.js,*.json PrettierAsync
One drawback of Prettier is that you have to install Prettier and prettier Svelte plugin in every Svelte project. It might be possible to use a global Prettier config, because it will search for Prettier configs up the tree.
However, I strongly advice against doing it, because you might want to share same config with your team.
My prettier config usually looks something like this.
Prettier uses cosmiconfig. That means you can use any name and format it supports.
Configuring Coc.nvim
If you need to configure Coc.nvim and its extensions you can open the config file directly in Vim by running :CocConfig command. You can also edit the coc-settings.json file directly. You will find it in your ~/.vim folder or ~/.config/nvim if you are using Neovim.
Maybe you can get some inspiration from reading them.
A Few More Tips
It's not sure that Vim will recognize that your Svelte file consists of different sections and languages (JavaScript, CSS) and might comment them out using HTML comments when you try to comment them out.
It happened to me, and if it happens to you, here is how to solve it.
Install the context_filetype Vim plugin. It will help us set the filetype based on the file section.
Plug 'Shougo/context_filetype.vim'
Add the following code to your Vim config.
if !exists('g:context_filetype#same_filetypes') let g:context_filetype#filetypes = {} endif
My goal has always been to shorten the time between an idea, a thought, and its final implementation on screen. I think I've come pretty close by now by using Vim as my main editor.
However, learning Vim comes with a price. I can barely write anything outside Vim now. Short texts, no problem. Longer texts, forget it. The muscle memory is strong!
One big reason I like Vim is that it's never in my way. I don't like being distracted. It's just me, a black computer screen and my thoughts.
My final advice:
Stop jumping around, always looking for something better, and invest your time and energy into something that has proven its value by now - Vim.
Very few people can master Vim fully, but many will increase their productivity from learning just a bit of Vim and by just start using it in their daily work. Try to stick to it and miracles will happen!
Never copy someone else's config. Start with sensible defaults and build it up as you go.
If you want to learn Vim, Vimcasts is a good starting point. Godspeed.
]]>Svelte's module scripts explainedLearn everything about Svelte's module script blocks and how they work2020-12-17T00:00:00Zhttps://codechips.me/svelte-module-scripts-explained/Svelte module script blocks have always been little mysterious to me. Sure, I use them all the time, but I never actually took the time to learn how they work.
Today I finally decided to go to the bottom of this. What I found was surprising, but I was actually not that surprised. Maybe it's because this is exactly how I imagined them to work?
Anyhow, turns out it's very simple and the Svelte compiler does no magic at all! Read on to learn how Svelte's module scripts work!
Note: This article is code-heavy. It's needed in order to clarify things. The code examples themselves are however kept light. No need to complicate things to get the point across.
Getting the basics down
You have probably stumbled upon module functions if you've worked with Sapper. This example is taken straight from its documentation.
const res = awaitthis.fetch(`blog/${slug}.json`); const article = await res.json();
return { article }; } </script>
<script> exportlet article; </script>
<h1>{article.title}</h1>
How does it work and how is the article available to the component? Well, in case of Sapper there is some magic going on behind the scenes, but to explain it in simple terms:
Everything you define in a module script block will be available to the component defined in the same file.
Let's break it down and start with the basics. First, we create a simple Svelte component that has a module script block. In order to understand what's going on we will add a few logging statements.
In the module block we defined two variables, foo and settings. Then, in the component itself we access those variable just like we define them in the component itself.
How is that possible? If you look at the Javascript file Svelte compiler generated for us you will see that the things we defined in the module block were copied to the main module file.
All the compiler does is to copy over anything defined in the module block to the top of the Javascipt module file where component is defined.
Since our Svelte component lives in the same module file, everything defined in the module context is automatically available to the component. That's how Javascript scopes work.
When we import the component into our index.svelte file it will import the component class itself because it's a default export from the Javascript module Component.js.
Since component is defined in that module the module will be parsed and executed by the Javascript engine and all module level variables will be initialized.
importComponentfrom"./Component.js";
When we view this page in the browser with dev tools open we will see this output in the console.
As you can see from the screenshot the module is executed only once, and also before any component is initialized. It happens when this module is imported by some other file.
When variables and functions are defined on the module scope they will be evaluated only once, when the module is first evaluated (imported), and will be available to all components defined in that module.
As of today, you can only have one component per module in Svelte, but there is an RFC to be able to define multiple components per module, eg in one Svelte file. Maybe we will be able to in Svelte v4.
Hopefully this make it more clear how module level scripts work, but it's not very useful right now because we cannot manipulate these module level variables. Let's fix it.
Making it useful
In order for us to be able to change our shared variables, and for those changes to be picked up by all components, the variables have to be reactive.
Now we can manipulate those variables from any component and all the changes will be instantly reflected in the other components. The power of Svelte's reactivity.
Module exports
But what if we want to manipulate and access these module variables outside the component itself? We can do that by prepending an export statement to the variables and function we want to export.
// export foo store from module exportconst foo = writable('foo'); // this store is private, not exported from the module const settings = writable({ show: true });
exportconstsetFoo = s => { foo.set(s); };
// export function to manipulate module state that is private to the module exportconsttoggleShow = () => settings.update(state => ({ ...state, show: !state.show })); </script>
If you look in the end of the compiled file you will see that the Svelte compiler exports these variables for us along side with the default Component module export.
// Component.js
const foo = writable("foo");
// this store is private, not exported from the module const settings = writable({ show: true });
This is pretty much everything you need to know about Svelte's module script blocks.
DIY context="module"
If you for some reason don't want to use module scripts you achieve the same functionality with pure Javascript modules. Here is a simple example of how to do it.
<!-- Page.svelte (former index.svelte) -->
<script> // import module state and Svelte components from main module file import { Component, toggleShow, setFoo, foo } from'./index';
As you can see, we managed to replicated Svelte's module block functionality with regular Javscript. I don't know if we gained anything from it though. Feels like it only complicates things for us.
Summary
The context module directive is straight-forward when you examine it closely. When you tag your script with context="module" the code it contains will be copied to the module level of that Svelte file. That's it. How variables and functions defined on the module level can be accessed in the component class is just how JavaScript scoping works.
You can find the full code for this article if you want to play around with it.
One might wonder why there's such trivial, and even unnecessary, functionality in Svelte as module level blocks. Modules and Svelte slots allow us to build very powerful abstractions on top of them. I will teach you how in my future posts.
]]>Sapper server-side authentication with Auth0Learn how to setup Express authentication in Sapper with OpenID Connect2021-01-06T00:00:00Zhttps://codechips.me/sapper-auth0-authentication/I hesitated to write this post since the announcement of SvelteKit and with it the slow death of Sapper. But who knows when SvelteKit will be released, so here is a short post on how to setup server-side authentication in Sapper.
One year ago I wrote a post on how to do client-side authentication in Svelte with Auth0 - Svelte Auth0 integration in 66 LOC. While it's possible to use it in Sapper you shouldn't do it. There is a better, and more secure way, to do in with Express middleware called express-openid-connect.
This post will also show you how to make authenticated requests to your third-party backend API using Auth0 access tokens.
Although the express authentication middleware is maintained by Auth0 it's not locked to it and you can use it with any OpenID Connect provider.
I am using it in a Sapper app running on Vercel with Auth0 as my authentication provider.
This app is an internal app and one nice thing about Auth0 is that you can do fancy stuff in the configuration, such as allow users to sign in with their Google account, but restrict it to your company domain only.
NOTE: The app itself is written in TypeScript and therefore all examples will be in TypeScript as well. If you are not using TypeScript you can just omit all the type imports and their usage in code.
Also, all code examples are copied straight from the app and slightly adjusted. This post is meant to guide you in the right direction and not serve as the complete working example.
The Setup
Sapper is using Polka as a default server, but I use Express.js in my app. Since the app is written in TypeScript so we also need to install Express.js types.
$ npm add express @types/express
Because we will be making requests to the backend API we also need to install some kind of HTTP client. There are many good clients available. Some of the most popular ones are Axios, Superagent and got. In my app I use wretch, a thin wrapper on top of the Fetch API that also works on the server.
$ npm add wretch node-fetch form-data
With all required dependencies in place we can now start configuring our Sapper app for backend authentication and remote HTTP calls.
Sapper Middleware
I assume that you already have your Auth0 config ready, so I won't explain how to set everything up in the Auth0 console. Two important requirements is that your config is setup as a backend app and not SPA and that you have defined an audience.
The audience part is crucial, otherwise you will not get a correct JWT token back. Also, it's important that you use access_token for your backend calls and not id_token. This is a common misconception and mistake I see developers make. Id tokens should only be used for fetching profile information! You must use access token if you plan on setting up and using grants aka API access permissions.
Here is the server.ts file in all its glory with Auth0 middleware in place.
if (dev) { app.listen(PORT, () =>console.log(`Listening at http://localhost:${PORT}`); }
exportdefault app;
As I mentioned earlier this app is running on Vercel and Vercel builder requires us to export the app. I am setting up wretch in the beginning of the file. This is needed for it to work on the server-side.
I also setup Auth0 config using environment variables. The cookie secret variable is just a random long string that openid connect middleware will use to sign (and maybe also encrypt?) the authentication cookie with. The rest of the values comes from Auth0 config.
You can see that I wrap Sapper middleware into its own function. That is needed, otherwise it will override the openid connect routes. It's important that Sapper middleware comes last in the middleware chain.
The openid connect middleware exposes /login and /logout routes in our app that we will leverage. It has tons of other configuration options, which I only understand half of. The documentation is very good and you have plenty of different authentication example scenarios to choose from.
We are done with server configuration. If you set up everything correctly and can start the app it means that we are half-way and have enabled server-side authentication in our app.
Let's put it to use!
Checking Authentication State
Since we've added Auth0 state to the Sapper session with isAuthenticated and user properties, we can use them both on server-side and client-side to check the if the user is logged in or not.
As you probably already know, Sapper hydrates the app. It means that the initial request will be processed server-side and then, when you request a new route, Sapper will intercept it, fetch the page in the background and replace it for us on the client-side. This is what makes Sapper apps and page transitions smooth like butter.
You can access Sapper session in any page of your app, but probably the best way to do it is in _layout.svelte as this page is usually shared by other pages.
{#if $session.isAuthenticated} <div> Signed in as <strong>{$session.user.given_name}</strong> | <ahref="/logout">Sign out</a> {:else} <ahref="/login">Sign In</a> {/if}
<pre> {JSON.stringify($session, null, 2)} </pre>
That's it! Now you should be able to login and logout through Auth0 middleware. To test that authentication works correctly: login, logout and hit the back button in the browser. Are you still logged in or do you end up in the "not authenticated" app state?
All is good, but the app is kind of useless if we can't make authenticated calls to our backend API. Let's tackle that next!
Secure Backend Calls
This is the hard part. We want to call our backend API using Auth0's access_token. It's not as straight-forward as you might think. Because of CORS restrictions I found that the easiest way to call external backend API is through Sapper's backend API. You can say it's kind of an internal proxy call.
What do I mean by that? We need to create a separate backend API route in Sapper for every call we want to make to our external API. So the flow will be "Frontend Ajax Call -> Sapper API route -> External Backend API". "Why the ceremony?" you might ask. Bear with me and I will explain everything.
You see, when you authenticate with Auth0, the middleware will set a cookie for us in the browser and that cookie will be sent and validated on every request to the backend. There are no databases involved. The complete Auth0 session is kept in that cookie. What's stored in the authentication cookie is partially defined by the scopes we defined earlier in the Auth0 config in server.ts file.
This means that we have access to that information in the Sapper's backend. Let's use it by creating a simple Sapper API endpoint where we fetch some user info from an external API.
Create a new API route at src/routes/api/user.fetch.ts. This will create a new API route in our Sapper app available as /api/user.fetch. I like to use this kind of RPC route names. I got inspired by Slack's API and it makes them much nicer to read and understand in my opinion. Single purpose.
There is nothing magical going on. We call this route with GET /api/user.fetch?id=123 in the frontend, extract the user ID from the request object, call our external API with the access token and then return the result back to the frontend.
In this backend route you can validate your payloads and massage the response before it's sent back to the client if you need to.
You might have noticed the getAccessToken(req) call. This is where we fetch the access token. I've abstracted it away so I can reuse it in other API calls.
This is just a helper function that extracts the access token from the request and refreshes it if it's expired. I haven't validated it, but I think that the library makes an call to the Auth0 if the access token has expired and needs to be refresh. Doing that little OAuth jazz dance.
If you want to get access token on the client side, and make an API call directly from your frontend, here is an imaginary API route that can help you achieve it.
Something like this. You can even put in on the session object. However, I strongly advise you not to call your backend from frontend directly!
First, you have to deal with CORS pain. Second, access tokens are short lived and if you cache them on client-side you have to keep track of expire time and refresh them. More code, more possible bugs and potential security issues.
Putting It All Together
We now have authentication middleware and our "proxy" API routes setup. Let's wire everything together by fetching the data from our backend API route.
This is it. Everything you put in your session store will be available to other components of your app. If you have some shared data, the best place would probably be to seed it in the _layout.svelte file because this file is shared by other pages.
As you see, SSR is not easy. Especially when you have to deal with authentication. It often leads to more code to maintain and also to insecurity if security is correctly setup. At least for me. Are the trade-offs worth it? I am not sure.
One issue that I haven't really solved yet is the case when Auth0 session times out. That happens when you leave your browser window open and come back to it a few days later. It looks like you are logged in. You can navigate between pages, but when you try to call a third party backend you get error back because the access token cannot be refreshed because the main session has timed out.
It's not a big blocker for me since this is an internal app, but would be nice to solve it somehow. One idea that comes to mind is to start some kind of timer on the frontend with the token expire time set and when it times out just log the user out. I need to test it soon. If you have any other ideas please shoot me an email and I will add it to this post.
Although the code in this post is maybe not something that you can just copy and paste straight off, but hopefully it will point you in the right direction on how to handle server-side authentication in Sapper.
]]>Eslint, Svelte and TypeScriptLinting is useful, but can be overwhelming to set up. Here is how I did it.2021-03-04T00:00:00Zhttps://codechips.me/eslint-svelte-typescript/You never realize what value linting brings until you start using it. I was that developer once. Ignorant. Why use linter when you have svelte-check, right? Wrong! The TypeScript compiler won't either help you catch all errors. It will not whine about you naming your variables incorrectly. Nor will svelte-check, but a good linter will annoy the hell out of you until you learn to do things right.
A short while ago Svelte's Eslint plugin didn't support linting TypeScript in templates. That was a show stopper for many. Now that it's in place there is no excuse not to use it.
In this post I will guide you to the right tools and libraries for building a proper linting pipeline for your Svelte Typescript-enabled project.
Project Setup
First, we need a Svelte project to test this on. Let's use the official Webpack template for a change. The template comes with TypeScript support that we need to enable explicitly.
$ npx degit sveltejs/template-webpack svelte-eslint $ cd svelte-eslint $ node scripts/setupTypeScript.js $ npm install $ npm run dev $ open localhost:8080
If you followed the instructions above you should see a simple page with "HELLO WORLD!" displayed on it.
Setup Prettier
If you use Svelte's official VSCode extension you get auto formatting for free, but I use Vim, so I need to setup Prettier explicitly.
$ npm add -D prettier prettier-plugin-svelte
Even if you use VSCode extension it's a good practice to create a Prettier configuration for every project. We also need it to format the code when linting as you will learn later.
Above is my Prettier configuration, but you can adjust it to fit your needs.
Strict mode on
When starting a new TypeScript project it's a good idea to turn the strict mode on directly. For this we need to change the tsconfig.json to the following.
Again, TypeScript configuration varies greatly. Adjust if needed.
Linting and formatting are two different concepts. Try not to mix them. I know that you can integrate Prettier with Eslint, but don't do it. It's always better to format files separately, before you lint them.
Setting up Eslint
The time has come to setup Eslint with TypeScript support. Let's install the required dependencies first.
Now we need to add ESlint configuration file. If you are using Tailwind CSS you have to disable Eslint from linting the <style> tags in Svelte templates. You can do it in the settings section of Eslint config by setting svelte2/ignore-styles setting to an function that returns true. I know, weird, but it works.
If you have done everything correctly, and your editor has linting support enabled, it should just work. If you are not sure, check the guidelines on how to integrate Eslint in your editor.
Next thing we need to do is to add an error to the app to see if the ESlint catches it. Replace the script section in App.svelte with the code below.
The prelint command will make the format command run before doing the actual linting, "format, then lint" style. It will be invoked automatically if you run npm run lint or npm run lint:fix. This is neat. One less command to keep in mind.
Try to lint the project and see Eslint catch the $store.length error above. This error would have slipped though the TypeScript compiler, try running npm build, but now Eslint caught it for us.
BONUS: Lint before you commit
Humans are not machines, not yet at least. It's easy to forget things, because it's ... human. Therefore, we need to automate things as much as possible so nothing can slip through the cracks. Husky and lint-staged are two tools that can help us achieve this.
Husky is a CLI tool that helps working with Git hooks easier. It will install Git hooks that we can in turn hook up different commands to. We can for example use the pre-commit Git hook to trigger a command and depending on the outcome either allow or disallow a commit.
Another tool, lint-staged, helps us narrow it down only to the files that have changed. This might seem unnecessary, but as your project grows in size I guarantee that you will appreciate it. Let's install and configure them.
$ npm add -D husky lint-staged $ npx husky init
Husky should now have installed a pre-commit hook in the .husky directory. Open that file in your editor and add the npx lint-staged command to the bottom.
#!/bin/sh . "$(dirname "$0")/_/husky.sh"
# run lint-staged command npx lint-staged
To explain, every time you will try to commit your changes in Git Husky will call lint-staged command and that command can in turn call other commands on only the files that are affected by the commit.
You can configure lint-staged in many different ways, but for our case adding a new lint-staged option in the package.json file should do.
"lint-staged":{ "*.{js,ts,svelte}":["svelte-check","npm run lint:fix"] }
This configuration will run the two commands above on any files matching the pattern when you try to do a Git commit. If the checks fail nothing will be committed.
One thing I recommended doing is to add the linting to your build command as the first step. If something managed to slip through the cracks it will be caught there. You probably don't build production builds often, maybe you even have a CI pipeline setup for this, so it will not affect the DX and slow things down for you.
You can write JavaScript in many different ways. Linting helps you stick to the defined rules and keep your code consistent. TypeScript compiler can help you catch some errors, but not all. A good linter will guide you to write better code and become a disciplined developer.
Solid linting pipeline can be daunting to setup. Honestly, I've been skeptical of linting and haven't used it much myself in the past, but after working on a bigger project with many developers involved I realized why people use linters and why they are extra useful in a JavaScript project.
I cannot guarantee that my setup will work for you, things move fast in the frontend world, but at least I hope that you got some inspiration out of it.
]]>Reactivity News #10Repost of Reactivity News March 2021 edition, my Svelte focused newsletter2021-03-10T00:00:00Zhttps://codechips.me/reactivity-news-10/Welcome to the March 2021 edition of Reactivity News. This edition covers SvelteKit, bundlers, forms, interesting projects found across the web and the mandatory Bad Joke of the Month.
Svelte Trunk
Svelte crew managed to get four releases out in February. Incredible! Check out the changes below.
If you a curious about the future of Svelte, check out the RFCs repository. Lots of interesting suggestions and discussions going on there.
Sapper Trunk
Sapper had one release last month and is now on version 0.29.1. If you are using TypeScript that release probably broke some types for you, the Preload.Preload one.
I like bundlers as much as I hate them, but they are fun to play with. I tried Snowpack before the official version 2 came out and really liked it, but after using it for a few projects my feelings are mixed. One recent project upgrade from Snowpack v2 to v3 didn't go smooth for me either.
Rollup is currently the official bundler for Svelte, but I think it's more suited for building libraries than web apps. I like Svite, but the author put it on hold after Vite v2 came out. What else is left? Webpack of course!
I must admit that actually never took a close look at Webpack, because I always found its configuration daunting. This ignorance made me reject it. This time I decided to take a deep dive and finally find out what it's made off.
It took me a while to go to the bottom of things, but it was worth the time. I think I've finally found the bundler I've been looking for.
Webpack might not be the fastest bundler, but it's solid as a rock and flexible as a Russian Olympic gymnast. It's also the oldest bundler (est 2012). This is actually good, because the age means it has a mature codebase, mature ecosystem, tons of documentation and all the wrinkles are ironed out.
Webpack's Svelte loader v3 came out in January and it works incredibly well with latest Webpack 5.
Webpack is slow(er) to start, but once you are up and running, the reloads are blazing fast with hot module reload enabled. The feedback loop is really short.
There is also official Sapper Webpack template with TypeScript support if you want to give it a try.
Vite.js, the next gen ESM bundler, had a v2 release recently, together with a gorgeous documentation site. Its Svelte plugin repo is now archived, but apparently Vite supports Rollup plugins out of the box. Interesting! Just need to find some time to try it out.
Also, I don't know what @benmccann and @lukeed are cooking with Vite, but it sure looks interesting.
Svelte's official Eslint plugin finally supports TypeScript in Svelte templates. Enable it at your own risk in the existing project with strict TypeScript settings on.
If you are using Tailwind CSS make sure to disable the style tag parsing in Eslint configuration or you will get errors.
Interesting discussion (or maybe rant) happened on /r/sveltejs recently - Please Stop being Fanboys. The comments are interesting too. What's your stand on this?
Ever wondered what you can use Svelte's new keywork #key for? Me too! Here is a simple REPL that will make everything click.
Clubhouse is all the rage at the moment and Svelte is there too! Mike Nikles started Casual Svelte Chat on weekdays where you can hang out and chat about Svelte. However, I think that he wants to move it from Clubhouse to some other platform. Check out his Twitter on where and when.
Svelte Quick Tips
Check out Svelte Quick Tips by Dana Woodman. This one on basic internationalization.
MiniRx
I always say that you can double Svelte's reactivity by using RxJS. Florian Spier and friends just released MiniRx, a framework agnostic reactive store backed by RxJS.
Firebase Open Source
Fan of Firebase? Check out this collection of Firebase open source projects.
Svelte Forms
There has been an explosion of Svelte form libraries lately. That's fantastic to see! Forms library are useful, and fun to build, but they will not solve all your problems. More on this further down.
Remember I said earlier that form libraries will not solve all your problems? I know this from experience of building a couple of forms heavy Svelte apps last year. You usually always have a fresh start, but sooner or later you run into edge cases such as parent-child selects, dynamic fields, calculated fields or input formatting. Things that no forms library will solve for you.
Instead of using form libraries, I've developed a set of useful abstractions and patterns for working with forms. It might result in slightly more code, but at least that code is under my control and not upstream in some forms library.
I've distilled and documented all my Svelte forms knowledge in a book. It's the missing manual for Svelte forms. Check it out here.
If you want to use a forms library, there is a whole chapter dedicated to it in the book. You will learn how to build a reactive, validation library agnostic form library with calculator field support in only 100 LOC using nothing, but Svelte.
Bad Joke of the Month
What do you call a dog who can perform magic?
A labracadabrador
That's all for now. See ya next month!
P.S. Like the content? Subscribe to this newsletter at reactivity.news.
]]>Awesome form validation with Vest and SvelteVest.js has become my go-to library when dealing with form validation2021-03-23T00:00:00Zhttps://codechips.me/form-validation-svelte-vest/When it comes to form validation I am a big fan of Vest validation library. It's modular, flexible and half the size of Yup. It also takes a slightly different approach to validation. If you ever written tests in Jest or Mocha before you will feel right at home.
I saw on its website that there was no Svelte example and I decided to fix it. Said and done. I ported its React async validation example to Svelte. This is what the final form looks like.
And here is how I did it.
Project setup with Vite.js 2
If you just want to see the code you can skip to the next section, but if you want to follow along we need to setup a new Svelte project. Vite v2 came out recently and I decided to give it a spin. Apparently it supports Rollup plugins out of the box. This means we can use Svelte's Rollup plugin.
Let's set it up.
# pick vanilla JS template $ npm init @vitejs/app
Switch to the project folder and add Svelte and Svelte Rollup HMR plugin. Since this is a port of the official React example we will reuse its SASS style file. Vite supports PostCSS and SASS out of the box. We just need to install the right dependency.
We also need to teach Vite how to deal with Svelte files. For that we need to create a Vite config file.
// vite.config.js
import svelte from'rollup-plugin-svelte-hot'
exportdefault { plugins: [svelte()] }
Create a src folder in the project directory and move the main.js to it. Make sure to update the script reference in index.html file to point to'/src/main.js'.
From now on it's business as usual to create Svelte files. Let's start with a simple App.svelte file that will use as base for our example. Create it in the src folder.
Start the app with npm run dev. Works? Good! Then let us continue.
Short introduction to Vest
Vest is a validation framework with a slightly different validation approach. Instead of writing your validations with with a DSL like in Yup, you write them as a suite of validation tests.
Here is a basic example of a Vest validation suite.
test('email', 'Email is required', () => { enforce(data.email).isNotEmpty() })
test('email', 'Email is not valid', () => { enforce(data.email).isEmail() })
test('password', 'Password is required', () => { enforce(data.password).isNotEmpty() })
if (data.password) { test('confirm_password', 'Passwords do not match', () => { enforce(data.confirm_password).equals(data.password) }) } })
let data = { email: 'johndoe', password: '', password_confirm: '' }
const result = validate(data)
if (result.hasErrors()) { console.log(result.getErrors()) // { email: ['Email is not valid'], password: ['Password is required'] } }
We extend Vest with a custom email validator from validator.js. We also validate password_confirm field only if form values password field is not empty.
You can see that beside the data we pass additional currentField argument in the Vest callback. This allows to pass a specific field name, and if there are tests defined for it, Vest suite will run validations for that field only.
Vest has no opinions on how you write your validation suite. This allows us to model our form validation exactly how we need it.
This example was to only to show the basics of writing validation tests in Vest, but I've only scratched the surface of what's possible.
Creating authentication form
Next, we need to create our registration form. I tried to keep the structure of the original React form as much as I could.
// we copy the supplied for values to our form state // this is a good practice and helps us with resetting the form let formState = { ...values }
// used as an indicator flag for async username availability check let usernamePending = false
// form submit button status let disabled = true </script>
<formon:submit|preventDefault={submit}id="example-form"class="col-xs-10 col-lg-6"> <h2>Authentication</h2> <Input name="username" label="Username" pending={usernamePending} placeholder="try: ealush or codechips" {errors} bind:value={formState.username} /> <Input name="password" label="Password" errors={{ ...errors, ...warnings }} bind:value={formState.password} onInput={check} /> <Input name="confirm_password" label="Confirm Password" {errors} bind:value={formState.confirm_password} /> <Input name="email" label="Email" {errors} bind:value={formState.email} /> <Checkbox name="tos" label="I have read and agreed to the terms of service." bind:checked={formState.tos} /> <footer> <Buttonclass="btn-submit"type="submit"{disabled}>Submit</Button> </footer> </form>
I've omitted the validation part for now, as we will add it later. Notice that I clone the original form values, supplied to the form component in the values property, into a formState object. I think it's overall good practice to follow. When working with forms you want to work on a copy of the original data. This also helps with form resets as you will see later.
We also re-bind our exported form component values in the main form. Another neat feature in Svelte.
Creating form components
When it comes to form components I just ported them straight from React to Svelte.
<!-- components/Button.svelte -->
<script> exportlet type = 'button' </script>
<button{type}{...$$props}> <slot /> </button>
Our button component contains a Svelte slot. This allows us to pass other Svelte components into it or other HTML elements that can make our buttons look more pretty, like adding a spinning submitting indicator icon.
I like to always give the exported properties default values, so nothing blows up. This is especially true for input handlers. A noop (no operation) function is a way to go to keep JS interpreter happy.
One good thing to know is that you cannot pass type as dynamic property to the input types when you use bi-directional bindings.
You can see that we have a cryptic $$props variable in the components. This magic variable is available in every Svelte component and allows you to pass in properties to the container that are not explicitly defined on it. If that doesn't make sense it will click when we will wire up validation to our form.
Writing Vest validation suite
Let's setup some validation constraints for our registration form. From looking at the form we can see that our fields consists of username, email and password fields. We also have a Terms of Service checkbox that we need to consent to.
Username - cannot be empty, must be at least 3 chars long and cannot be taken
Email - cannot be empty, must be valid email
Password - cannot be empty
Password Confirm - must match password field
Terms of Service - must agree to them
Beside errors Vest also supports warnings. Warnings are non-fatal and will let the validation suite pass. Their role is to advise, not hinder.
// extend vest with email validator enforce.extend({ isEmail })
const suite = vest.create('user_form', (data = {}, currentField) => { // if field name is supplied validate only that field vest.only(currentField)
test('username', 'Username is required', () => { enforce(data.username).isNotEmpty() })
test('username', 'Username must be at least 3 characters long', () => { enforce(data.username).longerThanOrEquals(3) })
if (!suite.get().hasErrors('username')) { // use memoization to reduce the number of API calls test.memo( 'username', 'Username already exists', () => { if (data.username) { returndoesUserExist(data.username) } }, [data.username] ) }
test('email', 'Email address is not valid', () => { enforce(data.email).isEmail() })
test('password', 'Password is weak, Maybe add a number?', () => { // mark this test as a warning only vest.warn() enforce(data.password).matches(/[0-9]/) })
if (data.password) { test('confirm_password', 'Passwords do not match', () => { enforce(data.confirm_password).equals(data.password) }) }
This validation suite is taken straight from the React example. The only new thing I added was the memoization feature of Vest. This helps reduce the number of call to the API when checking the username availability. Vest will remember all the checks we have done so far.
Notice that we don't do any API calls unless all other username checks pass. This is nice as it helps us reduce the number of unnecessary calls to the API.
Below is our fake username API check. It's a promise that resolves or rejects in case of failure.
I think that you can also reject it with an error if you want to show a custom error message.
Wiring up form field validation
We have now come to the final step where we put all the pieces together. Vest has a small CSS class helper utility called classNames that we will use. Its job is to derive CSS class names from Vest validation result.
Svelte differs from React. Svelte keeps it's state in the component, it's stateful, while React is stateless. It re-renders its component DOM on every change. Therefore, for our classNames to work we need to make it reactive by using Svelte's reactive variable functionality. Every time Vest result reference changes it will re-trigger this reactive variable.
// generic form validation function used in form submit callback // and individual form field validations construnValidate = name => { result = validate(formState, name)
// username validation is async and needs special treatment if (name === 'username') { usernamePending = true // for async validation we need to use the done hook result.done(() => { errors = result.getErrors() warnings = result.getWarnings() usernamePending = false // reassignment is needed for reactive cn statement result = result }) } }
Because we have async username validation we need to handle it in the Vest suite's .done() hook. This hook fires when all async validations have run.
Final step is to include our form component in our App.svelte. Notice that we pass down the original form state and submit handler as component properties.
This was a quick port of Vest's async validation React example to Svelte. The purpose was to show the basics of Vest validation library. This is however not something I would do in the real project. In a real project I would use Svelte's one-way bindings, because they are more flexible for such use case. Want to know how? It's something I teach in my Svelte forms book that you can get here.
]]>Why Webpack 5 is the best bundler for SvelteI spent some time learning and playing with Webpack 5 and I was impressed2021-04-13T00:00:00Zhttps://codechips.me/svelte-and-webpack-5/Many new bundlers have popped up lately. You have Vite, Snowpack, WMR to name a few and they are all good in their own way. But there is one bundler that's paved way for them alll, one that's been there for eternity, measured in Internet time, and it's Webpack.
Webpack might not be the sexiest bundler, but it's mature, battle-tested and a lot of teams and projects around the world rely on it. It might not be the fastest bundler, but once it starts the developer experience is on par with other cool ESM bundlers thanks to the HMR support. The reloads are blazing fast!
The thing with Webpack is that it's a real DYI bundler. It's its curse, but also its beauty. It might take you some time to get to the setup you are happy with. The tweaking possibilities are virtually endless. You can tweak every parameter and optimize your production bundle in every imaginable way.
Read on to learn how to start!
Creating the base setup
Webpack in itself is just a library. You need to add a Webpack runner if you want something to happen. The standard, official runner is webpack-cli, but in this example we will use a lightweight runner instead called webpack-nano.
Webpack is all about configuration and if you are not familiar with it, things can get quite intense and overwhelming. You can configure Webpack in many different ways, but the base configuration always has some common parts such a loaders and plugins.
Here is a pseudo code of what a configuration file might look like.
module.exports = () => { return { // the main app entry file entry: { app: ['./src/index.js'] }, // directory to output files to output: { path: './dist' }, // how and if to generate source maps devtool: 'eval-cheap-module-source-map', // how to process different file types using Webpack loaders module: { rules: [ { test: /\.js$/, exclude: /node_modules/, use: { loader: 'babel-loader', }, }, { test: /\.[p]?css$/, use: [ MiniCssExtractPlugin.loader, 'css-loader', 'postcss-loader', ], }, ], }, // which different Webpack plugins to use plugins: [ newMiniCssExtractPlugin({ filename: 'app.css' }), ] } }
The SurviveJS Webpack book preaches another, more sensible approach, to structure your Webpack configuration.
The most common way to configure Webpack is to use different config files, one for each environment. We will not do that. Instead we will have one main config file called webpack.config.js where we will handle configuration for all of our environments and another helper file called webpack.parts.jsthat we will use to assemble the main configuration file with the help of the webpack-merge library. The only thing this library does is to merge the objects together.
To run Webpack we can run this command with the different mode flag.
$ npx wp --config config/webpack.config.js --mode development $ npx wp --config config/webpack.config.js --mode production
The two commands above will run Webpack in development and production configuration modes.
I like to keep Webpack configuration in a separate config directory. Therefore we need to tell Webpack explicitly where to find the config file.
Currently the configuration is empty so don't expect miracles to happen when you run them. Let's fix it.
Adding a dev server
First thing we need to do is to add a development server and an entry index.html file that holds our application. There are two de facto standard Webpack plugins people often use, webpack-dev-server and html-webpack-plugin, but we will instead use lightweight alternatives - webpack-plugin-serve and mini-html-webpack-plugin.
We added another entry point to the configuration - webpack-plugin-serve/client. It's needed for live reloads to work. The serve plugin has many different configuration options
and supports HMR by default.
Also, Webpack normally writes and serves the files from disk. You might speed things up by leveraging webpack-plugin-ramdisk.
Adding Svelte support
Next up is adding support for Svelte files. For that we will use Svelte's official svelte-loader.
Now we have to define a Svelte part in our Webpack parts file. Notice that we also have to pass in the current mode as we need to pass them to Svelte compiler.
Svelte loader configuration is taken straight from Svelte's repo. There is no chance I could write this myself. If you ever looked at Svelte's standard Rollup configuration you will recognize a lot of things, so I will skip the explaining part.
One cool thing I like is that we have granular control over the order the resolved main fields in the package.json files of external libraries. It's something I missed in Snowpack for example.
Adding TypeScript support
Adding TypeScript support is straight-forward. We could add Babel support instead because Babel is much faster than official TypeScript compiler, but we won't do it. Adding Babel only complicates things in my opinion.
Make sure to add the file pattern to the Tailwind config otherwise you will end up with a very large CSS file in production. If you want to get a small CSS file already in development make sure to enable Tailwind's JIT mode.
You can build mini-pipelines of loaders in Webpack. Tailwind is built on top of PostCSS, but you might be working in SASS in your project. Therefore we can pass different CSS loaders in the arguments to the extractCSS part.
Our common Webpack config looks like this so far. Notice that we pass our PostCSS loader as an argument to the extractCSS function. Maximum flexibility!
Handling SVG assets
In Webpack version 4 you were forced to use a separate plugin to handle your assets, but Webpack 5 has built-in support for asset handling.
Asset handling in Webpack is a huge topic. I recommend that you take a look at Webpack's asset module documentation to learn more.
When it comes to SVG you can also optimize your SVGs by using svgo-loader and to other fancy stuff with other Webpack plugins. Search and you will find!
Dealing with environment variables
Webpack doesn't not have native support for environment variables, but it's just one dotenv-webpack plugin away.
Whatever you put into your .env file will be resolved at compile time. Of course, if you have a real environment variable defined, for example in your build server, that will be used.
# .env file KANYE_API=https://api.kanye.rest
That variable is now available in your code in process.env.KANYE_API.
Speeding things up with ESBuild
For larger projects TypeScript compiler can slow things down. Luckily there is an ESBuild plugin we can use to transpile our TypeScript files during development.
I don't recommend using ESBuild for your production build and it does not do any typechecking. This is not a problem for us. We can use ESBuild in our development environment and TypeScript in production.
const production = merge([ { entry: ['./src/index.ts'] }, parts.typescript(), ])
Hopefully you start to get a feeling for how we are assembling our main Webpack configuration piece by piece from separate parts.
Bundling for production
It's good idea to tree shake and minify your bundle when building for production. TerserJS plugin is built into Webpack 5. No need to install it separately. However, if you want to minimize CSS you can do it in two ways: setup cssnano in PostCSS config or use css-minimizer-webpack-plugin. Let's use the plugin.
$ npm add -D css-minimizer-webpack-plugin
Webpack gives you granular control of how your bundle can be optimized and it would require a separate article. We will instead use the default settings which are good enough.
Word of caution: When building a production bundle make sure to specify NODE_ENV=production in the package build script if you are using Tailwind CSS. Otherwise Tailwind will not purge your generated CSS file.
Other niceties
There are tons of other Webpack plugins that you can use in your pipeline. Let's use two of them just for demonstration purposes.
// show a nice progress bar in the terminal exports.useWebpackBar = () => ({ plugins: [newWebpackBar()] })
Hopefully you get the idea of how to setup different Wepback parts and how webpack-merge merges them together.
Dependency analysis
It's always interesting to know what dependencies and the size our production bundle consists of. There are a few plugins that can help you analyze and visualize this. The most popular one is webpack-bundle-analyzer.
Instead of having one giant configuration file we assembled our configuration file from different configuration parts that we have defined in a separate file. Feels a little like building with Lego, don't you think?
The last part we need to do is to add a few NPM script commands to our package.json.
You can't go wrong by betting on Webpack. Many big projects out there use it and they use it for a good reason. It might not be the fastest, but for sure it's the most reliable and flexible bundler on the market today. The tweaking possibilities are virtually endless.
Webpack also has a huge and mature ecosystem. It has no native support for ESM yet, like Vite or Snowpark, but it's in the roadmap. You have to keep up with all the cool kids, right?
The configuration is the hardest part. I suspect that I currently know around 10% of what you can do with and in Webpack, if not even less. The good new is that its documentation is excellent.
One major thing that scares most of the developers is Webpack's complex configuration. Usually it's abstracted away from you when you use some starter packs. My suggestion is to spend some time learning Webpack. It's time well invested. Bundlers come and go, but Webpack is here to stay.
]]>Reactivity News #11Repost of Reactivity News April 2021 edition, my Svelte focused newsletter2021-04-27T00:00:00Zhttps://codechips.me/reactivity-news-11/It's first Monday of the month! This issue's topics are SvelteKit, Deno and writing reactive SSR apps without JavaScript, but first things first.
Svelte Trunk
Svelte had two new releases last month. Incredible pace with no signs of slowing down. Feels like we might go places soon, peeps!
SvelteKit is finally here! Although in Beta, but at least we can study the source code. I can't find the source, but I read that Svelte crew had to make the Github repo public because they run out of quota on the Github actions. That's quite funny if true.
Svelte community is currently bubbling with excitement and somebravesouls have already ported their apps from Sapper to SvelteKit.
There is no official changelog yet, but you can follow the progress towards 1.0 on Github. My prediction is that it will be sometimes at the beginning of summer, but I've been wrong before.
SvelteKit is all about adapters, but it's hard to know what adapters are available at the moment. There are official ones and others built by the community.
Another way to adding new functionality to SvelteKit is by using svelte-adders. Check it out!
One of the major underlying changes to SvelteKit is the switch from Snowpack to Vite 2.0. In my last newsletter I posted a link to a secret repo on Github that I found by accident and that involved Svelte and Vite. I guess that was some kind of POC. This pull request explains the motivation for the switch.
Personally, I will wait with migration as my Sapper app is written in TypeScript and uses Auth0 Express middleware. None of the things SvelteKit currently supports. Auth is currently the biggest unknown, because SvelteKit is true serverless framework and normal things don't (yet) work.
I've been closely following the development of Deno. I like its mascot a lot, but what I like the most is its approach to imports. I believe we are currently in the middle of a paradigm shift when it comes to package imports. My guess that NPM will become less relevant in the near future and decentralization will take over. Snowpack already supports this with its streaming imports and my guess that more will follow.
There are a lot of 3rd party packages and frameworks available for Deno https://deno.land/x
One big unanswered question is how to run Deno apps in the cloud. Heroku supports Deno, but there is also Deno Deploy as an option from the creators of Deno and the company behind it.
Reactive apps without JavaScript
Some time ago I tweeted: SPA = your users pay for rendering, SSR you pay the rendering cost. I quickly got reminded that this cost is nothing compared to code maintenance and the cost of duplication of the models on the client and the server. While using solutions like Firebase or GraphQL might ease the pain, but they will not make it go away.
I like Svelte simply because it fits in my head and also because it has a great DevX. But if we take a big step back and look at our app objectively, we will most likely discover code and complexity not directly related to the apps's functionality per se. Like code bundling or state management for example. Be honest, how many times did you pick a fight with your bundler lately? What about all the time you spent trying to keep TypeScript compiler happy? Also, are you sure that you picked the right state management library for your project? The new one that was released yesterday seems much better. Maybe you should switch to it? The complexity, FOMO and yak shaving is real in the frontend world, folks.
The answer to this on everybody's lips seem to be SSR. It's all the rage at the moment, no matter what problem you have at hand. But wouldn't it be cool if you could build reactive SSR apps, but in a much better way and (almost) without writing any JavaScript?
The internet is getting faster and users expect near real-time experience
Websockets are much faster than Ajax calls because you are already connected
Why send over only data when you can instead send DOM diffs and patch the DOM in the client side?
The statements got me curious and down the rabbit hole I went. Now, I wouldn't use Rails (again), but I got really impressed by Elixir and its Phoenix web framework that offers the same functionality with its LiveView feature that the article mentions.
The DOM patches Phoenix sends over the wire (or websockets) are ridiculously small thanks to smart architecture and the use of Morphdom library.
The most beautiful part is that you barely have to write any JavaScript. You get the reactivity for free with smart DOM patching. Mind blowing!
If the talk got you curious I suggest you watch The Soul of Erlang and Elixir by Saša Jurić next. It explains well what makes Elixir so special compared to other languages and runtimes.
After that you can read these three short(ish) articles:
I've been learning and experimenting with Elixir and Phoenix for that past month and I can't stop. It was long time ago I had that much fun while feeling productive at the same time. Crazy!
Even if you don't plan on using Elixir I suggest you give it a fair chance. It's always healthy to expand your views. Elixir is a functional programming language and it will for sure influence how you write your JavaScript code for the better. A good starting resource is the free and short online book - The Joy of Elixir. Great storytelling too!
I did a TypeScript poll on Twitter a while ago where I asked if people use TypeScript in their Svelte projects. I was truly surprised by the answers. Turns out that majority of people do. Not by a lot, but still. The feelings are however mixed. Maybe the YES/NO poll options were too binary. After all, I also use TypeScript, but only for non-Svelte files.
However, in my recent personal apps I've dismissed TypeScript completely as I feel that it brings little gain and more pain. I feel more comfortable with dynamic nature of JS I guess.
Mint
There is a lot of fragmentation going on in JavaScript land today. You literally can accomplish the same thing choosing one of the 1001 libraries available. Ever needed to have state management and searched for the best option? Good luck deciding!
Elm is the most known language that makes all those hard decisions for you, but looks like its development has stagnated a bit.
Recently I re-stumbled on Mint, a language designed for writing single page applications, in this post on StackOverflow blog. Will it become a game changer or not? Time will tell.
Bad Joke of the Month
Q: Why do French eat snails?
A: They don't like fast food
Want to get this newsletter directly in your inbox? Subscribe at reactivity.news.
]]>Calculator fields in Svelte formsThere are situations when one form field has to act as input to another2021-04-29T00:00:00Zhttps://codechips.me/svelte-forms-calculator-fields/Sometimes, when working with forms in Svelte, there are situations where you need one input field to drive the value of another field. An example would be a blog editor where title form field generates the slug for the blog post. It acts as a driver for it.
Another typical example would be some type of interest calculator form. You change one field and that change forces other fields to recalculate their values.
The first thing that comes to mind is to use Svelte's bind directive, and you are right, but that alone is not enough. We have to use unidirectional (one-way) bindings, made popular by React.
Bidirectional Bindings
By default, Svelte offers bidirectional (two-way) bindings. You bind the input's values with bind:value for text type inputs and bind:checked for checkboxes.
// wire up the generated input handlers listen(input0, "input", /*input0_input_handler*/ ctx[1]), listen(input1, "change", /*input1_change_handler*/ ctx[2])
There is a lot of internal Svelte magic going on, but the important concept to understand is that default bind directives generate code that roughly matches this JavaScript code.
As you can see, default two-way bindings are not magical in Svelte, but by using them we are limited to what we can do. Luckily, we have an escape hatch in form of unidirectional bindings.
Unidirectional Bindings
Instead of outsourcing our input bindings to Svelte we will manage them ourselves. Sure, it's a little more code, but this code give us more granularity and control over what we can accomplish. Now that we know how Svelte compiler does it we can replicate the functionality ourselves.
The handlers are almost the same. Only differences is that they are written by us and not generated by the Svelte compiler. This is important as it allows us to gain control of the logic in them.
The Svelte compiler is smart, it will augment our handlers and wrap state in an internal function. That function invalidates state if it has changed and updates the inputs value. Svelte's reactivity in a nutshell.
For the curious, Svelte compiler is using acorn as JavaScript parser in its compiler toolchain.
Calculator Fields
Now that we've learned both types of input bindings, let's dive into the calculator field generators.
We will keep complexity low. Our requirements is to generate a slug for our blog post based on it's title. For slug generation we will use the slugify package.
Let us also throw in another common business requirement. Slug should not be auto-generated if the slug input field has been touched, meaning interacted with by the user.
Without peeking at the solution below imagine how you would solve it with Svelte's bidirectional bindings. Hard, right?
It's much easier to think in terms of unidirectional bindings for this kind of problem. Here is the solution to the problem.
<script> import slugify from'slugify'
const initial = { title: '', slug: '' }
// always work on the copy of original data let values = { ...initial }
// keep state of touched fields let touched = {}
constsubmit = () => console.log(values)
consthandleInput = ({ target: { name, value } }) => { if (name === 'title') { values.title = value // only generate slug if the field has not been touched if (!touched.slug) values.slug = slugify(value, { lower: true }) }
The solution is naïve, but that's on purpose. I wanted to demonstrate how to think in unidirectional bindings and how they can help you solve problems that Svelte's bidirectional bindings are not able solve in a good way.
Closing Thoughts
I noticed that I reach for Svelte's bidirectional bindings less and less because they are limited when it comes to complex forms. Unidirectional bindings give you a lot more control.
Imagine when you have input fields that are truly dependant on each other, a classical temperature converter comes to mind. I have seen solutions using bidirectional bindings and Svelte's stores to solve this, but the code you end up with is messy and unnecessary complex. However, it's a piece of cake when you reach for unidirectional bindings.
One-way bindings are super-flexible, especially when it comes to advanced form validation. If you want to learn more take a look at my Svelte Forms book. It's packed with cool use cases and easy to understand examples!
]]>Reactivity News #12Repost of Reactivity News May 2021 edition, my Svelte focused newsletter2021-05-31T00:00:00Zhttps://codechips.me/reactivity-news-12/It's May and it's Monday and it's also one year anniversary edition! Time flies! This issue's topics are a mix of alternative frameworks and languages, but first let's see what happened in Svelteverse.
Feels like a lot of energy is going into SvelteKit right now. The logo on its website is stunning. It also has a very smooth setup experience and minimal amount of dependencies. I encourage you to create a new project. I guarantee you will be pleasantly surprised.
Overall it's still a little shaky and rough around the edges, but we are off to a good start! You can tell that SvelteKit is gaining popularity by the increased number of YT videos and all the SvelteKit related questions being asked on Svelte subreddit.
According to Github it's 77% complete. I predicted at the end of June in the last newsletter. Let's see if my predictions hold up!
Sapper Trunk
I guess we can now officially proclaim Sapper dead. Its development has stalled and for a good reason. Good luck with the migration to SvelteKit! Should be smooth as butter.
Fresh out the oven another Svelte state management solution. Immutable store for Svelte with full Typescript support and Redux Devtools integration. BOOM!
The cool thing about Svelte stores is that as long as you fulfill its contract you can pretty much do anything on the inside. No wonder there are so many new solutions popping up. It's fun and easy!
These kind of posts are always super-fun to read. Svelte is (of course) gaining on every front, but it's cool to see Solid.js and Alpine.js get more attention.
Mad scientist Joshua Nussbaum is doing something crazy mad. He is doing a 1000 experiments experiment. One a day. They are not only code experiments, but still! That's like 3 years in total! Currently on #170.
Talking about Gitpod. Mike Nikles, who recently joined the company, has started a project called Webstone. He mentioned it on Twitter after I said that Svelte is currently missing a generator for CRUD. Like forms, DB access and other useful things that some frameworks have. Hopefully this project will make it easier to get started. Contribute!
This is not a comparison of the frameworks. Well, actually it is, but not which one is better than the other. After working with Svelte and using external libraries I've noticed that some of the libraries on NPM work better with React that with Svelte.
Why is that? Because Svelte is stateful and React is stateless. React is declarative. Every time you change state it will re-render itself, allowing you to call some library function in the process. Svelte, on the other hand, will not do anything when you modify state unless you explicitly tell it to.
One way to fix this is to use a computed variable. Every time the variable changes Svelte will call some function, but I must admit that it feels a little "hacky" to me.
SolidJS
I've mentioned above that Solid.js is gaining ground. It's a really cool and well designed framework with a React-like API. One good thing is that it, like Svelte, does not use virtual DOM. It also claims to be the fastest framework, but I doubt that it matters unless you are building games or something else requiring high FPS. I bet that your users won't complement you on your form field validations feeling snappy.
I recommend that you check out the FAQ and read through the articles. Lots of knowledge there.
Elm
My recent frustration with TypeScript and its complex, and fake types, made me re-evaluate Elm. I've mentioned in the latest issue that it feels like Elm's development has stagnated. Turns out that's not the case. The Elm community is thriving and everyone who started using Elm say that they can't go back to writing JavaScript again.
For those of you who don't know what Elm is: it's a strongly typed functional language that compiles to JavaScript. It's famous for its "no runtime errors" guarantee and "if it compiles, it runs" motto. It's also known for CDD (Compiler Driven Development) as Elm's compiler has the best errors messages. It tells you exactly what you did wrong and how to fix it.
I've played with Elm a couple of years ago and liked it, but I've abandoned it because tooling (editor support) was not that great. Things have significantly improved since.
One thing I never liked (and still kind of don't) is the way you write HTML in Elm. It's lists all the way down and if you what to use an SVG icon you have to convert it to an Elm type first. There are CLItools for that or you can do it with Webpack.
Even if you feel that Elm is not for you I recommend that you take a look at it. I guarantee it will influence how you write and structure your normal projects. In a good way.
Start by reading Elm at Rakuten. It's a long article (40 minute reading time!) evaluating Elm after two years in production with many interesting pointers to other places, not only Elm related.
One of the articles mentioned in the article above is TypeScript's Blind Spots that highlights some of the TypeScript type gotchas.
Read also Elm vs. Svelte if you are curious how the two differ.
The Rest
Svelte with Webpack 5
Webpack might be old (I prefer mature), but it won't go anywhere soon. Many companies and projects around the world rely on it. You can't go wrong on betting on Webpack. Here is an article that shows how to setup a Svelte project using the newest Webpack 5.
Never heard of it before, but feels like I am a little late to the party. Neat service if you need to store some JSON in your app. And who doesn't, right?
Finally! Firebase has listened to its users and is releasing version 9 of the SDK which is tree-shakeable. Personally, I am very excited as Firebase SDK (Firestore and Auth) are a hefty (700kb!!) chunk of my app bundle. The app itself is around 150kb. The SDK is currently in beta.
If you don't want to use modern NoSQL solutions plain old SQL will get you far. There is this one project I've been keeping an eye on called Litestream. It's replication of SQLite database. You are probably rolling your eyes, but SQLite will take you far especially if you are on a budget or tinkering with a hobby app. Wrap it in a Hapi or Express server, add Prisma ORM, put it on some PaaS and you've just got yourself a nice and cheap API.
Q: How do you generate a random string? A: Put a Windows user in front of Vim and ask him to exit
That's it for this month. Thank you for reading!
]]>Better Node.js management with ASDFShort practical guide to Node.js version management2021-06-14T00:00:00Zhttps://codechips.me/nodejs-guide-asdf/For a long time I've relied on NVM to manage my Node.js versions. Later onc I switched to fnm. FNM is similar to NVM, but written in Rust. Both of them are good at what they do - managing Node.js versions, but that's about it. They are specialized tools.
Recently I gave asdf a try and I don't think I will ever go back to other Node.js managers. Asdf is not only a Node.js manager. It's a tools manager. It can manage many different tools and programming languages that you probably already use in your daily work. Why use specialized tools when you can use one tool to rule them all?
I've written some notes on now to get started with asdf to manage Node.js. Mostly for myself, but hopefully you will find them useful too. Maybe I can at least awaken your curiosity so you can give it a try!
Installing ASDF
To install Asdf git clone it into .asdf directory in your home folder or some other location. You are free to choose the location, but I strongly recommend sticking to Asdf's recommendation.
If you source your Zsh config the asdf command should be available to you. I am on Linux, so make sure to check installation instructions for your distro or operating system by reading Asdf's excellent documentation.
Asdf is useless on its own. To install a tool or programming language you first have to install a plugin for it in asdf. Maybe a best way is to view asdf as a plugin manager. You first install a specific plugin and then you install specific versions of tools or languages using that plugin.
Asdf has a well thought-out design. You keep everything self-contained and isolated and use asdf top level command to orchestrate everything. Its design also enables modularity and easy plugin authoring. Everything is kept in one local directory - $HOME/.asdf. No chmod or sudo commands required!
You can view all your installed plugins by running asdf plugin list all command. To see all available Asdf plugins you can run asdf plugin list all or visit Asdf's plugin page.
Installing Node.js ASDF plugin
You can install many tools and programming languages with Asdf. Here is how to install Node.js using Asdf.
# add nodejs asdf plugin $ asdf plugin add nodejs
The command may fail if you don't have all plugin's requirements installed on your computer. Often plugins rely on a few specific system packages to be installed. For example Node.js plugin relies on dirmngr, GnuPG, curl and awk to be present.
Installing Node.js
After you have a working Node plugin installation you can proceed to install a specific version Node.js, but first you have to know versions are available.
# list all node versions $ asdf list all nodejs
The command will print out a couple of pages of Node.js versions with latest and greatest version at the bottom of the list.
If you want to install the latest version of Node you don't have to specify the version, just use latest.
$ asdf install nodejs latest
% Total % Received % Xferd Average Speed Time Time Time Current Dload Upload Total Spent Left Speed 100 4009 0 4009 0 0 16430 0 --:--:-- --:--:-- --:--:-- 16430 gpg: key D7062848A1AB005C: public key "Beth Griggs " imported gpg: Total number processed: 1 gpg: imported: 1 .... % Total % Received % Xferd Average Speed Time Time Time Current Dload Upload Total Spent Left Speed 100 31.8M 100 31.8M 0 0 3369k 0 0:00:09 0:00:09 --:--:-- 3553k node-v16.3.0-linux-x64.tar.gz: OK $
Same goes for Node LTS. Just use lts instead of latest. To see what versions you currently have installed run asdf list nodejs command.
Installing global NPM packages
I rely on a few global NPM packages in my daily work. Luckily Asdf's Node.js plugin can install global packages for us automatically if we specify them in ~/.default-npm-packages file.
If you don't want auto NPM installs after installing new Node.js version you can install the packages manually. A common gotcha is to forget to reshim after installation.
$ asdf reshim nodejs
If you forget to run the reshim command the globally install NPM package will not be available in your path.
Different projects, different versions
Asdf lets you specify specific tool versions per project. For that it relies on the .tool-versions file for switching between versions. If you are coming from NVM you can have asdf read an existing .nvmrc or .node-version file. To do this, add the following line to $HOME/.asdfrc.
legacy_version_file = yes
To use a specific version of Node.js in your project run asdf local node <version> command. Just make sure that node version is installed first otherwise the command will fail. If everything went fine Asdf will write to a .tool-versions file in the project folder. Next time you come back to that folder asdf will use the project-local node version.
Global versions
You can specify system-wide (global) version of the tool by running asdf global node 16.3.0 command. This will add it to the ~/.tool-versions file and that version will be use if no local version is specified. Here is my global versions file.
It's a short list for now as I am currently in the tool migration phase.
Every day ASDF commands
asdf list <plugin> - show locally installed tool versions
asdf list all <plugin> - show all available tool versions
asdf plugin add <plugin> - install asdf plugin
asdf install <plugin> <version> - install specific tool version
asdf uninstall <plugin> <version> - remove specific tool version
asdf global <plugin> <version> - set global tool version
asdf local <plugin> <version> - set project-specific tool version
asdf reshim <plugin> - refresh plugin state
asdf help - probably the only command you need to know
Bonus: Installing Neovim
I've recently switched to Neovim where some features are only available in the nightly build. Just for the reference, and to demonstrate now to use Asdf to install something else, here is how I installed Neovim using Asdf.
Side note: A Vim user? I encourage you to give Neovim nightly (upcoming v0.5) a try!
In summary
Why use many specialized package managers when you can have one manager to rule them all? Of course, it's not always smooth sailing. Asdf can be a bit quirky to set it up if you are unlucky.
Although Asdf supports many tools I have some personal threshold. For example, I would not install Postgres with it. For that I would either use Docker or install it using native OS package manager. For everything else I will probably use Asdf in the near future.
]]>Reactivity News #13Repost of Reactivity News June 2021 edition, my Svelte focused newsletter2021-06-30T00:00:00Zhttps://codechips.me/reactivity-news-13/In this edition: Svelte, Solid, Web Components and other interesting stuff.
Svelte Trunk
Two releases in the past month ... or maybe none? Not sure. For in-depth details see Svelte's official blog post.
From 77% to 65% complete in a month. I predicted at the end of June in the last newsletter, but the odds are getting lower. This is no surprise. The more you fix the more you discover.
In the past month I've been reading up on Solid.js. Very interesting reading! Ryan Carniato has really thought everything through when designing Solid taking the best parts and inspiration from number of different frameworks.
If there is one thing I can recommend in this edition s to read all the articles by him! You can find the links in Solid's Github repo.
Feels like Solid.js is gaining a lot of traction at the moment. This is a framework to watch!
"SolidJS is a frontend UI framework whose syntax is very similar to React but is compiled to modern javascript like Svelte is allowing people to get the speed and bundle sizes of Svelte but use the React syntax they are used to"
Lately I've been playing with Phoenix LiveView. It's a totally different approach to regular frontend apps. In LiveView you keep state on the server. Here is a short and easy-read article that teaches us the differences. Maybe it will arouse your interest to learn more about LiveView.
A library built on top of Phoenix LiveView that lets you build rich interactive user-interfaces, writing minimal custom Javascript. Still in early development, but looks very promising.
I am not sure what I think about web components yet, I've never needed to write one, but the idea of having framework agnostic components is certainly appealing. There are many use cases for web components, but where do you draw the line?
How we use Web Components at GitHub
An interesting read about how Github builds and thinks about web components
Q: How does a farmer count all his animals in the barn?
A: With a cowculator
That's all for this month. Godspeed!
]]>SolidJS - a first lookI take SolidJS for a spin and compare it to Svelte in terms of DevX2021-07-20T00:00:00Zhttps://codechips.me/solidjs-first-look/I've been watching and reading about SolidJS for the past year. The articles by its author are full of knowledge about the inner workings of JavaScript frameworks. No doubt that Ryan, the author, knows his JavaScript and web. I believe he has been a member of the Marko team and that framework is the fast!
SolidJS prides itself by claiming that it's currently the fastest framework out there. Speed is often not the problem for most apps. Unless we are talking about low-powered devices. Network speed is also an issue. Large app and slow Internet connection is a bad combination. That's why we see all the SSR frameworks such as SvelteKit, Next, Nuxt and others gain in popularity. Hydration is cool but it also makes the code more complex and requires a server, well, or a cloud function in most cases.
Svelte prides itself by creating the smallest JS bundle. That doesn't apply if your app has many components, but is often not a problem unless your app is exceptionally large. Some time ago Ryan managed to optimize Solid's bundle size to be on par if not even smaller than Svelte's.
Svelte also prides itself by being used for low-powered devices. This got me thinking. If Solid is the fastest framework with the smallest bundle size it must be a perfect framework for low end devices and also in general. You get faster asset downloads and theoretically you should get more juice out of it because it's the fastest.
Another bonus, in my eyes, is that Solid does all this without virtual DOM.
But what about developer experience? How is it compared to Svelte? I decided to find out by porting my simple Svelte app to Solid.
The Sample Application
The sample application is simple, but has a few moving parts. Its primary purpose is to fetch and display a random quote from Kanye Rest API. It also has a timer to test HMR reloads, Tailwind CSS to test how it is to work with CSS in Solid and a fade CSS transition to test how this works in Solid.
SolidJS has a nice set of Vite-based app starter templates. The Tailwind is supported by WindiCSS. I am actually not sure if it's Tailwind CSS anymore. By judging Windi's website it looks like is taken its own path to become a Tailwind alternative.
Anyway, for my project I chose the WindiCSS + TypeScript template as I wanted to see how autocompletion performs in the editor.
I wanted to see how good Solid's HMR is and for that I created a small timer component. All it does is to calculate the time difference in seconds from the app loads and now. For that I used the excellent date-fns library.
return ( <pclass='px-2 py-1 text-center text-indigo-900 bg-indigo-400'> You've just wasted <strong>{timeSpent()}</strong> of your life on Kanye </p> ) }
Solid signals are the basic reactive primitives. You can some what compare them to React's useState directives or normal Svelte variables.
Because Solid components are constructors and only run once you have to set up your component lifecycles. In the time component I used onCleanup method to cancel the interval timer.
To calculate and format the time in seconds I used createMemo directive. You can compare it to Svelte's reactive variables. I actually could have done it in a simpler way by only creating a function and not wrapping it in createMemo directive. createMemo is used for better caching for example to reduce work required to access expensive operations like DOM node creation. According to Solid's guidelines it's often better to derive signals. Solid's documentation states: What can be derived, should be derived.
In the component constructor you can see that we pass the time interval as frequency component property.
Props are a little confusing to me. It's not clear if I can set default props. Solid is sensitive when it comes to how you must handle the props. Because of how its reactivity primitives work you are not allowed to destructure props and I feel this can lead to a lot of frustration and time spent debugging.
Wisdom.tsx
This component is the core of the app. It's inside it where quote handling is done. Here it is in all its glory.
// Wisdom.tsx
import { createResource, Switch, Match } from'solid-js' import { Transition } from'solid-transition-group' import usa from'./assets/usa.svg'
typeQuote = { quote: string }
// this is defined in .env file in the project root folder constKANYE_API = import.meta.env.VITE_KANYE_APIasstring
<divclass='mt-5 text-5xl md:text-7xl font-extrabold leading-none text-indigo-800'> <Transitionname='fade'> <Switchfallback={<p>Failed to fetch quote</p>}> <Matchwhen={quote.loading}> <pclass="releative">Loading ...</p> </Match> {/* if you don't handle errors the whole app breaks */} <Matchwhen={quote.error}> <pclass="relative text-red-600">{quote.error.message}</p> </Match> <Matchwhen={quote()}>{q => <pclass="relative">{q.quote}</p>}</Match> </Switch> </Transition> </div>
<divclass='mt-10'> {/* no way to easy style components with Tailwind */} <buttononClick={refetch}class='btn-fetch'> Preach to me! </button> </div> </div> ) }
There are some Solid specific directives such as createResource, refresh, Switch, Match and Transition. Don't worry if they don't make sense. We will go through them later.
Styling components with WindiCSS
Styling in JSX works just as you expect, but unlike in React you can use normal class instead of className property name. As a Svelte developer I am spoiled by having scoped components styles in Svelte. Solid has an official style library - solid-styled-components. It's a css-in-js style library. For some reason I find it a bit inelegant to work with. I still gave it a try, but couldn't get it to work with Tailwind's @apply directive so I extracted the button's style to the global CSS stylesheet.
SVG Asset handling
SVG handling is not something framework specific, but bundler specific. Because this starter project is Vite-based Vite takes perfect care of that for me. I wanted to import and render raw SVG file markup. If you use Vite you can append ?raw to your SVG imports to get the raw markup. I couldn't get it to work in Solid. so I used an image tag instead. Maybe there is a way to do it, but I was short on time.
Rendering raw SVG files is a breeze in a Svelte setup by using the @html directive.
Ajax Requests
Solid has a neat function called createResource that help you work with async functions. It's not reactive by default. The way it runs is by reacting to changes in the id supplied as a function argument. I don't have an id because I am fetching random quotes. Luckily there is a refetch function that lets you trigger fetching manually.
// Wisdom.tsx
import { createResource, Switch, Match } from'solid-js'
typeQuote = { quote: string }
// this is defined in .env file in the project root folder constKANYE_API = import.meta.env.VITE_KANYE_APIasstring
It's nice that you can supply a type to the function. Autocompletion in editor works out of the box, but the bundler doesn't catch a mistyped property name in JSX and gives you no error in dev console nor in the terminal.
Solid comes with many helper components that lets you handle common template control flows. There is <For><Show>, <Suspense> and others. In this app I used <Switch>/<Match> component to display different quote states. This is an improvement over React where it's common practice to use raw JS code to handle these cases.
// Wisdom.tsx
<Switch fallback={<p>Failed to fetch quote</p>}> <Matchwhen={quote.loading}> <p>Loading ...</p> </Match> {/* if you don't handle errors the whole app breaks */} <Match when={quote.error}> <pclass="text-red-600">{quote.error}</p> </Match> <Matchwhen={quote()}>{q => <pclass="relative">{q.quote}</p>}</Match> </Switch>
One weird error I encountered is that if you get an error in the fetchQuote function it breaks the whole app unless you handle it. This happened to me when I got disconnected from the WIFI and couldn't fetch a quote. So it looks like you have to handle the error cases explicitly.
You should always handle error cases, but should the timer in a separate component be affected by a network error? I am not sure. In my opinion the components should be isolated, but apparently they are not in Solid.
CSS animations
This was an interesting problem. I wanted to implement a simple CSS fade transition for switching between quotes. In Svelte I would have used the #key block together with built-in Svelte transitions for that and be done, but in Solid I had to import a separate transition package for it - solid-transition-group.
There are multiple ways to build CSS transitions using this official library. The official example already had a fade transition so I just copied all the code and CSS classes from it.
The transition package has a known limitation. Transition and Transition Group work on detecting changes on DOM children. Therefore it only supports single DOM childs and not text or fragments. Because of that I had to wrap all the elements in paragraph tags.
In the code snippet below name='fade' is used to generate transition class names.
<Transition name='fade'> <Switchfallback={<p>Failed to fetch quote</p>}> <Matchwhen={quote.loading}> <pclass="releative">Loading ...</p> </Match> {/* if you don't handle errors the whole app breaks */} <Matchwhen={quote.error}> <pclass="relative text-red-600">{quote.error.message}</p> </Match> <Matchwhen={quote()}>{q => <pclass="relative">{q.quote}</p>}</Match> </Switch> </Transition>
The implemented transition is a flaky experience. Sometimes it works, sometimes doesn't. Sometimes it works and suddenly it just stops. Maybe I did something wrong. I also feel that the whole thing is overly complex. Working with CSS transitions is so much easier in Svelte, because they are built-in.
Building the bundle
Solid has a really small runtime, 6 kB minified and gzipped which takes 1ms to download on a decent connection. It's five times smaller compared to full jQuery library, which is 30.4 kB.
The whole production build is around 10 kb. It's actually more or less on par with the bundle size of the Svelte version.
vite v2.4.2 building for production... ✓ 274 modules transformed. dist/assets/usa.ede8af9e.svg 0.88kb dist/index.html 0.55kb dist/assets/index.9f119c76.js 2.11kb / brotli: 0.92kb dist/assets/index.2c586559.css 4.85kb / brotli: 1.27kb dist/assets/vendor.ce7411c6.js 31.43kb / brotli: 8.68kb
Overall I am impressed by SolidJS. It's an advanced framework and code can get complex, but at the same time I think if you master it you can write fast and efficient code that can make your apps fly. Because of the complexity I wouldn't recommend it as your first framework.
To me personally SolidJS is a next step up for the advanced Svelte developer who wants to try something new, wants to have one-way bindings as default and fine-grained reactivity. Or a React developer who likes JSX, but who is burned out from React.
However, I wouldn't recommend Solid just yet if your app needs advanced CSS animations. It's doable, but in Svelte you get it our of the box and it's simpler to do too. I also couldn't figure out how to use framework agnostic JS libraries, such as tom-select for example, something that is easy to do in Svelte.
SolidJS is still a young framework. This often means that there are not many third-party libraries for it yet. Even though it's primarily based on JSX and feels React-ish you cannot re-use any of the existing React libraries.
Although Solid has support for SSR there is no SSR framework, ala Next.js or SvelteKit for it yet. I am exited to see what community will build on top it. I cross my fingers and hope for the best, because Solid is a great and promising UI library.
]]>Reactivity News #14Repost of Reactivity News July 2021 edition, my Svelte focused newsletter2021-07-31T00:00:00Zhttps://codechips.me/reactivity-news-14/Svelte Society has reached 10K Twitter followers. Cool! Over all feels like Svelte is gaining ground. There are suddenly a lot of posts about people migrating their blogs to Svelte and a lot of posts on how to build your blog in Svelte. If that's not a sign of the tipping point then I don't know what is!
Svelte Trunk
One release last month. Feels like there is currently a lot of focus on SSR. For details see Svelte's official blog post.
More and more larger companies are betting on Svelte. I know about Ikea, but sadly don't know the story behind the decision. Among others are Square, Brave Search, and Decathlon. That last site is blazing fast and a joy to browse. A rare find in today's sluggish world of ecommerce.
Snappy PWA
Parsnip is a mobile-first, progressive-web-app that helps you to learn to cook at home. Built entirely with Svelte, Routify, TailwindCSS, and Firebase. Feels really snappy on mobile! Here is the story and tech behind it.
Timeline of rontend frameworks
Cool timeline animation video about the popularity of JS frameworks. Hard to imagine that even React was small back in the days and nice to see that Svelte is on the rise!
SolidJS, the fastest React inspired framework without virtual DOM, has finally hit release 1.0 and with it came a new website. It has a nice tutorial that was clearly inspired by Svelte's. In my opinion Solid is an advanced framework and some concept might be had to grasp if you are new to web development. I really dig Solid and hope that it gains in popularity.
It was only a matter of time before someone would build a CSS utility framework ala Tailwind in SASS. There is UniformCSS and YoghurtCSS. Both look interesting!
Enrichment Calculator
Nice app build with Svelte and IBM Carbon Components. No, it won't help you get rich. Sorry!
The friendly full-stack language with "groundbreaking memoized DOM" that compiles down to JS. Looks cool and reminds me a bit of CoffeeScript, but on steroids.
I think that RxJS is really cool and wish that more people discovered this library. Here is a Svelte REPL that showcases some common RxJS operators and how to use them as Svelte stores
More and more people are migrating their Sapper apps to Svelte. I should probably do the same soon. It's always interesting to read up on their experience. Warning for strong colors!
YASSG (Yet Another Static Site Generator) from the people behind Snowpack. Only this one is framework agnostic and renders the entire site to static HTML.
What do you call 2000 pounds of bones? A skele-ton!
That's it for this month!
]]>Reactivity News #15Repost of Reactivity News August 2021 edition, my Svelte focused newsletter2021-08-30T00:00:00Zhttps://codechips.me/reactivity-news-15/In this edition: Svelte, Svelte Native, ClojureScript and PWAs.
Svelte Trunk
Six new releases in the past months. Incredible! I thought that summer vacations in the Northern hemisphere would slow things down, but it's actually the opposite. Maybe people don't take vacations or maybe that's what they actually do and contribute to Svelte on their vacations.
SveltePress
SveltePress is a documentation tool built on top of SvelteKit. It's something like VuePress, or maybe Docsify, and is an easy way to get your project or API documentation going.
Snel
A tool to compile Svelte to JavaScript files to create web application using Deno and Svelte. Don't know if anyone is using it in production, but interesting to see that people are building things on top of Deno runtime.
Lightweight i18n library
Internationalization is often a pain. typesafe-i18n is an opinionated, fully type-safe, lightweight localization library for TypeScript and JavaScript projects with no external dependencies that works with Svelte and SvelteKit.
svelte-restate
Because Svelte's store contract is so simple it's easy to create a custom store implementation. Restate is an immutable store for Svelte with full Typescript support and Redux Devtools integration. It is highly inspired by re-frame (ClojureScript) subscriptions.
Felte Forms Library
Felte is an ambitious forms library for Svelte and Solid. I like forms. I work with them a lot and also wrote a book[link] on the subject. I haven't had the time to play with Felte yet, but it sure looks interesting!
SvelteKit + Supabase
Supabase is an exciting alternative to Firebase. This template offers everything you need to get off the ground quickly to build apps on top of SvelteKit and Supabase.
Firestore Lite
One of the biggest pain points working with Firebase what its large bundle size. Well, no more! The new version of Firebase SDK is tree-shakeable and there is even leaner Firestore Lite.
3 lessons from React
Ryan is also a great teacher and is not dogmatic about any frameworks. Here are some of his thoughts on becoming a better Svelte developer by looking at how things are done in other frameworks.
I still don't know what to make with (and off), web components, but I am sure they will become more popular as the web and web development progress. Did you know that you both build web components in Svelte and also use web components built with other tools in Svelte. Confusing right? Fear not! These links will make everything clear.
Using custom elements in Svelte
Learn how to use web components build in Lit, and the gotchas that come with it, in your Svelte apps.
Svelte for Web Components development: Pitfalls and workarounds
Learn some of the pitfalls and how to solve them when developing web components in Svelte.
I have a secret fascination with Lisp. Many years ago I had the chance to work with Clojure and remember that I liked the experience a lot. Then I got more involved in web development and with it came JS and Node.js. So no more Clojure.
I recently dove deep down into ClojureScript ecosystem and its funny package names. While the entry barrier is high I truly believe that teams can be 10X productive in ClojureScript than in other languages. First, it's simple, stable and doesn't change often. Second, ClojureScript is purely functional and in Lisp code is data and data is code. I urge to to research what it means for your code on your own.
Reagent
A nice guide to Reagent, a ClojureScript wrapper around React. It gives you a way to easily create React components.
Re-frame
Re-frame is a mature framework built on top of Reagent with great documentation. Lots of takeaways and learnings even if you don't plan to build anything with it.
shadow-cljs
One of the biggest hurdles coming to ClojureScript is to understand how to setup the project. shadow-cljs is one of the popular tools in the ecosystem, but many people don't understand where to draw the line between ClojureScript compiler and other tools. This article explains how ClojureScript compiles the files to JavaScript.
I think we can all agree that Tailwind CSS has become the most popular utility CSS framework and all popular things get copied. In the last issue I wrote about YoghurtCSS and UniformCSS, two SASS based utility frameworks. There is also Halfmoon and H-grid.
If you are a fan of Material Design there is Svelte Material UI, which is a collection of Svelte components.
Some people believe native apps will take off for real because the experience is so much better. Some believe it will be PWAs. Only time will tell.
I was curious if there is something like React Native for Svelte and it turns out there are a few frameworks. However, I don't know how mature it is or if anyone has built something with them in production.
Svelte Native
Svelte + NativeScript. Looks like an official framework, but not sure if it is.
What do sprinters eat before the race?
Nothing. They fast.
That's all for this month!
]]>Reactivity News #16Repost of Reactivity News September 2021 edition, my Svelte focused newsletter2021-09-05T00:00:00Zhttps://codechips.me/reactivity-news-16/In this edition: Svelte, CSS Transitions, FoTW and other interesting things.
Svelte Trunk
Svelte development shows no signs of slowing down. Four new releases in August. Boom!
Although SvelteKit is moving forward they need your help to get to 1.0. Doesn't matter if you are a total beginner. I am sure there is something for everyone.
How to build a decentralized chat dapp
Build a decentralized chat app using the GUN JavaScript library and Svelte. Learn how to use web3 and blockchain. This video is from Fireship so you know it's good.
Create a PWA with SvelteKit
SvelteKit is a hybrid framework meaning you can have dynamic pages and you can have statically generated pages. This article is a good starting point for understanding how to build a PWA in SvelteKit.
Philosophy of Svelte
Personal reflection on Svelte. I agree with most of the things in the article, but it's not all roses. There are some cases where other frameworks would make more sense to use.
Evidence - a YC backeed company is betting on Svelte and SvelteKit
I've read about startups betting on Svelte before, but they all faded away after the initial hype. My guess that it wasn't Svelte's fault. Evidence, a startup backed by Y Combinator bet on Svelte too. Vey cool and let's hope that they will do well.
Cool App: Thread Bare
I was blown away after watching this Youtube video I saw in this tweet. If you want to build highly interactive apps Svelte is your friend.
Svelte developers are happier and get paid more
StackOverflow's Developer Survey is always a fun read. Svelte did really good in 2021 and Svelte developers are getting paid more that React developers according to results. If you are still hesitating if Svelte is something you should bet on here is your answer.
JavaScript vs JavaScript. Fight!
Interesting article from Ryan Carniato that tries to clear up many confusions in today's frontend world. Did you know that SvelteKit, Nuxt.js and Next.js are SPAs? No? Go read the article!
Fragments over the Wire, HTML over the Wire, HTML over Websockets I don't know what the official name is, but I know for sure that this is one of the possible futures of Web development and I really dig it.
The reasons for this are plenty, but here are a flew of them according to me.
No need to write JavaScript
Writing pure frontend code can be daunting and take a lot of time. Write everything in the backend and outsource the rest to the framework.
Write everything in one language
Everyone knows that context switching is a real productivity killer. Writing everything in one language improves your focus on the business domain problems and not on the framework ceremonies.
Faster time to market
From my own experience these frameworks let you go faster and thus reduce time to market. Perfect for SME, POCs and side-projects.
Just as there are pros there are cons. Here are some of the reasons where they might not make sense.
Different teams for frontend and backend
If you work in a bigger company where you have different frontend and backend teams. The frontend devs will not have anything to do unless they are on the UX side of the frontend spectrum.
Highly interactive apps
Because the state is usually managed on the server these apps can introduce some network lag. If high interactivity is a requirement you will be better off if you offload that to custom written frontend app.
Offline support
Many of these frameworks rely on Websockets. Don't use them if you offline support is a must.
Here are some interesting articles on the topic.
The Future of Web Software Is HTML-over-WebSockets
The article that started it all and got me really excited about the concept. I guess that I read it in the middle of one of my frontend fatigues.
Blazor
Microsoft doesn't want to missout on all the fun. Blazor is their contibution to this space that sits on top of ASP.NET. I haven't explored it myself in depth yet, but that page contains many buzzwords. WebAssembly, SignalR, JS iterop. Well, what can I say? Microsoft.
Kweb
No, Kweb is not K-Pop. Sorry! Kweb is a new way to create beautiful, efficient, and scalable websites in Kotlin, where server-browser communication is handled automatically.
One thing that sets Svelte apart from other frameworks is that it has CSS transitions built-in. Overall, working with CSS and animations in Svelte is so much easier than in other frameworks. At least that I've worked with earlier.
Svelte is cool, but if you don't use Svelte for your project yet here a some nice libraries that can make your pages more interactive without doing that much work.
Transition.js
Simple JS library that provides a convenient way to create CSS transitions pragmatically.
Q: How do you make holy water?
A: You boil the hell out of it.
That's it for this month!
]]>Sneaky painful frontend burnoutThe history of modern web development and the dangers that come with it2021-09-28T00:00:00Zhttps://codechips.me/sneaky-frontend-burnout/I've recently noticed an alarming trend. There is a high churn of frontend developers due to the burnout. It's a shame, but it totally makes sense if you take a deeper look at the problem. It's not something you normally notice. All burnouts are sneaky, but this one is special. It comes creeping very slowly and before you notice it's too late. This article is a personal reflection from the interviews conducted with people who decided to leave the frontend field due to the burnout.
Rough history of web development
Things were simpler back in the days. jQuery was king and we relied on it to get things done. And we did get things done too. Browser wars made the frontend world accelerate at incredible speed. There were many new cool APIs we could use, but they were often browser specific. This created a lot of inconsistencies and forced us to use polyfills. Modernizr was a popular library that we relied on to detect what was possible for us to do in the browser.
The speed of browser advancements propelled the development of new tools. Bower was a popular, but short-lived package manager for the web that many developers relied on. We used different task runners such as Grunt and Gulp to get things done. The frontend ecosystem was getting complex, but we could still wrap our heads around it.
We were getting things done with the tools and libraries we had, but it wasn't enough. We wanted more and better tools. Webpack was gaining traction and Browserify was released and this is where I personally lost track of everything. I think it was around 2014 where things got blurry and made it impossible to keep track of all the news. This is also the year when I had my first frontend burnout and decided to move back to backend development. It became too much. I craved simplicity.
Let's fast forward to today and see if things have improved. The popular frameworks of the past are merely ghosts of their former glory. Today, React is the undisputed king followed by many other modern frameworks such as Svelte, Vue and Angular. TypeScript has become a de-facto standard language of web development. For sure, frameworks and languages have advanced for the better, but did they actually make our life simpler or allowed us to reduce time to market?
npm install broke the Internet
My opinion is that npm install broke the Internet. There were a few different attempts to bring package management to Node.js and NPM won. Today it's the standard of JS package management, but in the beginning it was actually for managing packages for Node.js only, hence the name - Node Package Manager.
Not that long after developers realized that they could also publish frontend libraries to NPM. I think it was Bower package manager that started the trend. Sometimes later, Bower quickly became out of fashion when most of developers switched to different JS bundlers. Fast forward to today and think of one frontend project that doesn't use a bundler and downloads half of the Internet when you run npm install.
That's the norm today. Why is it like this? First, NPM's recommendation to package creation was to create small focused packages that do one thing and do it well and I was a big proponent of this myself telling all other developers to think this way. Second, it's often easier to find and install a package from NPM than to write it yourself. Is it a good thing? I am not sure. Remember the leftpad incident? Also, if you rely on some NPM package and find a bug in it, how much effort is required to fix it versus if you would have written the functionality yourself?
It's easy to add new packages to your project and if it's easy we tend to do it. We have too much freedom of choice. It's also a little too easy to publish packages on the NPM and everyone wants to scratch their own itch. I am not saying it's bad. On the contrary, sharing knowledge and contributing to open source is good, but does it really justify itself as NPM package? Maybe a simple Github gist is enough? Copy, paste, adjust.
Here is a thought experiment. Would you be able to build the same app with the same level of interactivity if you could only add your dependencies as scripts in the document head? How cautious would you be?
Enter TypeScript
JavaScript is a cool language that mixes OOP with FP. Pick and choose. It's also a messy language. Actually not messy, but maybe the right word would be - flexible, and if you know your way around the language and all its quirks you will do just fine. Many existing websites and apps were written using plain JS.
When TypeScript entered the scene (almost) everyone cheered and thought that it will make all of their JS problems go away. Sure, it might have solved some of the existing problems, better IDE autocomplete comes to mind, but what people don't realize is that by adopting TypeScript they just made their developer lives more complex. If you ask me, TypeScript is a weird language with a fake type system that gives you fake confidence. I too do use TypeScript for some projects, but it feels like the only thing I do is try to keep the TypeScript compiler happy.
TypeScript is rarely frictionless, especially its setup. I bet there are very few developers that throw together a working tsconfig.json on the first try. It comes with a cost and it's something you have to think about. Because it's so wide-spread today, it's hard not to use TypeScript when building open source libraries. I mean, you don't want people to think you are a weirdo, right?
Adopting TypeScript is not enough. There is a whole JS surrounding ecosystem that you have to adopt to as well. Because JS is such a loose language you have to solve linting and code formatting. Should you adopt ESlint or StandardJS? Is there room for Prettier? If you go with ESlint what plugins do you need? Should you adopt Airbnb style or is there something else, something better and newer? You might want to introduce automatic linting too so you can't commit bad code. Husky might help you with it.
The tooling ecosystem surrounding JS adds additional complexity layer to your project. Now, I am sure that you can reach the perfect setup for your project, but how many many hours of frustration, searching and reading documentation did it take you to get there?
Where are we at?
It's clear that the frontend world is getting more and more complex and those people who tell you it's still young and we are still trying to find good solutions to existing problems are ignorant. Two decades is a long time for the dust to settle, but if you keep adding more wind all the time your sight of view will only get shorter. The wind is added by a lot of new frameworks and libraries, the flexibility and shortness of the JavaScript as a language and NPM. It's too easy to publish and consume NPM packages today and everyone is doing it. The flexibility and the possibility is what got us here. I understand that innovation is hard, it's blood, sweat and tears, but what if we have been running in the wrong direction this whole time? The direction of complexity instead of simplicity.
In fact it's so bad that I've heard that some of the developers have developed the green field project anxiety. There are too many choices and they rather take on maintenance projects than make the tough decisions. React fatigue and overall frontend fatigue is real. How do I know that the tech stack I am betting on will still be relevant in two years? SSR or SPA, routing, state management, style libraries. It's easy to end up in the state of analysis paralysis and it's not a nice place to be in.
We also tend to get things backwards. Developers think that in order to get things done you have to use [insert some cool framework name here]. I've witnessed this myself. I have seen code schools teaching newbies without any IT experience how to build apps with React without teaching them the basics of HTML and how the web works. That's crazy, but also sad. It's sad how much money people pay in hope to get a job after they finish the coding course.
It's not the fault of the people who taught the course. It's Economics 101, demand vs supply. If someone can make money out of you they will. React should be the last thing you learn because React is super-complex, but there is a surge for React developers so let's skip the essentials and concentrate on the needs of the market.
Choosing boring technology for the project is boring. I myself is guilty of this too. Luckily I can figure most of the things out because I have a lot of experience under my belt, but it can imagine how frustrating it can be for a newbie. Heck, sometimes even I don't figure stuff out. Not because I can't, but because it's hard and I don't want to invest my time in it, spend my mental energy. To me it's a clear sign of how complex current frontend stack is.
This leads me into the main topic of the article - the dreaded frontend burnout.
The signs of burnout
This burnout type is sneaky. You don't usually notice it because it doesn't really feel as a burnout, but more like a never-ending mild frustration at first.
It's a slow burnout. It's like drinking coffee from your favorite coffee cup that has a small, but sharp crack in it just at the right place and you scratch your lip every time you take a sip. First it's annoying, but then you get used to it, only to realize months later that you have had enough, and you throw that cup into the wall with anger.
When you reach this moment it's usually too late. That's why you have to pay close attention to the following signs.
Bringing your work home. Not physically, but mentally. If you come home with the constant nagging feeling that you didn't finish what you planned to accomplish today. The feeling of mild frustration.
Yak shaving. If you feel that the only thing you do is fight with the tools and project related things and it leads to a lot of time spent tweaking, solving, dependency management, but no actual coding. Frustration builds up.
Mentally taxing. If you come home mentally drained and the only thing you have energy left to do is to watch Netflix. You have no power to do anything else.
Lost opportunity cost. If you start doubting if building UIs and web sites was the right career choice for you. You ask yourself if things would be different if you programmed an operating system or backend APIs, but you are building interactive UIs and it's just as complex.
Negative feedback loop. If you feel that things are getting worse at work every day and you are not getting anything done.
Work/life balance. If you feel that work bleeds into your private life and work/life boundaries become fuzzy. It can be as simple as thinking about the unfinished ticket in the evening or fail to fall asleep because you are thinking about work. This is especially common if you work remotely.
Performance drop. If you feel tired and lethargic when you come to work and can't get anything done. You have hard time concentrating on the task at hand and procrastinate. Nothing feels exciting anymore.
Framework envy. If you are thinking that things would be easier, more productive or fun if only you used another framework or technology in the project.
Quitting. If you are thinking about switching jobs. This is a common fallacy. People often think it's their current employer that is the problem, but oftentimes it's not.
Denial. If people close to you tell that you have changed lately or you are not present mentally, and you blame it on the tough intense period at work, it's definitely a sign. It's called self-denial.
These are just a few signs that you are nearing the point of no return and it's only a matter of time before the burnout hits you. There are also always physical symptoms associated with those feelings. The most common are: lack of energy, irritation, agitation and sleeping trouble. Pay close attention to your body, not only to your mind.
If you can relate to any of those signs it can mean that you've caught this early and it might not be too late yet. Recognizing and accepting is the first and most important step.
My best advise here would be to take a break and go out for long walks in the nature. They help clear your mind plus you get the physical exercise as a bonus. Also, make sure to book some social events with friends or family even if you feel that you have to force yourself. Next step is have an honest talk with your manager and explain how you feel. It might be hard to do, but you will be glad you did it.
What can we do?
There are things in my opinion we can do to reverse this trend, and they are exciting too, but it's a topic for another upcoming article.
Tune in into your feelings
I fully understand, and accept, that the frontend world is turbulent at the moment, and it will be a bumpy ride before we get to somewhat stable state, but please be careful. Watch out for the signals yourself, watch your friends and colleagues. Pay close attention to how you feel and your body. Burnout is never worth it.
Think objectively. Development is fun, but sometimes it can be too fun. Do you really need to use this frontend framework? Do you really need to use SSR? Is SEO a requirement? Remember that complexity increases with every choice you make. It might not be obvious at first when you get everything setup and running, but it will be obvious later when you find yourself in the hole you that have been digging yourself and it's too deep to climb up from.
We, as programmers, often tend to complicate things. It's in our DNA. We like a good challenge, to solve complex problems and we are really good at it too. The problem is that the complexity often steals our time. Time that is better spend building features instead that bring real value to the users.
Next time you are about to start a new project always ask yourself: What is the simplest solution I can get away with?
It's totally fine if you don't agree with me on everything. I just wanted to get it off my chest.
]]>Tailwind CSS and SvelteKit - The easy wayAdding Tailwind CSS to SvelteKit is a simple 3 step process2021-10-26T00:00:00Zhttps://codechips.me/tailwindcss-sveltekit-the-easy-way/Long story short, I needed to integrate Tailwind CSS into a new SvelteKit project and searched around on the Internet on how to do it. The first option is to use svelte-add, but it won't work unless you start off with a fresh project. The other common way to do it is some variation of my old Sapper and Tailwind solution. While it's still valid today turns out there is a much simpler way to do it.
Create new SvelteKit project
When you create a new SvelteKit project with npm init svelte@next my-app command you have a few options to choose from. The choices you make will affect how easy it will be to integrate Tailwind CSS. For example, here are the choices that I made during my project creation.
As you can see in the screenshot above I chose TypeScript support. In order to get TypeScript working in Svelte you have to use svelte-preprocess library. That library is also the key to get Tailwind working in our project. Its job is to support and process many different languages in Svelte templates and it also has built-in support for PostCSS that Tailwind is based on.
Don't worry if you didn't choose TypeScript as an option in your project. You can install svelte-preprocess separately and implement it in your svelte.config.js like this.
// svelte.config.js
import preprocess from'svelte-preprocess';
/** @type {import('@sveltejs/kit').Config} */ const config = { // Consult https://github.com/sveltejs/svelte-preprocess // for more information about preprocessors preprocess: preprocess(),
kit: { // hydrate the <div id="svelte"> element in src/app.html target: '#svelte' } };
exportdefault config;
Now that we have PostCSS support in place let's move on and install and configure Tailwind CSS and other required libraries.
Install Tailwind CSS and friends
First things first, we need to install Tailwind and supporting NPM packages and Tailwind configuration file.
We are almost ready to go, but if you start you project you will get an exception that has the following error message in it somewhere.
Instead rename tailwind.config.js to end in .cjs, change the requiring code to use import(), or remove "type" : "module" from [...]/package.json
What Node basically says is that it expects a different type of module. The solution is simple. Change extensions for Tailwind and PostCSS configs from .js to .cjs.
In order for Tailwind to know what CSS it needs to purge during production builds you have to add purge patterns to your Tailwind config.
We now have a correct Tailwind and PostCSS setup in place. Let's use it.
Import your CSS
The last step is to create a Tailwind CSS file and import it in the project. Create an app.css file under src directory, if it's not there already, and add the following to it.
You can also use Tailwind directives in your style tags. I usually add lang="postcss" to get rid of editor warnings, but you can safely omit it if you want as it has no effect on the functionality.
That's all there is to it. Tailwind CSS integration in SvelteKit in 3 easy steps. If I now counted correctly that is.
]]>Reactivity News #17Repost of Reactivity News November 2021 edition, my Svelte focused newsletter2021-11-01T00:00:00Zhttps://codechips.me/reactivity-news-17/In this edition: SvelteKit, cool libraries and new bundlers
Svelte Trunk
Four new releases last month. Svelte is currently at v3.44.1
Transitional Apps
Rich Harris gave a talk at the Jamstack conference trying to coin a new term transitional apps. In it he shares his thoughts on the shortcomings of SPAs and emerging technologies like HTML-over-the-wire. Funny, because if you think about it the only type of apps that could satisfy all the requirements are ironically only native apps.
Phoenix LiveView 0.17
BEAM is an awesome VM, Elixir is an awesome language, Phoenix is an awesome web framework and with the 0.17 release of the Phoenix LiveView framework building live apps just became so much better. Watch this keynote from Chris McCord, the creator of Phoenix framework, from the ElixirConf 2021 to understand why.
New Suspense SSR Architecture in React 18
Talking about LiveView, React doesn't want to be left behind, so they are moving to the server too, or actually already did. I stumbled on this discussion on Twitter by accident, and while it explains React Suspense in great detail, one cannot wonder about all the complexity. Do things really need to be this complex?
SvelteKit on Firebase
One great thing about SvelteKit is its adapter architecture. If you are a fan of Firebase you can utilise the Firebase Hosting CDN with dynamic content served by SvelteKit on Firebase Cloud Functions. Adapter is still in beta, but still worth checking out.
SvelteKit SSR Forms
In frontend apps today we don't usually don't submit our forms the "old school" way anymore, but opt out of the default browser behavior. If you what to have a fallback to the server here is a nice article that explains the basics of it in SvelteKit.
Human friendly dates in JavaScript
Sometimes you have to show human friendly dates in your app. You know like 2 minutes ago or just now. There are plenty of libraries available to you on NPM, but it's actually pretty simple to write yourself.
Parcel 2 is released
After long time of development Parcel v2, the zero-config bundler, is finally released. I honestly don't know how it compares to other modern bundlers like Vite or Snowpack, but let's see if it catches on.
Rome will be rewritten in Rust
Talking about bundlers and tools. Rome team announced that it will be rewritten in Rust. For those of you who don't know Rome, it's a linter, compiler, bundler, and more for JavaScript, TypeScript, JSON, HTML, Markdown, and CSS. A one stop tool, but by being all that isn't it spreading yourself thin and what will the Rust-rewrite bring to the table except hopefully being a little faster?
Favico.js
I was blown away by this small favicon library. It even allows you to stream your webcam as an icon. Check it out if you are building a messaging, e-commerce or real-time collaboration app.
Markdown Editor
Cherry Markdown Editor is a Javascript Markdown editor that is lightweight and easy to extend. There are plenty of others, but I personally like this one. Check it out!
OpenAPI vs AsyncAPI
Today's software is shifting more and more towards event-driven async architectures. Even though it might not apply directly in the frontend, it will still influence the flows and design. There are two major standards today - OpenAPI and AsyncAPI. See how they compare and know the difference.
Q: Why did the kids eat their homework?
A: Cause the teacher said it was a piece of cake!
That's it for this month. Thanks for reading.
]]>SvelteKit SSR forms explainedLearn the basics of working with SSR forms in SvelteKit2021-11-24T00:00:00Zhttps://codechips.me/sveltekit-ssr-forms/I took the time to convert all of the examples for my Svelte Forms book to SvelteKit. Everything went surprisingly smooth except for a few minor import issues. SvelteKit is the SSR-first framework and if you want your clientside imports to work you either have to wrap them in the onMount hook or explicitly turn off SSR for that page.
SSR has its use cases, but it also makes things more complicated. I couldn't resist the urge to learn more how SvelteKit deals with forms in SSR mode. Below are my findings and lessons learned.
Why SSR?
My personal first rule of SSR: if your app doesn't need SEO, don't use SSR.
Let me unpack this.
First, if you use SSR it means the app needs some kind of server to render the pages, serverless or not. This can add some substantial server costs. It might be a luxury problem and with in your budget, but still something to keep in mind.
Second, SSR adds additional layer of complexity to your app. Say what you want, but it is a fact. Do you really need or want that?
But wouldn't app's bundle size increase if I turn off SSR? It's a valid question and the answer is - NO. Or at least that's what I think. SvelteKit is good at code splitting and will only load JS and assets when you visit the page.
You can turn off SSR for the whole app, but it's not SvelteKit's default behaviour.
Progressive enhancement and graceful degradation
Why might you want to use SSR? Back in the early days of the web when Ajax call were just invented some smart developers came up with two great concepts - progressive enhancement and graceful degradation. To me they are both equal in that way that they both accomplish the same goal. Progressive enhancement starts with the basic HTML and gradually adds capabilities to the page depending on what features browser supports. Graceful degradation is the same, but starts assuming that browser supports everything and then gracefully degrades to bare minimum of the features that the browser supports.
You might ask what that has to do with SSR? To me personally it means that if the JavaScript is broken on the page your app should still work and the users should still be able to submit the existing forms. You might think to yourself "that doesn't apply to me, I have tests," but the web is too unpredictable. Your tests is no guarantee even if they pass. Always assume the worse. I am not talking about becoming a total pessimist, but about programming defensively.
Create an new login form
For our SSR for example we will use a simple login form, because you know, everyone can relate to one and have probably used one at some point in their life.
The example is built on top of SvelteKit's demo starter project. Go here to learn how to create one.
SIDENOTE: the code in all examples is naïve and simple. The main point is to illustrate and explain the core flows. It's happy path all the way!
SvelteKit uses a file based router. Because we put the index page in the login folder under routes you can access it at /login in your browser. If you submit the form the page will just reload itself because we have nothing in place to catch it. We need a SvelteKit endpoint to process the form.
Create an API endpoint
Simply explained, endpoints in SvelteKit are exported functions with naming conventions. If your endpoint file exports a function with get, post, put, del names SvelteKit will map them to corresponding HTTP methods. Unlike Svelte code, they live in plain JavaScript or TypeScript files under the routes folder.
To process the login form we only need to support the HTTP POST method. I like to keep my code and its responsibilities co-located therefore we will create our endpoint file in the same login folder as our login page.
In order to keep things simple we need to start simple. Earlier when we submitted the form there was no API handler to catch it and that's why the page just reloaded itself.
We now have an API handler that can process the form's POST request. If you look at the code you might ask what's going on and why we need a redirect?
You see, SvelteKit is not your traditional web framework like Rails or Django where the templates are tightly coupled with code. There is no way for us to return a SvelteKit page from the SvelteKit API endpoint. Because of that we have to redirect the user back to the login page.
You also need to parse the form body in your handler. It's your responsibility and SvelteKit won't do it for you.
The handler function takes a SvelteKit request as its only argument and it contains a lot of useful information we can leverage to make smart decisions. Right now host and body are the only ones we are interested in.
You might ask why we need to create a new URL object and not just hardcode the path? There is a good reason for it that we will talk about later.
So what does this endpoint handler do? Not much yet, but if you try to submit a form you should see the form values printed in the server console. It's a start.
Handle errors and success messages
If you have large hands you might hit a few wrong characters when entering the password. We should be able to notify our users if something went wrong or if the login was successful. Unfortunately there is no easy way to do it in SvelteKit because endpoints are decoupled from the pages, but there is a hack for it. We can leverage URL query parameters to our advantage.
Remember that we created an URL object in the example earlier and I told you that there was a reason for it? If you look at the code below you will understand why.
We are leveraging URL object's search params property to augment our redirect URL with useful information.
You next question is probably how to present this information to our end users. We can use SvelteKit's load function to parse that information on the serverside and pass it to our login page instance.
Load function is central when dealing with SSR in SvelteKit and has many different use cases. If our example we are only interested in the query parameters.
The code shouldn't be too complex to understand. The important thing is that our module props name we return have matching exported variables in page's script block. In our case it's success and error.
One important thing to remember is to always return something back in the load function. If all of our if statements fall through and we don't return an empty object you will get a blank page back.
We have improved our flow and added meaningful user feedback, but I don't feel that comfortable with the solution. If you get an error page back you can change the message by tampering with the query parameters. This is not a big problem in our case, but what if we have logic that depends on boolean variables, like success? If you get this wrong it can lead to unwanted concequences.
It would be much better if you could pass an object to your page internally instead of relying on query parameters. I am not the only one who wants this.
Enhance the form with clientside submit
Hey! What year is this? 1997? SSR forms? Seriously? Who submits their forms via plain HTTP today, right? Yes yes. I get it. We have come a long way and I think that most of us expect the page not to reload when we submit a form.
Hopefully by now you understand how SSR forms in SvelteKit work. Let's fast forward to today and talk about clientside form submits. SvelteKit starter demo has a nice example of the todo list that we can get some inspiration from. It uses Svelte action to enhance the form. We can use that example as base to add progressive enhancement to the login form.
The action takes two functions as arguments - done and error. When the user submits the form we serialize the form as JSON and submit it to our API endpoint with the URL and method from the form object.
When the response comes back we check if it was successful or not and pass the result to the handler function, that were passed as action arguments, depending on the outcome. I am not sure what the logic for res.ok flag is, but my guess it's all HTTP 2XX statuses.
I don't know about you, but I find the enhance action pretty elegant. It can also be used with any form. In my opinion this is a perfect example of the power of Svelte actions.
The code example below illustrates how we can incorporate enhance function into our example.
constonError = (err, form) => { // we return error as JSON from the endpoint // so we can try to parse it here const text = JSON.parse(err.message).message; error = text; success = false;
Even though we can now do client side form submission it won't work because we need to handle JSON payloads in our API endpoint. Something that we need to fix next.
JSON support in SvelteKit API endpoint
API endpoints in SvelteKit have no opinion on how you want to deal with different types of payloads. The information in request will help you make the decision, but the rest is up to you.
Because our API endpoint has to deal with both JSON and form-encoded payloads we need to have logic in place to see what type of request we are dealing with. The simplest way is to create a helper function to check the headers if it's a JSON request and then return back an object. SvelteKit will serialize the response to JSON for us if we return an object or array in the response body.
/** * @type {import('@sveltejs/kit').RequestHandler} */ exportconstpost = async ({ request, url }) => { // check if request is JSON if (isJSON(request)) { const data = await request.json();
if (data.email == email && data.password == password) { return { body: { success: true } }; } else { // You can also throw an error here which will result in 500 error // throw new Error("Something went bonks") return { status: 401, body: { message: 'Unauthorized' } }; } }
const form = await request.formData(); const payload = Object.fromEntries(form);
// construct new redirect url const endpoint = newURL(`http://${url.host}/login`);
if (payload.email == email && payload.password == password) { // add query params endpoint.searchParams.append('success', 'true'); } else { endpoint.searchParams.append('error', 'Please check your credentials'); // You can also return HTTP error here instead // return { // status: 401, // body: 'Wrong credentials' // } }
// redirect back to /login page return { headers: { Location: endpoint.toString() }, status: 302 }; };
We have some if branching in our function body to check if we are dealing with JSON and do an early return if this is the case. Otherwise we treat all other requests and plain HTTP requests.
I was hoping that SvelteKit would deserialize JSON body for us automatically, but it doesn't look that way. We have to do it ourselves. If something blows up SvelteKit will respond with HTTP 500 Internal Error so make sure to wrap your code in try/catch blocks and handle the errors yourself instead.
If you try to submit the form now it should work and if you disable JavaScript and submit the form it should also work. Mission accomplished!
In summary
After you take a deeper look at SvelteKit's SSR forms they don't seem that hard, but the current documentation is thin and the examples are scarce.
SvelteKit is not your "traditional" web framework, but it's your "transitional" framework, right? Things might not work like you expect them to and there are also some features that I personally miss. For example, it would be nice to add isJSON property to the request object and deserialize the payload on the core level so we don't have to parse JSON manually. Maybe there is a good reason for it or maybe the functionality is just not in place yet. Time will tell!
If you are interested in learning more about how to work with forms in Svelte make sure to check out my book - Svelte Forms: The Missing Manual. It's packed with examples and I guarantee that they all work in SvelteKit.
]]>How to lose weight fast without any exercisePersonal notes and reflection on my short weight loss experiment2021-11-28T00:00:00Zhttps://codechips.me/lose-weight-fast-without-exercise/During a three month period I lost 10 kgs (22 lbs) almost without doing any exercise. Below are my personal reflections and method on how I did it. It doesn't involve counting calories or leaving the table hungry. There are no quick hacks or secrets to it, only self-discipline, commitment and persistence.
Background
I have always been active, a sports nerd. For the past 10 years I've been practicing BJJ (Brazilian jiu-jitsu), a type of martial arts that is used a lot in UFC. It's a fantastic and fun sport, but it also comes together with injuries. A year ago I accidentally twisted my knee during practice and it has been troubling me ever since. I've done my fair share of rehab, but I've also carried some extra body weight that I felt caused unnecessary strain on my knee. I felt like losing some weight might help a bit.
Sometimes at the end of summer I spoke to a friend who tried this weight loss method called Keto yielding great results. I've heard of it before, but never felt like I needed to try it myself as I never had any real weight issues. However, inspired by his success story and excitement I decided to try it for three months with a goal of losing 10 kgs. If I reached the weight goal sooner I would stop and resume my normal life.
I honestly thought I was going to crush my goal two months in because of the level of my progress, but it actually took me two and a half months to reach it and I continued for the whole three month period because I felt I was on a roll.
During the whole period I also got much less physical exercise than I usually do, maybe like 1/5 of my normal level. That's because I pulled my hamstring pretty bad at the end of the summer when wakeboarding.
Looking back I went from 92 kgs to 82 kgs without breaking any sweat.
Method
The weight loss method in itself is deceivingly simple. Drop all carbs from you diet and increase everything else. That means protein, fat and vegetables. Go especially heavy on the fat.
Most people are afraid of fat. They think that if you eat fat you become fat. That is partially true. If you eat a lot of carbs and sugar and also add fat to your diet it will be stored in your body, but if you skip carbs fat will be used as energy.
The "drop all carbs" part of this diet is incredibly hard because when you start looking the carbs are everywhere and in very large amounts too. According to the Keto diet you are only allowed to eat at most 20 g of carbs a day.
You are not allowed to eat starch (pasta, bread, cereal, potato, corn, beans, legumes, beer and most vegetables that grow below ground) and sugar (candy, milk, fruit and half of the things you normally buy at your local grocery store).
Doesn't sound so hard in theory, but really hard in practice. Carbs are everywhere!
Progress
I started my experiment on September 1st and decided that my last day would be Black Friday, which falls on November 26 this year.
First two weeks were incredibly hard. Not in terms of eating, but more of knowing what to eat. Finding inspiring recipes, doing grocery shopping, cooking. Not only that, I often had to cook separate meals for myself as the rest of the family were not onboard with my little experiment and wanted to eat normal meals.
During the first two weeks I lost 2 kgs. I was impressed! That's a lot! From my research it mostly wasn't fat, but water. One gram of carbohydrates binds four grams of water inside your body and as you deplete your body's carb storage the water exits your body as well.
There is also a well-known concept called Keto fever, a state when your body enters ketosis, meaning it switches from carbs to fat as the primary source of energy. I honestly thought it was a fad as nothing happened to me. Or so I thought. It hit me on Day 5. I woke up feeling weak and drowsy and with a terrible headache. Took some painkillers that made me feel a little better. It was gone the next day.
Keto is also more effective when paired with intermittent fasting. I've been doing intermittent fasting for years, the 16/8 method. I am not strict about it. I just skip breakfast as I am never hungry when I wake up. It has served me well, but I am not sure if it has helped me lose weight. Maybe more like it has helped me not gain any.
One thing that struck me is that Keto diet is boring af. Sure, it's fun to eat large stakes, vegetables and fat sauces in the beginning, but that fun lasts for about a week. After that it becomes very one-sided and blunt. You have to try and find food and recipes not that you like, but that you like a bit more than you dislike. Also you have to use a lot of spices to make everything more interesting.
A little more than one month into my experiment my weight loss continued, maybe not at the same pace as in the beginning, but it was still steady. By that time I was down 5 kgs. I was also a little worried that I was losing weight a little too fast. Normal weight loss progress is around 1/2 kg a week and I was losing around 1 kg a week. However, the fast progress also made me confident that I will crush my weight goal way ahead of the deadline.
Many people around me were curious when I told them about my experiment. Two of the common recurring questions were:
Don't you feel tired all the time? Do you get anything done during the day?
On the contrary! I was full of energy and my blood sugar levels were super stable. I didn't have any energy dips at all, the ones you can get after eating a large plate of pasta for lunch.
I am not a doctor, but I think the reason for that is stable insulin levels. Insulin is the hormone your body produces to decrease and regulate your blood sugar levels when you eat carbs or sugar. I didn't have that problem as I didn't consume any of that.
Beside my stable insulin levels my digestive system has never felt better. During my experiment not once did I have a bloated stomach, the kind you can get when you eat lots of carbs.
Another benefit of the diet is that I totally lost my sugar and fast food cravings. I am a real sugar junkie and I also wouldn't say no to a big fat juicy burger, but for some reason I didn't crave that anymore.
As I said earlier I thought that I would crush my goal in two months, but my weight loss actually slowed down. I was still losing weight, but not at the same pace as in the beginning. I think there were a few reasons for that. First, I lost a lot of weight fast and maybe there wasn't that much more fat to lose. Second, I was less strict with what I ate, because honestly, the whole thing was getting pretty boring.
I got a little worried that I might even miss my goal so I got myself back into the groove by eating more strictly again. I also doubled down my efforts on physical exercise by taking a least 40 minutes walks in the morning, often on my way to work. I didn't do it every day, more like 3-4 times a week.
It paid off. Today I weighted myself for the last time. 82.1 kg.
As a bonus I also got my six pack back! I will spare you the selfie. I am not that kind.
I celebrated the whole thing with a few homemade pizzas together with my family. At last! Eating pizza again was good, but honestly not as good as I remember it.
Some personal tips
Below is a collection of personal advice and tips that worked for me if you want to try this yourself.
Set an end date
If you decide that you want to give Keto a try it's important to set an end date for the experiment. Don't choose too short period. I would say give it a minimum of two months. You can also set a weight goal, but that can be hard to reach. It's better to set a date and see how much weight you can lose during that period.
Choose your difficulty level
Keto is the most strict of the diets and can be challenging to follow fully. If you want to be less strict you might want to give LCHF, its little brother, a try. It's basically the same thing, only it doesn't force you to remove all carbs from your diet.
I find it personally easier to go all in, cold-turkey. You might want to start with LCHF and gradually transition to Keto.
Fat is your friend
Don't be afraid of fat. Eat more of it as it will make you feel full. If you leave the table and still feel hungry it's probably a sign that you didn't eat enough of fat. Don't worry about cholesterol, but try to stay away from vegetable seed oils as I understand they are not very good for you. Eat a lot of nuts and avocados.
Don't count calories
Concentrate on what you eat instead of how much you eat. Concentrate on eating the good food and avoiding eating bad food. Search around. There is a lot of information on the Internet, but take it with a grain of salt.
Find the food you like
Going Keto basically means reducing your food palette. It can get boring pretty quickly and feel like you are eating the same food over and over again. That's why it's important to find food and meals that you actually enjoy. For example, my friend eats a lot of eggs, I eat a lot of fat yoghurt with hazelnuts and a little honey. Find the spices and sauces you like, for example Tabasco or Sriracha. Also use a lot of mayonnaise, butter and olive oil to bring out and enhance the flavours.
The Keto community is desperately trying to come up with good substitutes for normal food like bread, pasta, pizza and deserts. You will find a lot of weird recipes and I urge you to stay away from them. I tried a few of those and it was actually as bad as I expected.
Don't sweat the small stuff
Try to be strict, but at the same time don't be dogmatic about it. If you are eating out with friends try to choose something that is least bad or just make an exception and eat what you feel like eating that very moment. I've done it several times. It didn't affect my progress and made me enjoy the moment instead. Allow you to eat some fruits if you feel like it or even a small scoop of ice cream, if you can't resist the urge. Don't feel bad about it. After all, you are a human, not a machine. For example, I ate a lot of dark chocolate during the weekends and enjoyed some red wine and fine spirits.
Don't expect fast miracles
Remember, nothing happens overnight, so don't expect any fast miracles (pun intended). Everyone is different. Just because I saw fast progress doesn't mean you will too. The important thing is not to get discouraged and give up too early. Trust the process and trust yourself.
Don't weigh yourself too often
Make a habit of weighing yourself every second week. I usually did it on Sunday mornings. If you weight yourself every day you will easily get discouraged because your weight can fluctuate a lot from day to day.
Walk and then walk some more
A long walk is the best weight loss exercise. Not only does it help you clear your head and get the blood flowing, but it also helps you burn calories. Make a habit to take a least 40 min long walks, preferably in the morning. Make it into a ritual and I promise you will notice a big difference in a few weeks. Put on a good podcast if it makes it easier or just let your mind roam free and just observe what pops up.
Conclusion
It's interesting how the Keto diet forces you to become an amateur nutrition expert as a side effect. I've become an expert on reading nutrition facts on the grocery products, something that I almost never cared about before.
It's also scary to learn how much added sugar our everyday food contains and it's really hard to find something that actually good for you. No wonder why most restaurants normally serve a lot of carbs, because carbs are cheap. Good and healthy food costs, but it's worth paying for.
It's clear what you eat matters much more than how much you exercise, but just because of that fact don't neglect the exercise. See it as a booster.
Personally, this short experiment was successful for me, but I honestly feel that Keto diet is not sustainable in the long run. During it I ate a lot of meat and especially red meat. Although it was effective I don't think it's good for me or for the environment.
Will I do it again? I don't know, but one thing is sure, I am never going back to my pre-Keto way of eating. I now know too much of what good and healthy food means for me, my body and my well-being, even if it comes with a price tag.
]]>Delayed fuseA mental model, concept and framework that can help you in many different situations2021-12-05T00:00:00Zhttps://codechips.me/delayed-fuse/For some reason I've been thinking about this concept almost the whole day today. It's nothing new or groundbreaking, and it might even be known under different name, but never the less it has helped me cope mentally with worries and stress that life throws at you. Therefore, after preparing for upcoming holidays and decorating the Christmas tree, I decided to put it down in words and try my best to explain it as simple as possible.
It's the concept I call - the delayed fuse.
I actually got the name and the idea from a movie The Wolf of Wall Street. In the movie there is a scene where main characters take rare, but expired drugs aaaaaand nothing happens. Anticlimax.
Nothing happens until it actually happens and when it happens, it happens big.
This is the mental model in a nutshell, but let's expand it a bit.
For me personally it's a concept, a mental model, and a framework that has three parts to it: the fuse, the blast and the shockwave.
The fuse
Let's first talk about good ol' dynamite. You know, the kind you see in old movies where a couple of villains want to blow up a bank vault and take all the money. In those movies there is usually a scene where the fuse is lit and people run for cover not to be affected by the blast.
This is important because the length of the fuse is your safety margin.
There are different kind of fuses. Some burn fast and some burn slow. This knowledge allows you to plan. Controlling the length of the fuse gives you enough time to get to a safe space.
This concept is also true for hand grenades and traditional OTC fireworks and I bet you have seen a couple of clips on Youtube where things don't go as planned.
But what does that have to do with anything? It has to do with action, reaction and time. The time between action and reaction is the delay.
The gist of this is that nothing happens overnight, and you probably know that, but knowing it doesn't help you worry less or to get less discouraged when you launch something (product, newsletter, course, saas) aaaaand nothing happens. It's hard to hide the disappointment.
But thinking in terms of the delayed fuse helps you plan and also control the impact, which leads me into the second part of the concept - the blast.
The blast
After the fuse has burned out there is a reaction, a blast. This is your launch. However, before the blast, while the fuse is still burning, you can have plenty of time. During that time your goal is to gather as many people as possible and tell them that things are about to blow, or if it's fireworks, to enjoy the show.
This is you building your audience. How do you do that? By being helpful, by sharing your knowledge and good vibes.
Things are easier if you already have an audience around you, just let them know. But if you don't, you have to work hard for it and prove your worth first. It's not hard, but it takes time. Just be helpful, share your knowledge and tips with people around you.
The time factor is important and it's the length of the fuse and its burn rate that controls it. Don't choose a fuse too short and don't pick one has fast burn rate if you don't have any audience yet. Let things take time.
It's equally important not to choose a fuse that burns for too long. If you do, people will get tired of waiting for the show. You need to find a balance here.
Another positive thing of choosing a slightly longer fuse is that it will allow you to safely extinguish it and prevent the blast. That is if you fail to attract an audience.
How ever you now choose to do it you must let your audience know. The man in the weapon shop in the video above lit the fuse, but failed to notify his audience. The blast sure was impactful, but not so much the reaction of his audience. This is what happens when you don't warn your audience and just drop the bomb on them.
The situation is the equivalent of locking yourself in the room working on your next big thing with hopes that the day you are finally done you will instantly become an overnight success only by just letting the world know about it once. The world just doesn't work that way. Sorry.
If you did everything right you hopefully have gathered a few people around you to enjoy the show. Things are about to blast. The impact, the blast radius and how far the shockwave will travel, mainly depend on the number of people you managed to gather around you at that very moment.
The shockwave
If you set off a firecraker it will go poof and not KABOOM. If you have many people in your audience some of them might still get impressed and excited, but most probable is that many of them will instead just say meh, go home and not think about it anymore.
But if your audience is small and you set off a Tsar Bomba instead of a tiny firecracker, I am sure it will be something for them to remember and talk about. Both the blast radius and the shockwave will be huge. The sound and the light will reach people living far far away. The shockwave, in this context, is other people talking about the launch and the product and that way helping you spread your message.
The two examples are extreme opposites of each other. Both can create a sizeable impact, but if you try to maximize both factors the impact will have the biggest effect.
Small blast + Large audience = Impact Big blast + Small audience = Impact
Your goal should be to attract as many people as possible by telling them about the awesome show that is about to happen and to get them curious.
The takeaway is that almost nothing happens overnight. There is always a delay.
You lit the fuse, nothing happens, nothing happens, and then KABOOM!
Understanding the delayed fuse concept can help you cope with stress and worry, because you now know that delays are natural. It can also help you plan and control the impact - the blast radius and the shockwave.
But if you don't light the fuse nothing will ever happen.
]]>How to setup Svelte SPA with Vite and Tailwind CSSShort guide on how to integrate Tailwind CSS into a plain Svelte SPA2021-12-16T00:00:00Zhttps://codechips.me/svelte-vite-tailwind-css/I needed to throw together a small Svelte SPA with Vite and Tailwind CSS. There are many existing templates on Github, but it's good to know how to do it yourself.
Thought I might as well write it down in case I forget it. Here are the instructions.
1. Create new Vite project
I normally use pnpm, but the commands for npm should be the same.
$ pnpm create vite
Follow the instructions and choose Svelte template. TypeScript or plain, doesn't really matter.
2. Add PostCSS and Tailwind CSS
Next step is to add Tailwind CSS and then initialize it.
]]>On interests, hobbies and skillsHow to find your interests and how they differ from your skills and hobbies2021-12-31T00:00:00Zhttps://codechips.me/interests-skills-and-hobbies/You are a mix of your skills, hobbies and interests. Most people also confuse hobbies with their interests. There is a big difference between the two.
Your hobbies often cost money, but your interests can help you earn money.
Want to know how? Read on to learn how you can find and leverage your interests.
Skills
Your skills is something you currently get paid for. It's what you are good at. It's your job.
You might not like doing what you are doing, or you might do, but your skills put food on the table.
Skills is a compound of your previous interests, formal or informal education and serendipity. They are you.
All the previous choices you have made and the experiences you have had make up your current skill set.
Most of the knowledge workers sell their skills in the form of knowledge. They sell their expertise in form of time in exchange for money.
Depending on your skill set you can get paid a lot or a little, but you are most likely selling your time for money. A salary.
Skills are not your interests. But they might have been.
Hobbies
You hobbies is something you don't get paid for. If you get paid for them they are not hobbies. It's a job.
Hobbies often cost money. Travelling is a hobby, so is gardening or working out. Maybe your hobby is photography, cross-stitching or hiking. Maybe it's your dog.
Hobbies don't have to cost much but they often do. And they are worth spending money on.
Hobbies is something you do during your free time and you do it because it's fun. A hobby's main purpose is usually relaxation, meditation or pure enjoyment. Your hobbies help you forget all your worries and allow you to fully immerse yourself in the now. If only for a short moment.
You often use the money generated from your skills to sponsor your hobbies. Your hobbies are important for your well-being. You should try to keep them alive and set aside time for them regularly.
Hobbies are not your interests.
Interests
So what are interests if they are not your hobbies? In short, they are the seeds of your new skills. Skills yet to be learned. A seed that can grow into a beautiful tree that bears many fruits in the future.
Let me explain. The diagram below helps visualize the concept.
Here is the thing. Your interests don't have to be related to your current skill set, but they should help you expand it.
The interests are often found at the intersections. It's the missing skill. If you invest time and energy in a newly found interest you will expand your skills' circle after a while. Growth.
Interests have nothing to do with your passion or your purpose. You don't have to know your purpose. That's a much deeper question that very few people know the answer to.
Interests is you, learning.
But how do you find your interests?
How to find your interests
There are a few questions you can ask yourself that can help identify your interests:
What subjects am I fascinated with?
What topics am I curious about?
What topics am I currently excited about?
What topics do naturally capture my attention?
What subjects do I most enjoy reading and learning about?
If I could make money doing whatever I wanted, what would I do?
Spend time on them. Look for patterns.
Also, think about activities that make you lose track of time. That usually means you enjoy them.
Now that you’ve come up with things you’re interested in, choose the one that you feel most excited about right now. Don't worry, you can always come back to your other interests later.
Don't underestimate the power of the unconscious mind. There is energy waiting to be released.
Strike while the iron is hot.
How to earn money from your interests
I said in the beginning that you can make money from your interests. That is only if you invest time and energy in them.
But don't worry about right now. That comes later. First thing you need to do is to get started.
Let your enthusiasm and curiosity be the primary driving factors, and the journey be the main focus.
The journey itself will help you generate ideas for how you can make money. Just keep your eyes open.
Follow the protocol
The C.L.E.A.R. is the perfect protocol to base your interest journey on (not sure where I heard it first).
Let's break it down.
Curiosity
Your interest starts with your curiosity and fascination. Something that captures your attention. Do you research and find as much information on it as possible. Books, articles, videos, people, forums. Overwhelm yourself first, then try to distill everything to its essence.
Learning
Start learning and experimenting so you can get a better understanding of it. Do small projects and experiments and document your findings, both good and bad, in public. This is important!
Enthusiasm
First steps can be hard and frustrating, but don't give up! Let it take time. Remember, nobody is instantly good at something. Chances are the more you learn the more enthusiastic you get. Mastering a new skill provides satisfaction. Continue to share your learnings and your enthusiasm. Rant!
Awareness
As you become better and more skilled you will become aware yourself that you are getting pretty good at this. You start seeing opportunities and people around will start to interact with you. They will become aware of you. This will only happen if you continue sharing what you learn. Your journey.
Recognition
As you continue your journey and document it people will start giving you recognition. They will start seeing you as an expert.
Everything is clear, right? Good!
This is not some magic formula. Many people follow this protocol.
I did and it worked for me. My primary interest for that past year was Svelte web framework. I started from zero and by following the C.L.E.A.R. protocol I wrote a book, got consulting gigs and conference talks offers. All this from curiosity driven by interests.
A few tips
You have to invest time in your interests. Continuity. If you don't, you might lose interest (pun intended). Setting aside time is crucial. You can either follow the Seinfeld (don't break the chain) method or decide on the days when you dedicate a big chunk of time to them, like on weekends.
The more you do the faster you will master it. There are no shortcuts. Sorry. You have to put in the time.
Your journey will be full of pitfalls and frustrations, but don't let that discourage you. Nothing is easy. Keep pursuing your interests and work through the hardships so you can learn, improve and get better. Everything takes time and dedication. Make sure you do the work and use your failures as learning experiences going forward.
There will be a few pitfalls as you get deeper into your passion, but don’t let those discourage you. Even if you aren’t naturally good at something you’re passionate about, keep pursuing them and working through the hardships so you can improve and get better. Passions take time and dedication, so make sure you spend time doing the work and use any failures as learning experiences going forward.
While it’s important to persevere, it’s also important to recognize when to stop pursuing something. If you aren’t getting the same level of enjoyment that you were before, then it may be time to move onto something different.
Just as it’s important to persevere, it’s important to recognize when to stop. If you aren’t getting the same level of enjoyment or satisfaction, if it becomes a chore or you feel that you have learned enough, it might be time to move onto something different, more exciting.
After all, you are more skilled now than before you started. You just turned your interest into a new skill.
Now go and use it.
P.S. If you need help getting started or need someone to hold you accountable shoot me an email. I have an interesting working theory and an awesome playbook that I would like to validate, so the help will be mutual.
]]>The chained elephantThe story of the chained elephant and you2022-06-12T00:00:00Zhttps://codechips.me/chained-elephant/Every seen an elephant chained to a pole? It makes you wonder how come this massive and intelligent animal doesn't break the chain and just walk away to freedom. The pole and the chain would not stand a chance if only elephant decided to do it.
But the elephant does nothing. Instead, it quietly stands still chained to the pole.
Why?
Elephant's past that is holding it back. You see, when the elephant was just a baby it got chained by its foot to the very same pole. Of course the elephant didn't like it and tried to break free. However, it was still to small and too weak to break free. But the elephant didn't give up on the first try. It tried over and over again.
Every time the elephant tried to break free, the chain that was tied to its foot started to dig into its flesh. It quickly created a painful wound. As the time went by every new attempt to break free started to feel.
In very short period of time the elephant internalized that its escape attempts are associated with pain. It eventually gave up and accepted its destiny, being chained to the pole its whole life.
I don't remember where I first heard the story but it really resonated with me.
Hope it did with you too.
Don't let your past chain you down, my friend.
]]>3 practical Stoic principlesUseful and practical philosophical principles to live by2022-06-26T00:00:00Zhttps://codechips.me/3-practical-stoic-principles/Philosophy has always intrigued me, but honestly I never found any practical use for it. Not until I stumbled on Stoicism. Since my discovery of this ancient Greek philosophy almost a decade ago I've incorporated some practical tools that help me in my everyday life.
Below are my three favorite ones. Try them out and see if they make your life a little better.
Obstacle is the way
The most useful principle and the one I live by the most. When faced with an unforeseen problem I just deal with it. No need to dwell on the past or its cause. Sure, I might have had other plans, we all do, but things normally don't go according to plans. Life is too unpredictable and it also what makes it exciting.
Save yourself the frustration and just deal with the problem in front of you. This simple mindset will help you channel your energy in the right direction. Dwelling on the past and the reason is like ramping up your can engine while it's in neutral. You will only waste fuel. Take action to move forward instead.
I also find it important to ask WHAT and not WHY question in situations like these. Sure, it might be important to ask why but only if the answer helps you to know the what. Remember, you cannot change something that already happened, you can only deal with things in the present and future moments.
The view from above
A great tool for anger management. We all face tough situations every now and then. Our problems always seem so big. It's easy to get caught up in anger or frustration.
But if you zoom out far enough and look at the situation from a higher perspective it will become small. Often almost trivial.
Take a couple of minutes to do this exercise. See the situation a fem meters from above, then zoom out more and more until Earth becomes as small as a grain of sand.
It's not until you zoom out and look at it from above you realize how small your problem really is. You realize how little time you have and that it's not worth to spend it on small things.
To put things in perpective take a look the short movie - Powers of Ten.
This visualization can be done as short daily meditation. Take five minutes of your daily commute or when waiting in line to contemplate.
Negative visualization
Assume the worst. The death of your loved ones. Your own death. Losing your job or your house. This visualization can be very challenging to practice, but it will prepare you for the worst. Not only that, it will also make you appreciate things you already have in your life and to not take them for granted.
Don't practice this before falling asleep. Negative visualization practice is powerful and can be very uncomfortable. It can keep you awake long into the night.
Bonus: Gratitude
Every now and then, before falling asleep, think about all the people and things you have in your life. Roof over your head, food on the table, cloth to wear, maybe health or loving partner. Children. Your pet. Your job.
It will help you realize that being rich is often not about money and possessions and that you are already rich. That you have all the things you need.
And we don't need much. Honestly.
]]>The art of making fireStarting a fire is a skill that needs to be learned2022-07-06T00:00:00Zhttps://codechips.me/art-of-making-fire/It was February and I had the luxury to take the weekend off. To get away from everything. Just me, in total solitude.
I drove to our summer house in the middle of the winter. The house was cold. It was almost as cold inside as it was outside. I had to quickly get warm to stop the shivering.
I decided to make a fire.
Fire has always fascinated people. Without fire we would still eat raw meat. Without fire we would not have iron and technological advances. After water, fire is the most essential necessity to human existence.
It took me a good while to get the fire going. House was cold. Fireplace was cold. Wood was cold and wet. It's been covered in snow.
After a few failed attempts and lots of wasted old newspapers the warmth finally start spreading around the room. The steam from my breath finally disappeared and I could finally see from the windows as they started to defrost. I started to defrost.
I sat on the floor next to the fireplace mesmerized by the flames and sparking wood and thoughts carried me away.
I thought about the skill of starting a fire. It's a skill that you have to learn. Just like with everything, the more fires you make the better you get.
Heck, it's not even a skill. It's an art. It's more art than science even though some scientific principles still apply.
Then I started to think on what it takes to make a fire and fire in general. Below are my notes.
Dry wood vs wet wood. Wet wood requires a lot of energy to start burning. Dry wood ignites easily. Even without paper.
Starters. You often need something highly flammable to start the fire. Paper or candle wax. Tree bark burns really well. You can even use gasoline but that can be dangerous.
Arrangement. For the fire to start you need to arrange the wood carefully. It cannot be too dense. You need to leave plenty of space for the air to enter. You also have to place paper strategically in the right places. At the bottom.
First failure. I often fail to light the fire on the first try. Maybe the wood is cold or a little wet. Second time is usually easier as the wood might have dried a little or got a little warmer.
Material. You can use many things for your fire but there is a reason most people use wood. It's cheap and it's been tested by time.
Professionals. Some people are pros when it comes to fires. Scouts, hunters, lumberjacks, hikers. They make it looks so easy. They know exactly what to do. But they also had to start somewhere. There are many fires ahead of me and you.
Campfire. When it comes to wood arrangement there are a few different ways to do it. Everyone has their own preference and it's usually they way they were taught. Some wood arrangements have advantages of lasting longer. For example, there is a special camp file arrangement where you put the biggest logs at the bottom and then build you way up by size with the smallest pieces on top. Then you light the fire at the top and it works itself down.
Learning. If you want to know how to make fire, you have to find someone who can teach you. This is the way it works. You don't learn this stuff in school. Someone shows you once and then is mostly trial and error until you get the hang of it.
Small adjustment. Sometimes a slight adjustment of on piece of wood will kick off a dying fire or kill it. It's especially true in the beginning.
Spark. Every fire needs some initial energy, a spark of some kind. You have to start it yourself (action). Sure, you can wait for the lightning to strike, but I wouldn't take that chance.
Size. Only a fool would use large blocks of wood to try to start a fire. First, you have to find dry wood and they you have to chop it into thinner and smaller pieces. Smaller pieces require less energy to start burning. Only after you see that the wood is burning, and has burned for a while, it's safe to add larger pieces.
Density. Wood density matters. Heavier wood makes fire last longer as there is more energy in it.
Illusion. If you use a lot of paper you can create an illusion that the wood is burning. But it's can be deceiving. The fire dies as soon as the paper has burned down. I can't count the times I've been burned by this. There are no guarantees.
Purpose. What is the purpose of your fire? To keep you warm? Because it's cozy? Maybe you want to cook something? Just for fun? Or maybe you need to get the sauna warm?
Intensity. Fire burns most intensely in the beginning.
Keep it burning. You have to add more wood if you want to keep the fire alive.
Energy storage. You can store fire's energy to heat up the space. There are tiled stoves that radiate heat even after the fire stops burning.
Cheats. If you only have wet wood you can cheat and use gasoline as a starter. But it's dangerous. Gasoline is highly flammable and explosive.
Time. It takes time to learn how to make good fire on the first try. You can still fail even if you have done it 1000 times before. Conditions are different each time.
Modern fire. It's never been easier to start a fire. Today you have matches, lighters and other help. It's easy to take them for granted but they are actually not that old. A match was invented in 1826.
Practice. Don't be so hard on yourself when you fail. Practice makes perfect. Even if I think I am pretty good at starting a fire I've met people that are much better. And they all do it differently.
Now. "What does that have to do with anything?" you might ask.
Go back and re-read everything but this time replace fire with your business, company or product.
]]>The roads less traveledWalking for the sake of walking can take you places2022-09-20T00:00:00Zhttps://codechips.me/the-roads-less-traveled/I love to walk. I don't run, I walk. I try to walk as much as possible. When I wake up and see the weather is nice I drink a cup of coffee, put on my shoes and go for a morning walk. There is no better way to wake up the body and get the juices flowing. It's fantastic to see the sun rise and the world slowly wake up.
Sometimes I go for a late evening walk to wind down. When it's dark and silent outside. It makes you see the same road that you walked during the morning in totally new light. The street lights, or if you are lucky, the moon.
Silent evening walk in the neigbourhood
Luckily, I live in the city surrounded by water and lots of green areas. City is where I do all my walking. I love to walk in the woods but unfortunately it's hard to find them nearby (walking distance).
Cities are actually great to walk in and can be a very interesting experience. Every time I travel to a new city I make sure to go for a walk. Alone. Preferably in the evening, when it's dark outside. It might seem weird but I love to see the lights from the street lights. Neon signs on the buildings. Car lights. Random people passing by. Couples in love. And the silence of the evening. There is something magical about it.
Usually I walk without any destination in mind. I walk just for the sake of walking. Maybe you could call me a flâneur.
However, back home I have a few different static routes to chose from. I know how long time each one takes and I can decide on the which one to take depending on how much time I have.
I know these routes by heart. They are well prepped, asphalted roads specifically made for people who like to walk or jog. People like me and you. People who do it because it's what everyone says you should do. It's good for your body and health.
However, I don't do it for the sake of my health. I do it for the sake of walking.
And if you do it right it can be a super interesting and pleasant experience.
But what is right?
When I walk I see many people either run or walk fast. 80% of people have headphones on (with probably some interesting podcast on) or they walk and talk on the phone.
(Some people also run and talk on the phone. I will never understand it.)
When you have your headphones plugged in you literally try to shut off your surroundings. Why? Are you trying to maximize your life?
If you do one thing do one thing only, not two.
Walking is thinking. Walking is observing the world. Walking is enjoying life.
I've come to discover that there are actually two types of walking - automatic and exploratory.
Automatic is when you go for a walk on a common route that you know by heart. It's a great way to engage in thinking activity. Because you know the route you can just put your feet on autopilot and engage your brain instead.
Actually, you don't need to engage your brain that much if you don't want to. All you need to do is to think about something hard enough before you go for a walk. During the walk you can outsource the problem to your unconscious self and just observe the thoughts as they pop up in your head. Maybe something useful will pop up maybe not. From my experience it usually does.
Second mode of walking is exploratory. This is my favorite mode of walking. It's when you deviate from the main road and walk on some road you never walked before. I try to do it often because it's fun.
This type of walking is very active. You are forced to be present, to be aware. You have to make decisions. You have to scan your surroundings because you are in the unknown territory. You have to be in the now.
It's also beautiful. You see new things. You might discover something interesting. You might learn something. You explore your surroundings.
How do you do it?
When you walk on the road just turn left or right to some other connecting road. It's the road you never walked before but it's OK. You approximately know your main direction anyway. Now you just have to figure out how to get there and see where you end up.
Most roads that connect to the main road are smaller but still well maintained. Not that many people walk there but still many do. If the road is there it must lead somewhere, right? Just take it.
The road you took might have a fork in it. It's up to you decide if you should take left or right. You still have the approximate sense of direction in your head. Use your best judgment and take a chance.
It's most likely that the road you chose at the fork might be even smaller and less maintained, but still it's a road and you can see that others have walked there before you. So it's safe to assume that you are not a trailblazer.
Maybe, after walking for some time, you discover that that road comes to a dead end. (It happened to me a couple of times.) That's not the end of the world. You can always go back the way you came to the main road and take the path most traveled. The safe path. The path everyone walks.
But there is a big chance that if you carefully look around, standing there at the dead end, you might notice a small path leading into the woods or a small fence that you can climb over. You don't know where this new path leads but it's still an option, right? It's now up to you decide if you want to continue your adventure or turn back.
There is no shame in turning back. After all, you just lost some time and energy. But if you turn back will you not regret that you never took the road less traveled? That tiny, bare visible path?
If there is a path it means that someone has walked if before you. Not many but some.
Where does that path lead?
Aren't you curious to find out?
Remember, you can always turn back.
Heck, you might just substitute the word walk with work in this article.
]]>Don't sweat the small stuffYour life consists of many small chores and interactions2023-02-10T00:00:00Zhttps://codechips.me/small-things/There is a famous quote "How we spend our days is, of course, how we spend our lives." I cannot wonder if that quote takes into account the fact that most of our days consist of many micro-interactions and micro-chores.
Let's first define what terms micro-chore and micro-interaction mean to me.
Micro-chore
A micro-chore is an action, or physical task, that can take anything between 2 seconds to 15 minutes to do. A chore is something you don't enjoy doing. It's called a chore for a reason. Because doing them is usually a low value activity. It's your $10/hour work with no leverage.
Doing dishes, folding laundry, closing a cabinet or a door, picking something up from the floor, taking out the garbage. All those are examples of chores that add little value to your life but that you still need to do.
I used to get extra annoyed when someone else failed to do something expected of them. It could be trivial things. For example when someone in my family didn't close the kitchen cabinet or failed to put their dirty plate in the dishwasher after a meal.
But then I realized that I was spending more energy being annoyed that it would take me to do the damn chore myself. So I started doing the chores myself. The problem was that they were still boring, because I was still feeling annoyed while doing them.
And one day it all clicked. I learned to let go of the feeling of annoyance with one simple trick.
The trick is to approach every chore with mindfulness. To give it your full attention. Sounds cheesy but there is actually a good reason for it. When you do the chore and you feel annoyed or irritated you waste your energy. But if you approach it with full focus and mindfulness you actually train your focus, attention and the art of letting go.
Every small chore then becomes a micro exercise in mindfulness. Focus, complete attention, letting go. It makes every experience unique in its own way if you can concentrate fully on it.
Boring suddenly becomes interesting.
Micro-interaction
Someone cuts you off in traffic or someone walks into you in the street and yells something. There are many types of micro-interactions in our daily lives. The kind I want to talk about is the non-relational type. It's an interaction with someone you don't know or have no relationship with.
I used to get annoyed and I always had even more annoying post-reaction. "I should've said something smart back", "I should have done this or that." I use to think a lot of what I could have said or done, all the smart one-liners. I noticed that I got carried away in the evil spiral of annoyance because my ego got hurt.
Then I came up with a rule for myself. There is no reason to get annoyed or upset if nothing serious happened.
You are dealing with people and people are unpredictable. You getting annoyed means they managed to get to you, intentionally or not. They somehow managed to affect your feelings, your ego, your pride, your self-worth and they forced you to spend your mental energy on it.
Why let them do that? You don't know them and have no relationship to them. Strange, isn't it? Just let it go.
Again, you get a chance to train yourself of letting go of the things that are not important to you or your life.
How to practice? When the situation happens try to bring your attention to the now. Focus on external things. Your surroundings, the sounds around you. I've noticed that if I bring my attention inward, it can be on my feelings and emotions, I get caught up in them.
Now I am gradually learning to focus inward and inspect my feelings. It's actually a very interesting exercise to do. You learn to view your feelings and emotions objectively and see them for what they are. You become the silent observer.
I know it all sounds like new age bullshit, but when you learn to observe your feelings and emotions objectively, when you hear your inner critic, you cannot stop wondering who is the observer and who is that voice in your head? This is the practice of detaching from your ego, your inner critic.
Remember, you often spend more energy being annoyed about something than actually doing it or just letting it go.
Next time it happens ask yourself - Is it worth it?
]]>Start paying attention to the kids in the backThe quiet kids in the back of the classroom are usually right2023-05-11T00:00:00Zhttps://codechips.me/feelings/A recent, unpleasant situation made me realize that I suck at noticing my feelings. I was telling a friend about it and the other person asked me how I felt when it happened. I couldn't explain because I couldn't put it in words. Being an engineer and realist I can tell you exactly what happened, the reason for why it happened and all the logical outcomes. But my feelings? I have no idea.
This got me thinking, and my thinking normally involves lots of research. I am currently down in the psychology rabbit hole trying to understand different theories about how our mind works. Freud, Jung, Adler and friends.
One interesting theory is the Affect theory. It states that there are nine primary affects. An affect is an emotion or subjectively experienced feeling. These affects can be either positive, neutral or negative.
So you just learned that you have a core set of affects (or emotions). Great, now what? The hard thing is to notice them because your true core emotions are often suppressed by your other (false) emotions. It happens unconsciously and it happens for a good reason. To protect you, or sooner your ego, which is your personality. All this is explained by the Triangle of Conflict model.
Simply explained in layman terms: a situation triggers a core (raw) emotion in you. This emotion triggers an alarm and a committee is gathered to decide how you should deal with this emotion. This committee (your superego) is based on your upbringing, past traumas, values and a bunch of other stuff. If this committee decides that this emotion is somehow harmful or dangerous to your ego it replaces the core emotion with some other emotion (laughter, sarcasm, etc) or simply suppresses the emotion. It's a form of defense and is done for your own good. This process also happens at the speed of light without you even noticing it.
To explain it in computer terms, you have a built-in proxy that sits between your unconscious mind and your concious mind. This proxy decides if it should let your true feelings pass, drop them or replace them with something else.
Turns out this Change Triangle, as it's also called, is a useful tool to get to know your feelings better.
The first basic step is to start noticing your core emotions. Because everything happens automatically, and so fast, you can't process things in real-time. It's psychically impossible. What you can do is to carefully think about a situation in retrospect and see if you can identify your core emotions and if they were replaced by some other emotion. If you stick to this habit you will start noticing patterns in your behavior. This knowledge will slowly some shine light on your true feelings and you will start to notice small changes in yourself. Your behaviour and your reactions to various life situations will change.
I've been doing this for a while now and have identified that I normally suppress a lot of feelings than change them. My ego doesn't allow me to feel because it thinks that feelings are dangerous for me.
Even noticing my core emotions is super hard for me. I like to compare them to the shy kids sitting in the back of the classroom. When I ask a question there are a bunch of kids who sit in the front raising their hands, almost jumping out of their chairs, yelling "Me! Me! Pick me! I know this!" These kids are logic and reason. The over-achievers, the Besserwissers.
But then you see a tiny thin and pale hand that is slowly raised in the back of the classroom. Scared, unsure. You tell the kids in the front to be quiet and ask the shy kid in the back to speak. Everyone turns around and the room goes quiet. The kid in the back starts to speak in a quiet voice. All the kids in the front start laughing because that's the stupidest thing they've ever heard. You hush at them to be quiet and ask the kid to continue talking. When the kid is done talking the room is silent. You can hear old florescent lights buzzing. Nobody is laughing now. Because deep down everybody knows that this is the best answer, even if it can be hard to admit.
Start paying attention to the kids in the back of your classroom and you will get true answers and not only the right answers.