Sapper server-side authentication with Auth0
Learn how to setup Express authentication in Sapper with OpenID Connect
I hesitated to write this post since the announcement of SvelteKit and with it the slow death of Sapper. But who knows when SvelteKit will be released, so here is a short post on how to setup server-side authentication in Sapper.
One year ago I wrote a post on how to do client-side authentication in Svelte with Auth0 - Svelte Auth0 integration in 66 LOC. While it's possible to use it in Sapper you shouldn't do it. There is a better, and more secure way, to do in with Express middleware called express-openid-connect.
This post will also show you how to make authenticated requests to your third-party backend API using Auth0 access tokens.
Although the express authentication middleware is maintained by Auth0 it's not locked to it and you can use it with any OpenID Connect provider.
I am using it in a Sapper app running on Vercel with Auth0 as my authentication provider.
This app is an internal app and one nice thing about Auth0 is that you can do fancy stuff in the configuration, such as allow users to sign in with their Google account, but restrict it to your company domain only.
NOTE: The app itself is written in TypeScript and therefore all examples will be in TypeScript as well. If you are not using TypeScript you can just omit all the type imports and their usage in code.
Also, all code examples are copied straight from the app and slightly adjusted. This post is meant to guide you in the right direction and not serve as the complete working example.
The Setup#
Sapper is using Polka as a default server, but I use Express.js in my app. Since the app is written in TypeScript so we also need to install Express.js types.
$ npm add express @types/expressBecause we will be making requests to the backend API we also need to install some kind of HTTP client. There are many good clients available. Some of the most popular ones are Axios, Superagent and got. In my app I use wretch, a thin wrapper on top of the Fetch API that also works on the server.
$ npm add wretch node-fetch form-dataWith all required dependencies in place we can now start configuring our Sapper app for backend authentication and remote HTTP calls.
Sapper Middleware#
I assume that you already have your Auth0 config ready, so I won't explain how to set everything up in the Auth0 console. Two important requirements is that your config is setup as a backend app and not SPA and that you have defined an audience.
The audience part is crucial, otherwise you will not get a correct JWT token back. Also, it's important that you use access_token for your backend calls and not id_token. This is a common misconception and mistake I see developers make. Id tokens should only be used for fetching profile information! You must use access token if you plan on setting up and using grants aka API access permissions.
Here is the server.ts file in all its glory with Auth0 middleware in place.
// src/server.ts

import sirv from 'sirv';
import compression from 'compression';
import * as sapper from '@sapper/server';
import express from 'express';
import { auth, OpenidRequest, OpenidResponse } from 'express-openid-connect';

// node fetch is installed
global.fetch = require('node-fetch');
global.FormData = require('form-data');
global.URLSearchParams = require('url').URLSearchParams;

const {
  PORT = 3000,
  OAUTH_BASE_URL = 'http://localhost:3000',
  NODE_ENV = 'development',
  OAUTH_ISSUER_BASE_URL = 'https://your-tenant.auth0.com',
  OAUTH_CLIENT_ID = 'your-client-id',
  COOKIE_SECRET = 'very-secret-12131415',
  OAUTH_CLIENT_SECRET,
  OAUTH_AUDIENCE = 'https://example.com/api',
} = process.env;

const dev = NODE_ENV === 'development';

const config = {
  attemptSilentLogin: true,
  authRequired: false,
  auth0Logout: true,
  baseURL: OAUTH_BASE_URL,
  clientID: OAUTH_CLIENT_ID,
  issuerBaseURL: OAUTH_ISSUER_BASE_URL,
  secret: COOKIE_SECRET,
  clientSecret: OAUTH_CLIENT_SECRET,
  authorizationParams: {
    scope: 'openid profile offline_access email',
    response_type: 'code',
    audience: OAUTH_AUDIENCE,
  },
};

const app = express().use(
  compression({ threshold: 0 }),
  sirv('static', { dev }),
  express.json(),
  auth(config),
  (req: OpenidRequest, res: OpenidResponse, next?: (err?: Error) => void) => {
    return sapper.middleware({
      session: () => {
        return {
          isAuthenticated: req.oidc.isAuthenticated(),
          user: req.oidc.user,
        };
      },
    })(req, res, next);
  }
);

if (dev) {
  app.listen(PORT, () => console.log(`Listening at http://localhost:${PORT}`);
}

export default app;
As I mentioned earlier this app is running on Vercel and Vercel builder requires us to export the app. I am setting up wretch in the beginning of the file. This is needed for it to work on the server-side.
I also setup Auth0 config using environment variables. The cookie secret variable is just a random long string that openid connect middleware will use to sign (and maybe also encrypt?) the authentication cookie with. The rest of the values comes from Auth0 config.
You can see that I wrap Sapper middleware into its own function. That is needed, otherwise it will override the openid connect routes. It's important that Sapper middleware comes last in the middleware chain.
The openid connect middleware exposes /login and /logout routes in our app that we will leverage. It has tons of other configuration options, which I only understand half of. The documentation is very good and you have plenty of different authentication example scenarios to choose from.
We are done with server configuration. If you set up everything correctly and can start the app it means that we are half-way and have enabled server-side authentication in our app.
Let's put it to use!
Checking Authentication State#
Since we've added Auth0 state to the Sapper session with isAuthenticated and user properties, we can use them both on server-side and client-side to check the if the user is logged in or not.
As you probably already know, Sapper hydrates the app. It means that the initial request will be processed server-side and then, when you request a new route, Sapper will intercept it, fetch the page in the background and replace it for us on the client-side. This is what makes Sapper apps and page transitions smooth like butter.
You can access Sapper session in any page of your app, but probably the best way to do it is in _layout.svelte as this page is usually shared by other pages.
// src/routes/_layout.svelte

<script lang="ts">
  import { stores } from '@sapper/app';
  const { session } = stores();
</script>

{#if $session.isAuthenticated}
  <div>
    Signed in as <strong>{$session.user.given_name}</strong>
    | <a href="/logout">Sign out</a>
{:else}
  <a href="/login">Sign In</a>
{/if}

<pre>
  {JSON.stringify($session, null, 2)}
</pre>
That's it! Now you should be able to login and logout through Auth0 middleware. To test that authentication works correctly: login, logout and hit the back button in the browser. Are you still logged in or do you end up in the "not authenticated" app state?
All is good, but the app is kind of useless if we can't make authenticated calls to our backend API. Let's tackle that next!
Secure Backend Calls#
This is the hard part. We want to call our backend API using Auth0's access_token. It's not as straight-forward as you might think. Because of CORS restrictions I found that the easiest way to call external backend API is through Sapper's backend API. You can say it's kind of an internal proxy call.
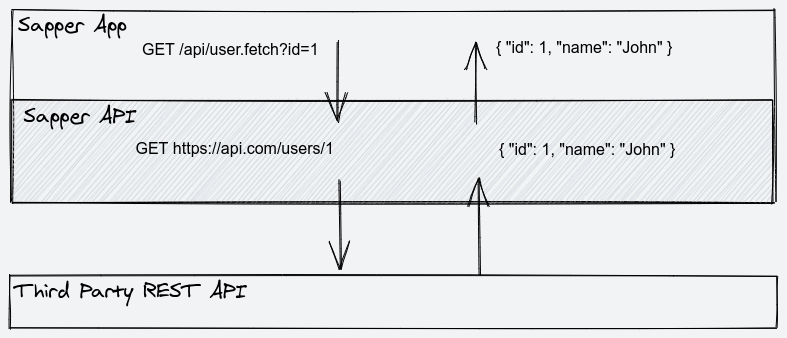
What do I mean by that? We need to create a separate backend API route in Sapper for every call we want to make to our external API. So the flow will be "Frontend Ajax Call -> Sapper API route -> External Backend API". "Why the ceremony?" you might ask. Bear with me and I will explain everything.
You see, when you authenticate with Auth0, the middleware will set a cookie for us in the browser and that cookie will be sent and validated on every request to the backend. There are no databases involved. The complete Auth0 session is kept in that cookie. What's stored in the authentication cookie is partially defined by the scopes we defined earlier in the Auth0 config in server.ts file.
This means that we have access to that information in the Sapper's backend. Let's use it by creating a simple Sapper API endpoint where we fetch some user info from an external API.
Create a new API route at src/routes/api/user.fetch.ts. This will create a new API route in our Sapper app available as /api/user.fetch. I like to use this kind of RPC route names. I got inspired by Slack's API and it makes them much nicer to read and understand in my opinion. Single purpose.
// src/routes/api/user.fetch.ts

import wretch from 'wretch';
import { getAccessToken } from './_utils';
import type { OpenidRequest, OpenidResponse } from 'express-openid-connect';

const endpoint = `https://api.example.com/api/users`;

export async function get(req: OpenidRequest, res: OpenidResponse) {
  const { id } = req.query;

  try {
    const accessToken = await getAccessToken(req);
    const url = `${endpoint}/${id}`;

    const payload = await wretch(url)
      .auth(`Bearer ${accessToken}`)
      .get()
      .json();

    return res.json(payload);
  } catch (error) {
    res
      .status(error.status || 500)
      .end(error.message || error.text || 'Got unknown error from backend API');
  }
}
There is nothing magical going on. We call this route with GET /api/user.fetch?id=123 in the frontend, extract the user ID from the request object, call our external API with the access token and then return the result back to the frontend.
In this backend route you can validate your payloads and massage the response before it's sent back to the client if you need to.
You might have noticed the getAccessToken(req) call. This is where we fetch the access token. I've abstracted it away so I can reuse it in other API calls.
// src/routes/api/_utils.ts

import type { OpenidRequest } from 'express-openid-connect';

export const getAccessToken = async (req: OpenidRequest) => {
  let { access_token, isExpired, refresh } = req.oidc.accessToken;

  if (isExpired()) {
    ({ access_token } = await refresh());
  }
  return access_token;
};
This is just a helper function that extracts the access token from the request and refreshes it if it's expired. I haven't validated it, but I think that the library makes an call to the Auth0 if the access token has expired and needs to be refresh. Doing that little OAuth jazz dance.
If you want to get access token on the client side, and make an API call directly from your frontend, here is an imaginary API route that can help you achieve it.
// src/routes/api/token.fetch.ts

import { getAccessToken } from './_utils';
import type { OpenidRequest, OpenidResponse } from 'express-openid-connect';

export async function get(req: OpenidRequest, res: OpenidResponse) {
  try {
    const token = await getAccessToken(req);
    return res.json({token});
  } catch (error) {
    res
      .status(error.status || 500)
      .end(error.message || error.text || 'Got unknown error from backend API');
  }
}
Something like this. You can even put in on the session object. However, I strongly advise you not to call your backend from frontend directly!
First, you have to deal with CORS pain. Second, access tokens are short lived and if you cache them on client-side you have to keep track of expire time and refresh them. More code, more possible bugs and potential security issues.
Putting It All Together#
We now have authentication middleware and our "proxy" API routes setup. Let's wire everything together by fetching the data from our backend API route.
<!-- index.svelte -->

<script lang="ts">
  import wretch from 'wretch';
  import { onMount } from 'svelte';
  import { stores } from '@sapper/app';

  const { session } = stores();

  onMount(async () => {
    $session.userData = await wretch('/api/user.fetch?id=123').get().json();
  });
</script>

<pre>
  {JSON.stringify($session.userData, null, 2)}
</pre>
This is it. Everything you put in your session store will be available to other components of your app. If you have some shared data, the best place would probably be to seed it in the _layout.svelte file because this file is shared by other pages.
Libraries Mentioned#
https://github.com/auth0/express-openid-connect
https://github.com/axios/axios
https://github.com/elbywan/wretch
https://github.com/expressjs/express
https://github.com/form-data/form-data
https://github.com/lukeed/polka
https://github.com/node-fetch/node-fetch
https://github.com/sindresorhus/got
https://github.com/visionmedia/superagent
Conclusion#
As you see, SSR is not easy. Especially when you have to deal with authentication. It often leads to more code to maintain and also to insecurity if security is correctly setup. At least for me. Are the trade-offs worth it? I am not sure.
One issue that I haven't really solved yet is the case when Auth0 session times out. That happens when you leave your browser window open and come back to it a few days later. It looks like you are logged in. You can navigate between pages, but when you try to call a third party backend you get error back because the access token cannot be refreshed because the main session has timed out.
It's not a big blocker for me since this is an internal app, but would be nice to solve it somehow. One idea that comes to mind is to start some kind of timer on the frontend with the token expire time set and when it times out just log the user out. I need to test it soon. If you have any other ideas please shoot me an email and I will add it to this post.
Although the code in this post is maybe not something that you can just copy and paste straight off, but hopefully it will point you in the right direction on how to handle server-side authentication in Sapper.